Translation to English keyboard layout. Russian Keyboard online. Virtual keyboard - Cyrillic without a system Russian layout and does not need transliteration. Russian Keyboard online
Please tell me how you can do the following. For example, you are typing a text, you have already typed a lot, you look up - and there is Chinese abra-kadabra. And all because I forgot to switch from English to Russian after question marks, English terms, etc.
This happens to me often. In the old fashioned way, I erase everything, switch, retype. But you probably know some more effective way. For example, is it possible to create a button on the toolbar, by clicking on which the text will become readable and save time on correcting your own absent-mindedness.
Maybe this is possible?
Manukovsky Roman.
Yes, it's possible. In general, it would be possible to provide here the code for the corresponding macro, which allows you to translate erroneously typed text into the required encoding. But I found an easier solution: I will give a link to one program that will independently install its two buttons (for Russian and Latin) in the toolbar of the Word editor.
The program is quite old, but it works quite well in Word 2002. I found it on the Microsoft website in the development library section.
And here is the program itself (due to changes in links on the Microsoft website, I couldn’t find the program, and the author himself. If anyone knows where I can download this program, please let me know).
To install, you need to download the file, unpack it into a folder and run the file with the DOT extension. The editor will launch and two buttons will appear on the toolbar:
However, after closing the Word editor, there is a possibility that the installed buttons will disappear, so it makes sense to copy the macro from the active document to the Normal.dot global template.
It's easy to do.
- Go to the Tools menu and select the Macros command from the Macro drop-down list. A dialog box will open.
- Click the Organizer button. Another dialog box will open in which you need to select the macro template file that you downloaded and ran (with the .dot extension) on the Macro Project Items tab on the left side in the Macro Project Items available in group. . The macro name will appear in the upper left area: TranslateLayout.
- Click on this name and click the Copy button. The macro will be copied from the active document to the global template Normal.dot.
- Go to the Toolbars tab and repeat the same steps. In this case, the buttons for this macro will be copied to the global template Normal.dot, which will appear on the toolbar.
- Close the window and exit the Word editor.
- Launch the editor again. Now you are ready to work with text typed in the wrong layout.
Select your text and click on the appropriate convert button. Incorrectly typed text will be translated into the desired layout.
How to change the keyboard layout? By simultaneously pressing two keys:
- Alt+Shift(more often and more standard)
- Ctrl+Shift(less often, you need to configure Windows - but it’s more convenient).
The “Control + Shift” keys at the bottom right of the keyboard are more often used by those who are familiar with the computer: it’s easier to aim your fingers at the bottom extreme buttons than to look for the Alt key somewhere near the space bar. And not all keyboards have a convenient Alt location: especially on small laptop input devices, you often hit the Windows key with your finger, but not the one that changes the language layout.
How to change buttons to switch keyboard layouts
The Eng-Ru keyboard layout icon is located in the Windows tray
The Windows 7 keyboard has its own “dashboard” - the Language Bar. The easiest way to call it is by right-clicking on the icon with the language layout, then “Options...”. This icon (Rus/Eng) is located in the lower right corner of the monitor, near the clock in the tray.

How to customize your keyboard in Windows
The “Languages and Text Input Services” dialog box appears - the “Keyboard Switching” tab we need is located to the right of the others.

In the dialog for changing keyboard shortcuts, everything is clear on an intuitive level. Changing the input language is done using the Alt+Shift combination by default; It’s more convenient to switch the layout change to Ctrl+Shift. The right side of the menu, where it says about changing the keyboard layout, should not be touched. A pair of familiar “Ok” and “Apply” buttons - now the Russian-English layout will be replaced by the leftmost keyboard buttons.
How to add Ukrainian (Uzbek, Kazakh) font to your computer keyboard
In Windows 7 and newer operating systems, everything is already built-in and at hand. Right-click on the layout switching icon in the menu Options call the window Text input languages and services. Usually the main language pair is already listed there - Russian and English. It is easy to add additional national layouts.

- Open the Language panel (right click on the language icon).
- Here is the “Add” button.
- We select the desired language and the corresponding layout from a huge list (on the right is a drop-down plus sign).
- As usual – “apply”. Ready!

When adding a third (and fourth, etc.) language to the operating system, neither the English keyboard layout nor its Russian variation will go anywhere.
By the way, you can find out the Windows version in a second by looking at the keyboard layout change icon. If the language is displayed as three letters (Eng or Rus), then we have Win 10. If there are only two letters (En/Ru), then we are on Windows 7 or an older version of the OS.
Photo of Russian-English keyboard layout
Oh, and is it difficult to put the buttons back together in the correct order after taking it apart? The fingers know the location of the letters, but the eyes refuse to remember. Or another case - you need to put transparent stickers with Russian keys on the English keyboard - but it’s difficult to do this from memory.
For such cases, we present a photo of the order of letters for the Russian keyboard layout and for the English keyboard layout. You won’t have to remember anymore - everything is before your eyes.

IBM/Windows 105-key keyboard layout
| Esc | F1 | F2 | F3 | F4 | F5 | F6 | F7 | F8 | F9 | F10 | F11 | F12 | PrtSc SysRq |
Scroll Lock |
Pause Break |
|||||||||
| Ins | Home | PgUp | Num | / | * | − | ||||||||||||||||||
| Del | End | PgDn | 7 | 8 | 9 | + | ||||||||||||||||||
| 4 | 5 | 6 | ||||||||||||||||||||||
| 1 | 2 | 3 | Ent | |||||||||||||||||||||
| ← | ↓ | → | 0 | , | ||||||||||||||||||||
Let's first figure out what the harsh word means "Layout" in combination with the word keyboard.
I’ll be honest right away, my brain categorically does not want to perceive this combination of words as a concept. But we have to put up with it, just like with the concept “”.
Russian concept "Layout" matches the English word "layout"(layout), which translated into Russian means placement, arrangement, layout.
In other words "Layout" means where, on which keyboard key a particular letter or symbol is located. And if you have selected the “Russian” keyboard layout, then middle letter row you ALWAYS there will be letters "FYVAPROLJE", precisely in these places and precisely on these keys. Those. one-to-one correspondence of letters certain keys on keyboard.
"Russian" The layout that is usually installed looks like this: 
But. There is one small inconvenience associated with the letter "Yo" and punctuation marks (dot And comma). These characters are not very convenient to enter when typing quickly. And for those who professionally engage in typing on a keyboard, this point is very important. Based on these considerations, there is another layout (and the keyboards themselves with letters drawn for this layout), which is adapted specifically for fast typing. It is especially convenient for those who have mastered the “touch typing method,” that is, typing text without looking at the keyboard.
This keyboard layout is called "Russian (typescript)" and looks like this: 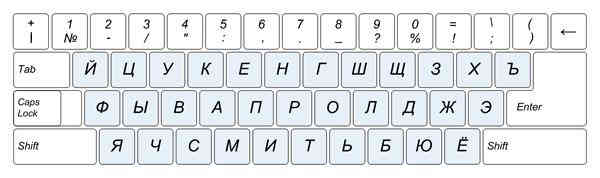
So, depending on your keyboard and preferences, you can choose one of two layouts for typing in Russian letters: “Russian” or “Russian (typescript)”.
Well, with the “English” layout it’s easier. Firstly, the English layout was the first to appear. And secondly, the English language has fewer letters. Therefore, there is enough space on the keyboard for punctuation marks, and they are located quite conveniently for quick typing.

Typically, manufacturers of keyboards themselves produce these same keyboards for two layouts (for non-English-speaking countries, of course), which is logical. Well, the “letter” keys combine the letters of the English and national alphabets. Accordingly, two layouts are usually selected. In my case (and in yours, most likely) these are English (Latin) and Russian (Cyrillic) letters. And, accordingly, “English” and “Russian” layouts.

The “English” layout is generally present on all keyboards, since it is essentially the “native” language for the computer. And you can “communicate” (and communicate) with the computer in this language, giving it commands, and in return receiving a certain result. And there is even a name for such communication - "Command line". But this is a separate, rather large topic and is more interesting to specialists and professionals.
Before I continue, I want to once again sharpen Yours attention on two different concepts: "keyboard" And "keyboard layout".
The keyboard itself is a standard set of keys. But what exactly each key will type when we press it is determined by the keyboard layout. Let's look at an example of one of the keys to clarify this point.

If we have selected "Russian" layout, then when you press this key, a dot will be displayed (printed) on the monitor screen «.» or comma «,» depending on what we choose register(we’ll look at this in, it’s not important now).
If we have selected layout “Russian (typescript)”, then when you press this key, a Russian letter will be displayed (printed) on the monitor screen "e" or "Yo"
If we choose "English (US)" layout, then when you press this key, the “slash” symbol will be displayed (printed) on the monitor screen «/» (right slash) or question mark «?» depending on the register we choose.
Well, let's have some more exotic layout, but not very much. For example, "Portuguese (Brazil)" layout. When you press this key, the symbol “semicolon” will be displayed (printed) on the monitor screen «;» or "colon" «:» depending on the register we choose. Well, etc.
Why am I telling all this for so long and tediously? Just so you know that if suddenly, when you press a key on which a dot is drawn, for example, a question mark is printed on the monitor screen instead of a dot, then this only means that the keyboard layout is currently selected, in which, when you press this key, exactly a question mark should be printed.
I don’t know about you, but for me at one time this was very difficult to understand. But let's not talk about sad things.
In fact, not everything is as gloomy as I wrote to you. In fact, everything is more prosaic.
Keyboards, as a rule, are all standard. And under All keyboards exist "correct" layouts that are already installed on your computer.
The exception is “sophisticated” keyboards for gamers and music lovers with a “bunch” of additional keys such as volume controls, Internet buttons, etc., as well as keyboards for laptops and netbooks. But even for these keyboards, the manufacturers of this equipment always additionally include CDs with layouts for these keyboards. And always, if something happens, you can download the desired layout for your keyboard from the Internet.
So that we always know what layout is currently turned on (or more correctly, which input language keyboard is currently enabled), there is a “keyboard layout indicator” on the taskbar in the lower right corner of the monitor screen. That is, if this indicator has the value "EN", then text input will be carried out in English letters if the value "RU", then text input will be carried out in Russian letters.
To be completely honest, this "layout indicator" is officially called "Language bar".
So in this language bar and various settings and various parameters related to keyboard layouts and input languages are set.
But before we delve into the jungle of these parameters, let’s see how this very language bar “appears” and “disappears” on the taskbar (let me remind you that the “Taskbar” is a blue bar at the bottom of the screen. What can you do with it I talked about it in one of my articles “”.)
The presence or absence of a language bar is determined by the presence or absence of a “checkmark” opposite the menu item "Language bar" in the panel properties. How to get there and see is shown in the picture.

Click once on the “Taskbar” with the right mouse button. Then, in the menu that appears, move the mouse pointer to the “Panels” menu item.
Please note to the right of the menu item "Panels" costs little pointer triangle. This triangle indicator means that this menu item has its own additional submenu.
As soon as the mouse pointer is on the “Panels” menu item, another menu (submenu) should automatically appear (they also say “fall out”). There are times when this submenu does not appear, then it is enough to press the left mouse button once and this very submenu will definitely “fall out”.
In this submenu that appears, a list of “Panels” will appear, which can also be placed on the taskbar. To place any panel from the list that appears, just move the mouse pointer to the “name” of this panel (menu item) and click on this menu item once with the left mouse button. As a result, a “checkmark” will appear to the left of this menu item (though we won’t see it right away, because both “menus” will disappear), and the panel itself will appear on the “Taskbar”. To put away additional panel from the taskbar, you need to do all the same actions shown in the picture, move the mouse pointer to the desired menu item (which already has a “checkmark”) and click on this menu item once with the left mouse button.
We are currently interested in only one panel - linguistic. Let's experiment with it to make it clear.
So, we have a menu (submenu) with a list of additional panels that we can install in the “Taskbar” (“Address”, “Links”, “Tablet PC Input Panel”, “Desktop” and “Language Bar”). As we can see, there is a checkmark opposite the “Language Bar” menu item. The presence of a “tick” means that the “Language Bar” is located (enabled) on the “Taskbar”. This is true, because we see the “indicator” “EN” (or “RU”).
Move the mouse pointer to the “Language Bar” submenu item and click the left mouse button. We will lose everything at once. Both our “menus” and the “Language Bar” itself will disappear from the taskbar.
To return our “Language Bar” to its place, we will do all the same actions shown in the picture.
Now we see that there is no check mark next to the “Language Bar” menu item. Move the mouse pointer to the “Language Bar” submenu item and click the left mouse button. Our “menus” will disappear, but the “Language panel” will appear in its place.
This seems to have been sorted out. Now let's see what layouts We have keyboards installed.
Move the mouse pointer to our “Indicator” of the Language panel “EN” (or “RU”) and right-click on it once. In the menu that appears, move the mouse pointer to the menu item "Options..." and click on it once with the left mouse button. We will see a window for setting parameters "Text input languages and services".

What I want to tell you before continuing. In this settings window, the concept "Service" corresponds to the concept "Layout". This may not be entirely correct in this case, but if you dig deeper (which we won’t do for now), then, in essence, it’s true. Just take it on faith for now that in this settings window, adding, deleting or changing service settings corresponds to adding, deleting or changing keyboard layout settings.
So what do we see and what does it mean?
We have two keyboard layouts installed. First "English (USA)" with indicator "EN", and the second "Russian (Russia)" with indicator "RU". And that the input language is set "Russian (Russia) - Russian".
I want to talk a little about the default input language "Russian (Russia) - Russian."
Let's look at what “Russian layout installed by default” means in relation to our daily work on the computer.
So. You turned on the computer, it booted and the “Desktop” appeared in front of you. In the lower right corner of the taskbar you have a layout indicator "RU" shows that the input language “Russian” is currently enabled. No problems yet.
We launch the browser (a special program - a browser for viewing pages on the Internet (Internet Explorer, Firefox, Chrome, Opera...)). In the lower right corner there is still a Russian layout - indicator "RU" it shows us. Let's let's introduce in the address bar some address (for example, http://mail.ru). We dial:
reezJ...fshdyukg
Having cursed a little, we switch the layout from Russian to English using the mouse or a key combination. The keyboard indicator switches to "EN". This means that we can now enter English letters. We erase what we have typed and try to dial the address we need:
Happened. But, let’s say, we didn’t just log into this page on the Internet, but we want to log into our mailbox. (Features of Internet resources that provide us with the opportunity to create our own electronic mailbox (mail.ru, google.com, etc.) are that when you go to the login page for your mailbox, then, as a rule, field The “mailbox name” has already been filled in and you just have to enter your password. This is where it begins...) Usually the “Mailbox name” field is already filled in and we must enter our password.
But. We again have a layout indicator in the lower right corner "RU"(and passwords on all major serious resources are always entered only in English letters, numbers and special characters), i.e. the layout automatically switched to Russian, since we have a Russian layout. We, of course, don't notice this, since we're going to look at our email, and not bother looking at the monitor for keyboard layouts.
We enter your password, which for security reasons is never shown on the monitor screen. Asterisks “*” are usually displayed instead of the password. The computer shows us a message (in computer slang - “throws out a rag”) that we have entered our username or password incorrectly. It is almost impossible to figure out what the real problem is, either in the layout, or whether we actually entered our password incorrectly. And this problem is faced not only by novice users, but, take my word for it, by ALL computer users.
I don’t know about you, but I started freaking out about this within a month.
I wrote how to get around this bad point in my articles and. But the fact remains a fact. In this example, the default Russian layout is not the best choice (the default English input language would be more suitable).
To summarize the above: When opening any new window, layout and keyboards and language input automatically switch to that layout and input language which you have installed by default (in our case “Russian”).
Now I want to give you the exact opposite example.
For example, your main activity is typing texts. The most common text editor for these purposes is Microsoft Word from the Microsoft Office suite of applications.
You open the editor. In the lower right corner of the taskbar you have a layout indicator "RU". No problem. You start typing text in Russian. Everything is fine.
After typing the text, you are going to save this text to a . You “select with the mouse” the “File” menu item in the top menu, then the “Save” item in the submenu that appears. You get new window, in which you can write the “Name” of the file. And you write this name calmly in Russian, i.e. input is carried out in Russian letters, since you still have a layout indicator in the lower right corner of the taskbar "RU".
In this example, the default Russian layout is not just convenient, but very convenient.
So it’s up to you to decide which default layout is convenient for you.
Well, to finish with the “default input language”, let’s see how it (input language and default keyboard layout) is installed. Honestly, it's pretty simple.
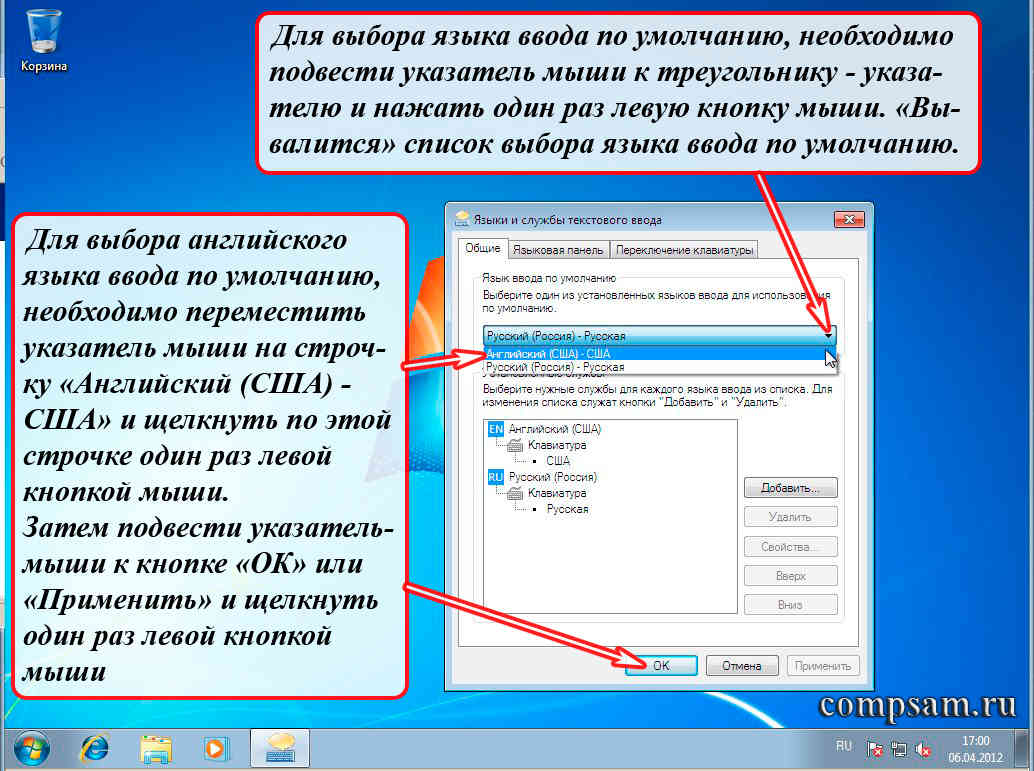
To select the default input language, you need to move the mouse pointer to the pointer triangle and press the left mouse button once. The default input language selection list corresponding to the selected layouts (services) will appear.
For English language selection default input, you need to move the mouse pointer to the line "English (USA) - USA" and click on this line once with the left mouse button.
Then move the mouse pointer to the button "OK" or "Apply" and click on it once with the left mouse button.
I would like to remind you what the difference is between the “OK” and “Apply” buttons.
If you select the “Apply” button, then all the changes you have made will take effect, that is, they will be applied. At the same time, we have the settings window “Languages and text input services” won't go to waste. In this case, we can continue the settings (well, for example, we can add more layouts, or change our minds and want to return the default Russian input language).
If you select the “OK” button, then all the changes that you have made will also take effect, but at the same time the settings window “Languages and text input services” will disappear.
Well, now let's move on to the layouts. In principle, we can see what the selected layouts are. This is done as follows. We move the mouse pointer to the “name” of the layout that we want to view.

If we want to see the “US English” layout, then move the mouse pointer to the name of the “US” keyboard layout and press the left mouse button to select this layout. Then move the mouse pointer to the “Properties...” button and press the left mouse button once. Thus, we can look at which keys on the keyboard contain letters, numbers and special characters (Let me remind you that special characters are the following characters - .,@#!"№;%:?&$*() -_+=).
To view the “Russian (Russia)” layout, perform the same actions, but select the name of the “Russian” layout.
Before we continue, let's define key names modifiers And pressing technique their combinations.

I hope you can understand the names from the picture. Now how to press these key combinations correctly.
Let's say your keyboard layout is switched using the combination "Left Alt + Shift". First, press the "Left Alt" key. Then, while holding down this key (without releasing it), press the “Left Shift” key. Then release both keys at the same time (or whatever happens, it will work anyway). How long you keep these keys pressed is not important, the main thing is follow the pressing sequence. (To be honest, the “Shift + Alt” combination will work, but it’s better not to do this and you don’t have to get used to it. In some programs, such a combination, instead of switching the layout, can give the most unexpected and unpredictable results).
It’s up to you to decide which fingers to press (everyone’s hand muscles are developed differently). I do it like this. If I press the combination “Left Alt + Left Shift”, then with the index finger of my left hand I press and hold the “Left Alt” key. Then with the ring finger of my left hand I press the “Left Shift” key. Then I release both keys.
I press the combination “Right Alt + Right Shift” in the same way with the index and ring fingers of my right hand. I press the “Right Ctrl + Right Shift” combination like this: With the ring finger of my right hand I press and hold the “Right Ctrl” key, then with the middle finger of my right hand I press the “Right Shift” key, then release both keys. Well, I'm used to it.
Why did I tell all this about myself? The fact is that there are keyboards where the location of these modifier keys is shifted (well, about a centimeter to the left or right). They seem to be in their places, but slightly shifted. All. For me this is almost a disaster. Since I press these combinations without looking at the keyboard, it turns out that I am pressing the wrong thing. Honestly, I'm at a loss.
What others do in this case, I don’t know. I'll tell you about myself. When I get a new computer at work, I either leave the old keyboard or go to the store and buy a new one, but with the usual arrangement of (not shifted) keys. Fortunately, such keyboards cost around 100 rubles.

In order to see the key combination that switches our input language (keyboard layout), you need to move the mouse pointer to the “Keyboard Switching” tab (in Windows XP it’s just the “Keyboard Options..." button in the same tab) and click on it once with the left mouse button. Here we, in fact, will see that to switch the input language (keyboard layout) the key combination “ALT left + SHIFT” is set.
Interesting point. If you have only two layouts (Russian and English, for example) and two input languages, you can switch these layouts using any “Alt + Shift” combination. (“Left Alt + Left Shift”, “Left Alt + Right Sift”, “Right Alt + Right Shift”, “Right Alt + Left Shift”).
In order to change the keyboard shortcut, you need to move the mouse pointer to the “Change keyboard shortcut...” button and click once with the left mouse button.
We will have 2 selection menus "Change keyboard shortcut". IN first selection menu “Change input language”, we can change the key combination for switching the input language, for example, to “Ctrl + Shift”. To do this, move the mouse pointer to the circle opposite the inscription “CTRL + SHIFT” and click on it once with the left mouse button. After that, click the “OK” button in our current “Change keyboard shortcuts” window, and then the “OK” button in the “Text Input Languages and Services” window. (But we won’t do that for now.)
In second selection menu “Change keyboard layout” You can select a keyboard shortcut to change the keyboard layout in the same way.
But there is one “BUT”. If with the “Alt + Shift” combination our input languages and keyboard layouts are switched without problems, then pressing the “Ctrl + Shift” key combination does not lead to anything. The computer simply does not react to this combination.
Here we have come to the moment when, finally, we can look and understand how they differ "Input language" from "Keyboard Layouts" .
To do this, we will add another layout for example "Russian (typescript)". In the “Change keyboard shortcut” settings window, click the “Cancel” button so as not to change anything for now, even if we changed something there and move the mouse pointer back to the tab "Are common". Click once with the left mouse button on this tab.

Then, move the mouse pointer to the “Add...” button and click on it once with the left mouse button.
The “Add input language” window will appear. This is where we will add another layout.
This window has a very long list to choose from. You can, of course, use the pointer triangles to “scroll through” this list by clicking on these pointer triangles that are located at the top and bottom of the strip tens or hundreds of times with the left mouse button. But it's long and boring.
To quickly move through this list there is one “tricky” way. To the right of the list we see a “slider” on a vertical bar (the first arrow points to it).
We move the mouse pointer over this “slider” and press the left mouse button. RESISTING left button mice pressed, move the physical mouse itself (which is in your hand) up or down. In this case, our long list will “scroll through quickly”. As soon as we find what we need (and we need the “Russian (typescript)” layout), we LET'S LEAVE left button mice. (I use this method in almost all programs and applications where text or something else does not fit on one screen or one window - browsers, editors, etc.).
There are two more interesting notations here - these are «+» And «-» in squares. “+” means that if you hover the mouse pointer over it and click once with the left mouse button, an “additional extended” list of something will open (in our case, additional layouts). Well, by clicking on “-”, we will simply collapse this additional list (so that, for example, it does not interfere).
Place a check mark in the box opposite the inscription “Russian (typescript)” by hovering the mouse over this box and clicking once with the left mouse button. Then move the mouse pointer to the “OK” button and click once with the left mouse button.
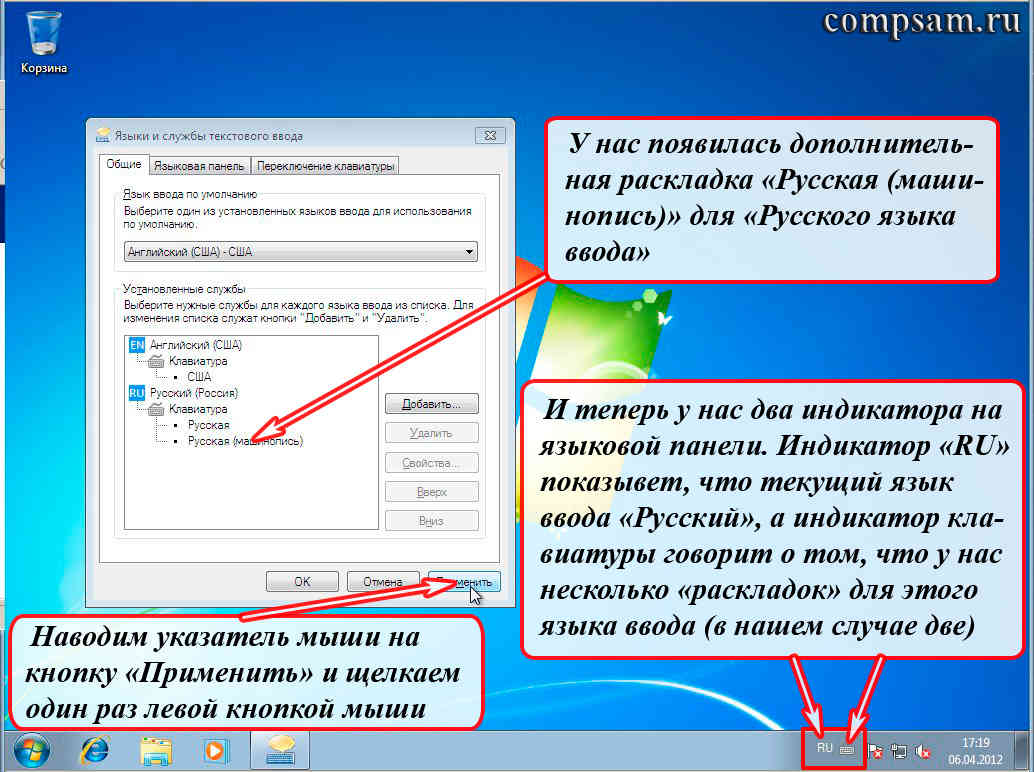
In the “Languages and text input services” window we have a new layout “Russian (typescript)”.
But in language bar on taskbar appeared small keyboard icon, if you currently have the input language “Russian” selected and the indicator "RU" it shows us. If you switch the input language to English, the input language indicator will switch to “EN” and the keyboard icon will disappear, since there is only one layout for the English input language (there is nothing to choose from).
So, if you now use key combinations to switch input language and keyboard layouts, then the input language ( "RU" And "EN") You will switch with a key combination "Alt + Shift"(For now there are two input languages, it doesn’t matter which ones are right or left. But if you add another input language with a layout, for example Greek "EL", then you can switch the input language, for our example, only with the combination "Left Alt + Shift"), and keyboard layouts ( "Russian" And "Russian (typescript)") key combination "Ctrl + Shift".
Well, if you use the mouse, then by pointing the mouse pointer at the “RU Indicator” and clicking on it with the left mouse button, we will see a list for selecting input languages.

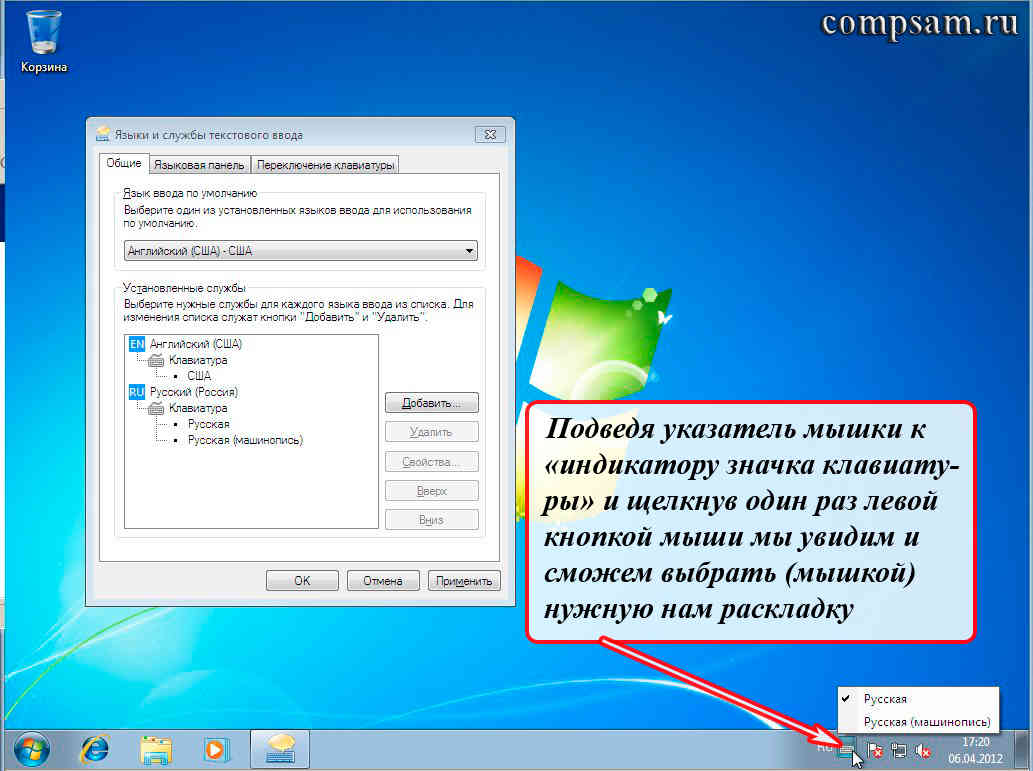
If we move the mouse pointer over the “Keyboard icon indicator” and left-click on it, we will see a list of layout selections.
This is where we can finish the main lesson on keyboard layout, but since, in my opinion, the lesson is quite difficult, let's relax a little.
Question: Is it possible to make sure that these two input languages and these three layouts are switched with one key combination, for example “Ctrl + Shift”.
Answer: No, this is not possible, since the operating system will not allow you to select the same key combination, for example, “Ctrl + Shift” for both selecting the input language and selecting the layout. You can experiment in the “Change keyboard shortcut” window, you will see it. But when you've played enough, click the "Cancel" button.
There is a joke about this.
In one store, to attract customers, the owner kept a parrot, which had a red ribbon tied to its right leg and a blue one to its left.
He said to all incoming customers: “If you pull the red ribbon, the parrot will say: “Hello.” And if you pull the blue ribbon, the parrot will say: “Goodbye.”
And one buyer comes up and asks: “What if you pull both ribbons at once?”
And the parrot says to him: “I WILL FALL!!!”
That's all. Good luck and creative success to everyone.
With respect to all my readers and subscribers
Oleg Ivashinenko
If you liked the article, share it with your friends on social networks.
There are 31 comments on this post
|
The problem is this: one day, after turning off the laptop (acer win.7), the update was running when turned off. Then, as soon as I turned it on again, the keyboard shortcut for switching languages - right alt + ctrl - stopped working. (it stood all my life). So, don’t tell me that you need to select the desired combination in the settings, etc., because we don’t have a right alt, we only have a left one. I had the left one and always switched the right one, but now it doesn’t. Help, please . It switches from English to Russian, but vice versa, ctrl+shift or e are not convenient for me. Please help me, I’m tired of setting right alt+ctrl, although it’s been like this all my life, help. | |
Online converter of Russian passwords into English characters (Latin). The service is intended for those who like to create and write Russian passwords on the keyboard, while the character input language is set to English.
All hotkeys can be customized, and in addition to the default combinations, you can set any key in combination with Shift, Ctrl, Alt or Windows. You can disable any combination by deleting the contents of the combination input field.
You can configure key combinations for the following program actions:
Program settings
Open Punto Switcher settings- quick access to the program settings window.
Enable/disable sound effects- If the key sounds bother you (for example, in games), press the selected hot keys to temporarily disable Punto Switcher sounds. Pressing these keys again will unmute the sounds.
Switching layouts
Change the layout of selected text- translation of the layout of the text selected on the screen from English characters to Russian and vice versa.
Shift + Break.
Enable/disable automatic layout switching- this combination is similar to the command Auto switch in the program's context menu.
Text conversion and transliteration
Cancel layout conversion- cancel the completed text conversion.
The default key for this is Break. If you prefer to use another key, assign it yourself. For laptops that do not have direct key access Break, you can use the key F11.
Change case of selected text- convert selected characters from uppercase to lowercase and vice versa.
The default key combination is Alt + Break.
Transliterate selected text- translation of Cyrillic characters highlighted on the screen into Latin according to the rules specified in the file translit.dat. If you need to change the transliteration rules, edit this file.
The default key combination is Alt + Scroll Lock.
Convert number to text- replacing a highlighted number or amount of money written in numbers with a number or amount in words.
The function will be useful for those who work with payment documents. Allows you to replace, for example, “247-23” with “Two hundred and forty-seven rubles 23 kopecks” or “457” with “Four hundred and fifty-seven” without entering the text manually. Assign your own keyboard shortcut to this feature.
AutoCorrect
Open AutoCorrect settings- calling a window for working with autocorrects.
Using autocorrect allows you to save significant time when performing routine actions.
Show/hide autocorrect list- call the quick insert list in the main menu. The list can also be called up by clicking the program icon with the left mouse button.
Show AutoCorrect insert menu- displays a menu containing full phrases specified in the autocorrect list. Select the desired phrase from the list, and it will be inserted into the text.
Add selected text to AutoCorrect- recording selected text or phrase in AutoCorrect. The option will be useful for those who actively use autocorrect.
Search and publish on the Internet
Find in Yandex- search in Yandex for text highlighted on the screen.
The default key combination for this is Win + S.
Find a translation in Yandex.Translator- translation of a selected word or phrase in Yandex.Translator.
Find an address in Yandex.Maps- search for an address or geographical name highlighted on the screen in Yandex.Maps.
Find a product on Yandex.Market- search for a highlighted word in products on Yandex.Market.
Find news in Yandex.News- search for a word highlighted on the screen in Yandex.News.
Find an image on Yandex.Images- search for a word highlighted on the screen in images on Yandex.Images.
Find in Russian Wikipedia- search for a word or term highlighted on the screen in Russian Wikipedia.
Find in English Wikipedia- search for a word or term highlighted on the screen in English Wikipedia.
Send selected text to Twitter- sending selected text to Twitter.