How to find out your Windows 7 hard drive. How to find out which hard drive is on your computer quickly, without using third-party programs - simple instructions. How to check your hard drive for bad sectors using third-party programs
When checking the HDD, the presence of bad sectors is checked, and if any are detected, information about the non-working sector is entered into the file system data table, and in the future it is no longer involved in reading and writing.
It is ignored by the system, and the volume of the HDD or SSD becomes smaller by the total volume of bad sectors.
The easiest way to diagnose and exclude bad sectors from the data storage area is to completely format the hard drive.
Once formatted, they are no longer used for storing or recording data.
And the hard drive can be used, you just need to periodically carry out diagnostics to find out whether new bad sectors appear.
In this case, they also say “the hard drive has fallen apart” - it is better not to use it, as you can irretrievably lose important documents without the possibility of recovery.
Checking with the built-in CHKDSK utility
1 Launch the program "Run" key combination Win + R
In the dialog box write -
Chkdsk volume: /f
Where volume: is the drive letter.
/f - parameter for error correction.
You should get the following command - chkdsk with: /f - in our case, the volume is designated by the letter H - drive H: 
You may have a different letter. It will not be possible to perform a scan from a running system, since the system partition must be locked.
5 When you restart, a check will begin, which may take some time.
It will not be possible to interrupt the scan if the scan takes too long; if you try to restart or interrupt it, it will start again.
The advice is to be patient, this may take several hours.

How to check your hard drive for bad sectors using third-party programs
The hard drive can also be checked using third-party functional programs, using the example of one of these programs - HDD Regenerator.
After downloading and installing the program, a dialog box will open; to start scanning, click on the button as in the screenshot. In some versions you can find a Russified version, but ours is English. 
Select the HDD to check - when there is one, the choice is between first and first. In our case there are 2 hard ones, we choose the one on which the system is installed. 
For the utility to work properly, you need to disable all programs that, in one way or another, access the hard drive (anti-virus software, search indexing...).
Run the scan. 
When an error screen like this appears, click “Cancel” - this error occurs when the HDD SATA controller is operating in ANCI mode.

A command line console will open. Select the 2nd item and click Enter - observe the scanning process. 
There is one drawback: when the OS is running, this program cannot carry out a comprehensive check.

To do this, you will need 1 GB flash memory.
1 Press the button “Create a bootable USB flash drive” or "Boot CD". After recording, you will be prompted to restart the PC.
4 Select a directory and click “Enter”, now all that remains is to be patient while the program checks the HDD or SSD. 
Programs for checking your hard drive for bad sectors
- Victoria HDD- a program for a comprehensive, deep, and at the same time fast scan of IDE and SATA hard drives. Marks damaged sectors that are at risk (responses from which the program received within a certain period of time) or did not receive them at all. Then this sector is marked as broken.
- Ashampoo HDD Control- to monitor the status of HDD or SSD in the background.
- HDDScan- for diagnostics: IDE, SATA SCSI, RAID arrays, external USB/FireWire drives, SSD and flash cards. Reading and analysis of S.M.A.R.T parameters. Change power management settings. Temperature monitoring. Compatible up to Windows 7. Saving and printing reports.
- Data Lifeguard Diagnostic- a small test for the Windows operating system. Capable of reading S.M.A.R.T. indicate critical parameter values. Displays information about the model (firmware version volume). Designed for hard drives made by WD. But it shows good results on Samsung and solutions from other manufacturers.
- HD Tune Pro- to test hard drive performance. Scan for errors, check using S.M.A.R.T technology. The program is shareware, the test period when you can use it for free is 15 days, after which you need to purchase a license in order to continue using it without breaking the law. There is a built-in benchmark that can be used to determine the maximum and minimum average data read/write speed.
- MHDD- for accurate diagnosis and repair of hard drives. Free, it can be used to accurately diagnose the HDD surface. monitoring IDE controller registers. Testing the hard drive under extreme conditions.
- CrystalDiskInfo- for monitoring and assessing the health of the hard drive. Portable version - does not require installation on a computer. A small free utility is very well suited for initial monitoring to assess the condition of the hard drive.
- HDD Regenerator- to scan the HDD to detect bad sectors. Fixing bad sectors or cutting them off or hiding them so that they no longer participate in the work. Scanning occurs in a DOS window.
- HDD Health- monitoring and early detection of hard drive problems.
conclusions
The most valuable thing in a computer is information. It is important not to lose it due to the appearance of bad sectors on the hard drive.
Sometimes the information is memorable photographs and videos of the child’s first step, working documents, projects, diplomas on which we have been working for several months.
Sometimes these are databases of all employees of the enterprise. And much more.
In order not to lose anything and make a backup in a timely manner, transfer all valuable information to other media or computers, periodically check your PC with the utilities that we wrote about just above.
Carry out diagnostics of the hard drive at the first “symptoms” and then you will not face any failure.
Checking the hard drive for errors
Problems may arise when operating your computer, and to resolve them you will need to check your hard drive for errors.
Hello friends. Checking the hard drive or how to check a hard drive for errors and bad sectors, we will talk about this in detail today.
In the previous article I showed. Today you will learn about programs for testing hard drives and other storage media. At the end of the review I posted a short video tutorial.
Checking our disk
It is useful for anyone who has a computer to know about the status of the hard drive or drives, if there are several of them. After all, the hard drive stores information that is important for some, and not so important for others. So, in order not to lose it, I recommend making backup copies at least once a month.
You can purchase a portable disk or flash drive to store important information, or you can use regular CDs and DVDs. If you don’t know how to save information on optical plastic discs, then I recommend reading.
You can test computer disks in different ways and with special programs. In this article we will look at:
- Checking the disk using Windows 7
- Useful Victoria v4.3
- HDDScan program
- Ashampoo HDD Control 2
There are, of course, many other useful and worthy programs and utilities, but in this publication we will only talk about these 4 methods.
How to check your hard drive using Windows 7
Any hard drive or flash drive can be checked for functionality using Windows tools. I wrote more about this here. Here is a simple algorithm for the necessary actions.
Go to My Computer, select the desired hard drive or flash drive, right-click on it and go to Properties.


Check the boxes you need or all and click Start.

This procedure can take a long time, everything will depend on the size of the storage medium that you want to check for errors and bad sectors.
Checking the disk with Victoria program
Victoria one of the main programs that I personally use to check the hard drive through Windows, or if the operating system does not start at all, then through a boot disk with this utility.
After downloading Victoria version 4.3, you need to go into the archive, unpack it or run the file with a green cross called Victoria43.

Let's launch the program, it's in English, if you don't know this language, don't be alarmed, I'll help you figure it out.
The Standard window describes the main characteristics of the storage medium: its model, serial number, disk size, how many cylinders, sectors it has, and so on.

In the Smart tab you can see the status of the hard drive. Click on the Get Smart button and look at the indicators that appear. Since my hard drive is new, my indicators are normal, SMART status = Good. You may have different meaning and information.

Smart is a technology of analysis, self-control and reporting. Using it, you can view and evaluate the condition of the hard drive, its built-in self-diagnostic equipment, and also predict the possible time of its failure.
To test the storage media, go to the Test tab and click on the Start button. If you have a lot of green, orange, red and blue rectangles (sectors) - this is not good. Ideally, all sectors should be light gray and grey.

If you have damaged sectors marked “Err X”, then after completing the test, check the box next to the word Remap and run the test again. The Victoria program will try to restore these sectors and fix errors on the hard drive.
Checking the hard drive may take a long time, so be patient, it all depends on the amount of information on the media. In the meantime, testing is underway, I recommend reading the article on how to set up your computer yourself or.
Checking the hard drive using HDDScan
HDDScan is a program for diagnosing and testing hard drives in English.
After downloading, you need to run the file called HDDScan.

Select the desired Select Drive device; on the right there will be basic information about it.

Click on the blue round button and select the desired action. Go to Surfase Test - select and run the test.

Check the boxes next to Verify or Read and click the Add Test button. I do not recommend choosing Erase - it erases data.

Once you click add a test, it will start automatically and will appear in the lower Test Manager window.

Double-click on RD-Read, go to the test that has started and look at its process, you can see it on the Graph.

View on Map. At the top there are navigation buttons for controlling the Pause, Stop and Report test process, cluster and testing speed in KB/s, and on the right is the sector scanning time in numbers from< 5 до >500 milliseconds.

In the third column of Report you can see the scanned clusters and sectors of the storage medium, and at the very bottom the progress of the test process is shown as a percentage.

Upon completion of the test, a corresponding message will appear in the task manager window.
If for some reason you did not like the first three methods, then I suggest for your reference a powerful and useful utility for diagnosing hard drives and storage media from Ashampoo.
Cool program Ashampoo HDD Control 2
I have already worked with this utility for diagnosing and monitoring hard drives from Ashampoo. I really liked this program, so I decided to mention it in this article.

After you download and install Ashampoo HDD Control 2. Depending on the language package, the program can be in either Russian or English.
It has a simple and accessible interface that anyone can understand.
Here you can see probably almost all the information about a hard drive or flash drive that you want: model, partitions, size, condition, performance, temperature and much other useful information.

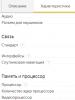
This program has extensive capabilities and many settings; at the top there are seven navigation tabs:
- Control
- Defragmentation
- Testing
- Disk Cleanup
- Removing Internet Traces
- Deleted files
- Content Analysis
You can browse through all seven tabs and explore useful information.
We are interested in checking the hard drive, go to the Testing tab, click Scan hard drives, select the one you need and click on the magnifying glass that says Start. This test can measure the speed of your hard drive.

In order to check the surface of the disk, you need to return to the Control tab and click Surface Test.

After this, the Hard Disk Surface Testing window will appear, in which there are symbols: blue square - not yet tested, green - excellent, red (already bad) - at least one bad sector.

The scanning time will again depend on the capacity and speed of the hard drive or flash drive.
In custody
Today we discussed in detail the topic of checking a hard drive or how to check a hard drive for errors and bad sectors. To do this, we used four methods: standard Windows tools, useful Victoria, the HDDScan utility and the cool Ashampoo HDD Control 2 program.
Now let's watch a short video tutorial on how to check your hard drive.
Checking the hard drive | website
You may have questions related to checking your hard drive. You can ask them below in the comments to this article, and also use the form with me.
Thank you for reading me on
Today I will tell you how to find out the number of hard drives installed on our computer. This information will be useful to us when we talk about things like data backup.
As you know, there are often several volumes on a computer. For example, C and D. But in most cases, these are two logical drives on which the only physical drive installed on the computer is allocated.
But it also happens that there are several physical drives installed on the computer, each of which can be labeled with one letter or, in turn, can be divided into several local drives.
It would seem that it makes no difference whether it is a logical disk or a physical one. For the system, everything is the same.
For the system, of course, yes, but not for you and your hardware.
For example, you have a computer that has two disks - C and D (there may be much more of them, this is not significant). If you have one physical disk installed, partitioned into two logical volumes, then if the physical drive fails, all the logical volumes into which your disk is divided will become unavailable to you.
If volumes C and D are separate physical disks, then the failure of one volume does not damage the other.
So how can you determine the number of hard drives on your computer?
Everything is very simple. Click "Start" and right-click on "Computer". In the context menu that appears, select “Management”.
The following window will open:

Here you need to select the “Disk Management” section. The display will show information about the physical drives and the logical volumes to which they are allocated. The following illustration shows an example of one hard drive divided into two logical drives. There are also two hidden sections intended for system needs.

And here we see two hard drives at once:

Now you know how to determine the number of hard drives on your computer. If you are ready to move on, follow the publications.
There are few cases when you need to find out the model of your hard drive. Most often, a similar question is asked when the hard drive has died for a long time - errors appear during operation, or the OS does not boot at all due to a non-working disk. It happens that you need to identify your HDD in order to replace it with a more capacious one, or this information is simply interesting for you.
In any case, problems with the hard drive are those that can be fixed in workshops, since computer repair at home is advisable only when the problem can be fixed quickly and efficiently. Diagnosing HDD faults takes a long time, which means you can only quickly replace the problem disk with a new one.
The most primitive way to find out your hard drive is to remove it from the system unit or laptop case. To do this, turn off the power (remove the laptop battery), unscrew the system unit (or the bottom cover on the bottom of the laptop) and take out our HDD, on which all the information of interest will be visible - manufacturer, volume, speed, country of manufacture and other parameters.
If you have no desire to disassemble your laptop or unwind the system unit, then we can find out all the information you need using the software method.
How to find out the real size of your hard drive
For a better understanding, manufacturers and sellers indicate the traditional disk capacity: 40, 60, 120, 160, 320, 500, 640 GB and so on. However, in reality it is always less than stated, because:
1 GB = 1024 MB
1 MB = 1024 KB
1 KB = 1024 bytes
and manufacturers round up to 1000 when making calculations. Below is a table of correspondence between the labeled HDD volume and the real one.
| Storage capacity | Total, bytes (rounded) | Real volume |
|---|---|---|
| 40 GB | 40,000,000,000 | 37.25 GB |
| 60 GB | 60,000,000,000 | 55.88 GB |
| 80 GB | 80,000,000,000 | 74.51 GB |
| 100 GB | 100,000,000,000 | 93.13 GB |
| 120 GB | 120,000,000,000 | 111.76 GB |
| 160 GB | 160,000,000,000 | 149.01 GB |
| 200 GB | 200,000,000,000 | 186.26 GB |
| 250 GB | 250,000,000,000 | 232.83 GB |
| 320 GB | 320,000,000,000 | 298.02 GB |
| 400 GB | 400,000,000,000 | 372.52 GB |
| 500 GB | 500,000,000,000 | 465.65 GB |
| 640 GB | 640,000,000,000 | 595.84 GB |
To verify this, right-click on the shortcut My computer and select Control. In the utility that opens, go to the tab Storage devices - Disk Management

In our case, the utility shows 465.65 GB, which corresponds to the 500 GB marking.
How to find out your hard drive model
As in the previous method, right-click on the shortcut My computer and select Control. In the computer management utility that opens, open the tab device Manager. Expand here Disk devices and you will see the hard drives installed on your computer.

In our case, there are two of them - Hitachi HTS545050A7E380 and SanDisk SSD i100 24 GB. The first is a traditional HDD, the second is a solid-state SSD drive.
How to find out all the information about your hard drive
To the program AIDA64 we already asked for help when we were looking for, etc. This utility will help us this time too.
You can familiarize yourself with the AIDA64 program and download it for free from our website.
Launch AIDA on your computer and go through the tabs Data Storage - ATA. At the top of the window, select the desired hard drive, if there are several of them, and the program will show all the information about the hard drive. The report is divided into parts, the information we need is entitled as ATA Device Properties And Device Physical Data.

As you can see, everything is elementary and absolutely simple if you know what tools to use to find information.