What to do if iPhone won't turn on? iPhone activation. How to set up your iPhone for full work The first time you turn on iphone 7
You have purchased an exact Taiwanese copy of IPHONE7 (Chinese phone) or IPHONE 6s, what secrets and surprises await you when setting up a Chinese iPhone and how to live with them .... Is there an instruction?….
We insert the SIM card and turn on the phone. After loading the phone, you can use all the external attributes of the iPhone, for example, immediately after loading, a beautiful “Goldfish” will appear on the screen (for the 7th iPhone, the fish is not on the splash screen by default, you need to select it in the settings) with a long press on any point of the screen, it will start turn and play with a tail, as in the original devices. This screen feature is designed to take and view 3D photos from the respective applications. The touch home button will delight you with the ability to recognize your fingerprint, and if the security of the contents of your phone is important to you, set it up.
Next, go to personal settings (in the Android system) .... All Chinese phones are correctly Russified and if you have bought a new phone at least once, you will not have any problems with the PERSONAL settings section. Screensaver, ringtone, notification methods, etc., are quite standard and intuitive. Small difficulties begin to arise when you try to download your favorite applications and services that are not originally on the phone. The AppStors icon is displayed on the main screen, but in fact it is a fake through which you will get to a specific place where hieroglyphography will dominate, and you will have nothing to profit from there if you are not Chinese. In the settings menu, find the APPS section, open and view them all. Perhaps there is already what you need. If not, then find the traditional Google Play Market icon and activate the app. Following the prompts, enter your Google account information and everything will work as usual. Perhaps this is the only inconvenience of the settings that you will have to face.
As for the Internet settings, immediately after turning on the phone with an active SIM card for the first time, the mobile operator will send the Internet settings and access points, which will be installed automatically in the system and will work correctly. For WI-FI settings, enter the password carefully and correctly.
If there is still any difficulty with any function, you can always contact your mobile operator or e-mail with the consultants of our store and get a qualified answer on setting up and improving the operation of the device. Don't forget to indicate the problem and your
Enjoying iOS 10 on your iPhone 7 and 7 Plus? Even so, most likely you do not know all its capabilities (you can read the list of system innovations in the iOS 10 review). Experienced iOS users may find previously unknown features in this version and changes from those previously presented.
Setting up iOS is not among the favorite activities of the average owner of Apple smartphones and tablets. Therefore, this article will talk about some of the options and tricks of the system that can improve the convenience of everyday work with it on the iPhone 7 and 7 Plus.
Get rid of unwanted apps
In iOS 10, users can remove pre-installed Apple apps they don't intend to use. The word "delete" is not entirely correct, since the applications will be hidden, but will continue to take up space on the flash memory. To eliminate an application, you need to press and hold its icon. The list of hidden includes 34 applications.
Turn off "Read" alerts in the Messages app

If you do not want the interlocutor to know whether you have read his messages or not, you can turn off notifications. This is done in the Settings > Messages section, here you need to disable the Send Read Receipts option.
Access the camera from the lock screen with a swipe to the left

Prior to the release of iOS 10, users had to swipe up to launch the camera app from the lock screen. In the new version of iOS 10, this is not the case. The camera now opens with a swipe to the left.

This feature is only available on the iPhone 6s/6s Plus, iPhone SE, and iPhone 7/7 Plus, allowing you to activate the device without any buttons. You just need to pick up the device and the display will light up, showing the lock screen with notifications on it, if any.

Widgets have been available in iOS for a couple of years now, but before that their implementation left much to be desired. This best brings with it iOS 10, where there is a new widget panel accessible by swiping left to the bottom of the lock screen or from the home screen, where Spotlight search is usually found. You can enable, disable and swap all available widgets.
Fighting spam calls

In iOS 10, you can get rid of unwanted calls by blocking caller numbers. To do this, you need to download an application from the official App Store that will detect potential spam and prevent it from reaching the user. One of the most popular such applications is Hiya. You can see the spam blocking apps at Settings > Phone > Call blocking & detection.
Using 3D Touch with lock screen notifications

iOS 9 brought system support for 3D Touch technology, but before it was not available on the lock screen. iOS 10 fixes this issue so that 3D Touch now allows you to work with notifications with rich previews and quick responses.
3D Touch also works with control center shortcuts

3D Touch works in the new system not only on the lock screen, but also in the control center. This opens up access to a number of useful shortcuts. For example, a flashlight opens a menu that allows you to choose from three levels of brightness.
Using the Memories feature to create a photo slideshow

iOS 10 brings a new feature to the Photos app. A tab called "Memories" scans the image library and creates themed movies from the available photos. This is a fascinating feature, although not the most important for the operation of a smartphone. To view these movies, launch the Photos app and tap the Memories icon in the bar below. You can edit memories by adding and removing images, trimming videos, changing audio tracks, and more.
Automatic dictionary switching

Although Apple allowed third-party keyboards in iOS 8, the default QuickType keyboard remains the best option. It's even better in iOS 10. You no longer have to switch between different input languages because QuickType automatically detects which language you're typing in and activates it. This feature is enabled in the General > Dictionaries section, where you need to download these dictionaries.
How Uber works from the Maps app

The Maps app also received a couple of welcome additions, including support for taxi hailing apps like Uber. Launch Maps, select your destination, select "Get Directions", then select a taxi.
Sleep better with Bedtime mode

Bedtime is an addition to the system clock, which is designed to remind you that it's time to go to bed, and after a certain time gives a signal to wake up. Open the Clock app, find Bedtime in the bottom bar and select your sleep duration.

Unlike previous versions of iOS, the latest will show Wi-Fi network problems with Internet access or other problems. This will display an exclamation mark on the Wi-Fi icon in the status bar. If you open the Wi-Fi menu in the system settings, you will be given troubleshooting tips, such as the need to restart the router, contact the provider, etc.

With the iPhone 7 and 7 Plus, Apple has taken a long-awaited move by mobile photography enthusiasts. It became possible to take pictures in RAW format and then process the images in a graphics editor on a computer or mobile device. This should noticeably improve the quality of the resulting images if the photographer knows what he is doing. Unfortunately, this feature is not available with the default camera app, so you will need to download another option.
Working with Apple Pay on compatible sites

iOS 10 introduced the ability to pay with Apple Pay on the web and buy goods faster. Large chain stores already support this system.

Notes in the Notes app can now be shared, edited, and shared.

In iOS 9, to unlock, you need to take the device, press the Home button to activate it and hold your finger on it (without pressing it again) so that the fingerprint is read. Simple and clear. What has changed in iOS 10? By default, unlocking iOS using a fingerprint requires you to first wake up the device by pressing the Home button, then you need to press it again and hold until unlocking.
To return to the option from iOS 9, you need to open General > Accessibility > Home button > Leave finger to open.

The Messages app in iOS 10 has become more functional, receiving support for handwriting, among other things. Open the conversation and turn the device to landscape mode. This is where you can enter text manually.

This feature is for teenagers and other lovers of informal communication. Certain words can be replaced with equivalents in the form of emoticons. For example, if you ask the interlocutor if he wants to go out for a drink, the word "drink" will be highlighted in orange, which means there is a replacement in the form of a smiley.
Sending low quality images in Messages to save bandwidth

The messaging app has received the biggest update in iOS 10, but messaging over it and sending images can use up a lot of bandwidth. A new option to send low-quality images will help save traffic. Go to Settings > Messages, scroll down and toggle the "Low Quality Image Mode" setting.
Selecting content on the lock screen

With the introduction of wake-up on iPhone 7, it's easier to access notifications and the widget bar on the lock screen, but it's bad for privacy. You can choose the type of content to show in Settings > Touch ID & Passcode, then swipe down to the "Allow Access When Locked" option. This turns off options for what should not be visible on the lock screen. It is advisable to disable Siri, Wallet and Home Control.
Apple Music in iPhone 7 can optimize memory

One of the useful innovations of the Music application is the ability to optimize the space occupied by audio files. Open Settings > Music and scroll down to the Optimize Memory menu. This sets the amount of flash memory used for music. If there is not enough free space, the application will automatically delete tracks that have not been launched for a long time.
Significantly superior to all its predecessors: the phone is equipped with more advanced cameras, stereo speakers and a bright screen with rich colors and has more performance and battery capacity. In addition, it is resistant to water, splashes and dust. The device also received a new operating system iOS 10. The experts listed 20 tricks that will make its use as efficient as possible.
1. Launch and quick access when the screen is locked
Now on iPhone, you can access a lot of features without having to unlock it: just slide the screen to the left to launch the camera, and to the right to see all the widgets and the Today tool. Alerts are opened by sliding the screen down and the control center up.
2. New features in the control center

In this section, you can change the intensity of the flashlight, copy the latest calculation results from the calculator, or use the stopwatch.
3. Lift activation
![]()
In order for the phone to switch to active mode, just pick it up. All notifications will be reflected on the screen (only available for iOS 10 on iPhone 6s and later).
4.Today section settings

This section can be customized by adding and organizing widgets.
5. Trigger button customization

The level of pressure and the pressing force of the start button can be adjusted in the corresponding section of the main settings of the phone.
6. Water resistance

If the iPhone 7 is dropped in water, they need to tap their arm while holding the device with the Lightning connector facing down and leave the device in a well-ventilated area. In addition, a fan can be directed to the aforementioned connector.
7. Formatting messages

The new system allows you to change the appearance of "bubbles" with messages.
8. Special effects in messages

iOS 10 users will be able to send balloons, confetti, laser beams, fireworks, and shooting stars to each other. In addition, special effects are activated automatically if the sender texts the recipient "Happy Birthday", "Happy New Year" and "Congratulations".
9. Group messages

The new Tapback feature will allow users to quickly respond to what is happening in group chats. So, questions like "Pizza or hamburgers?" or "Beach or pool?" can be solved much easier and faster by counting likes.
10. Sending photos from the gallery

In order to add a snapshot to a message, just click on it and drag it to the chat area. While in the "Messages" section, you need to click on the camera icon and select from existing photos or take a new one.
In order to create a handwritten message, you need to go to the iMessage application and turn your phone horizontally.
13. Own App Store for iMessage

From now on, iPhone and iPad users will be able to find, download, and open apps directly from the Messages app. This feature makes it much easier to share content, edit photos, pay bills, and chat with friends. In addition, it allows you to purchase animated and static stickers.
Any of Apple's tablets and smartphones needs to be activate. Beginner users and iPads are not aware that the activation procedure is quite simple - they are willing to pay sellers to take the right steps.
Apple's initial setup service is one of the most expensive; in different salons, consultants charge from 500 to 1,000 rubles for activation. This article will tell you how to properly set up your iPhone the first time you turn it on. on one's own, and save the user from the need to enrich the communication salons.
Before you start setting up your Apple device for the first time, you need to take the following steps:
- Recharge your device. It is necessary that the battery of the gadget is at least 30% full.
- Insert the SIM card into the tray using a special needle. Without a SIM, it was possible to activate gadgets with a pre-installed iOS operating system below version 7 by making an emergency call to number 112. The new iOS 10 operating system does not provide such an opportunity.
- Connect your smartphone to a Wi-Fi distribution or mobile Internet. If 3G (or LTE) appears next to the network signal indicator and the operator's name, you can do without Wi-Fi. If you have an EDGE signal (letter E), you will have to connect to the router.
- Download and install the latest version of iTunes on your PC. You can find the program here - http://itunes.apple.com/. If the user does not have access to a Wi-Fi network and does not have a SIM card with "unlimited", he is able to perform the initial setup via a PC / laptop with iTunes installed and wired internet.
After completing all of the above steps, you can proceed directly to the activation of the iPhone.
How to set up iPhone for the first time?
You need to activate the Apple gadget as follows:
Step 1. Turn on the device by holding the "Power" button for 2-3 seconds. The Apple logo will appear on the screen first, and then a greeting in different languages (“Hello”, “Hello”, and so on).
There is no need to be afraid of hieroglyphs at this stage - if the greeting is in Chinese, this does not mean at all that the iPhone is fake.
Step 2. Swipe your finger from left to right across the bottom of the display and on the next screen, select Russian from the list of available languages.
Step 4. Select an available Wi-Fi network and connect to it.

If there is no network in the list that you would like to use for activation, add it - click the "Select another network" button and enter the SSID.
If you want to use mobile Internet for the initial setup, click on the button " Use Cellular”, located just below the list of networks.
Step 5. Enable/Disable Location Services. Many of the iPhone applications are related to geolocation - if you refuse it, you will not be able to use, for example, a navigator. On the other hand, geolocation consumes a lot of energy - therefore, it is still recommended to turn it off during activation (“ Disable»).

Whatever decision you make at this stage, it will not be fatal. Location Services can be enabled or disabled at any time.
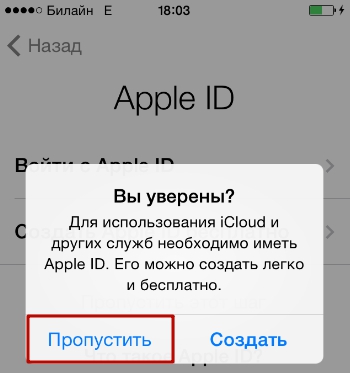
Step 6. The iPhone will prompt you to create an Apple ID or sign in with an existing account.

Click on the button " Skip this step” and then confirm your decision by clicking “ Skip».
Step 7. Accept Apple's terms of use - click " I accept". You can read them first, but this will not bring you much benefit - there is nothing remarkable and interesting in the text.

Step 8. If you have an iPhone 5S or later, the device will prompt you to set up touch ID- fingerprint sensor. At this point you have 2 options: Tune" And " Set up later».
It is clear that by choosing the first option, you agree to set up immediately, and preferring the second - postpone the procedure. It is recommended to set up Touch ID the first time you activate it. This will not take much time and effort - the user needs to put their index or thumb on the button several times Home". You can be sure of the correct completion of the procedure if the message “ Successfully» (« success»).

Image: everythingicafe.com
Step 9. Create a numeric password. This code will unlock your device if for some reason Touch ID fails to recognize your fingerprint. Enter 4 numbers that you remember exactly, twice.

You can leave the creation of the security code "for later" - to do this, click on the button " Do not add a password».
Step 10. The final step is for you to choose whether you want error data to be sent to Apple. The manufacturer recommends choosing the option " Send automatically”- according to representatives of the“ apple ”company, the feedback allows you to create better products.

Information that "leaves" to Apple includes geodata. In fact, this means that the manufacturer will know where and when you were.
This completes the iPhone setup process. The welcome message " Welcome!».

Click " Get Started» and start researching the new device!
Common problems when activating iPhone and how to solve them
Most often, problems when activating an iPhone occur because of the sim card. If the user sees the message " activation error”, he needs to make sure that the SIM is working.

Image: infoidevice.fr
To do this, just move the card to another phone and see if the network is detected.
If the SIM is OK, you should try to fix the error as follows: by pressing the " Home» bring up the bottom menu and click on « start over". This will not take you to the first page of settings - try to activate again. You may have to do this procedure 6-7 times in order to get rid of " activation error».
During the initial setup, you may encounter another error - " Could Not Activate iPhone.
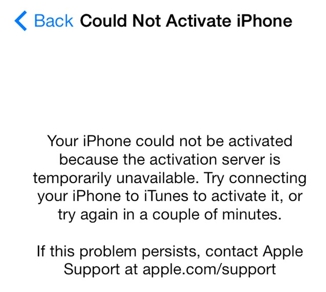
Image: ipadappsbuzz.com
The reason for this error is the high load on the Apple server. It is best to wait 2 - 3 minutes and try to activate again. If it doesn’t work out, you should change the way the gadget is connected to the Internet - for example, use 3G instead of Wi-Fi. You can also write a complaint to Apple support, but it will take several days to wait for a response from the company's specialists.
Finally, the third common problem is that beginners fail to set up Touch ID - the sensor simply does not respond to finger touch. The solution to this problem lies on the surface - it is necessary to remove the factory film from the front face of the device. The desire to protect the new iPhone from scratches is commendable, but you need to use a special film for this, and not the one that comes with the kit.
How to set up iPhone like new?
The need to set up a used iPhone like New occurs when the device starts to freeze and slow down. The memory of the gadget is clogged - this leads to slow and unstable operation of the device. A complete reset of the iPhone will help you quickly get rid of the "garbage" in the memory. You should not worry about the fact that as a result of the reset all user data will be deleted - after all, you can pre-package valuable information into a backup copy.
Correctly configure the "apple" device like new need like this:
Step 1. Check if Apple offers you to update the "OS" of the gadget. To do this, follow the path Settings» - « Main» - « Software Update". If you see below the iOS version it says " Latest software installed”, proceed with the next steps.

If there are updates available, install the latest version of iOS
On a jailbroken iPhone, you can only update the operating system through iTunes.
Step 3. Turn off the iMessage service and the " Find iPhone". The messenger is deactivated in the section " Messages" V " Settings". To disable " Find iPhone» you need to proceed to the section « iCloud».

Step 4. Start cleaning your device. Follow the path" Settings» - « Main» - « Reset". In the last subsection you will find the item " Erase content and settings"- you need him.

Click on this item and enter the security password.

Then confirm that you want to erase the iPhone - click on the appropriate button.

Next, wait for the gadget cleaning procedure to complete. If at the end of the procedure a welcome message appears on the screen, then you did everything right. Set up your iPhone according to the instructions in this article, and then. Through such manipulations, you can significantly increase the speed of the gadget without losing any important information.
Conclusion
2. Create an Apple ID.
If you haven't had an iPhone or iPad yet, or if you want to create a new Apple ID, then choose to set it up as a new iPhone. If you already have an Apple ID and want to use it, then choose Restore from iCloud copy or Restore from iTunes copy. I talked about restoring an iPhone in an article.
I will show you how to set up an iPhone with a new Apple ID and choose set up like a new iPhone.

An Apple ID is your account on iOS (iPhone or iPad) to be used on Apple devices.

After choosing a question and answering it, click next.


And finally, the third question and answer and click next.

Now we specify a backup mailbox, in case your main e-mail is not available to you, you can restore access to your Apple ID through a backup mailbox. This e-mail will be used for security purposes only.

Once you have entered your email address, click next.

Now setting up updates. Get Apple news and software updates, as well as the latest information about Apple products and services.

I do not want to receive news and information from Apple in my email, so I will disable these updates.

Now accept Apple's terms and conditions. Read and click accept.

We confirm acceptance of the terms and conditions of iOS, iCloud and Game Center.
We press accept.

The creation of a new Apple ID begins. We wait a few seconds or minutes.

Now we are prompted to use iCloud. iCloud is Apple's cloud storage, it allows you to have automatic access to music, photos, programs, contacts, calendars and more on all your devices.
If you do not have a computer, then you definitely need to use iCloud to save your contacts and music and programs to your iCloud account and in case you lose your iPhone or iPad, then you could buy a new iPad or iPhone to restore your contacts and photos and programs on a new iPhone or iPad.
If you have a computer, then you can save your iPhone or iPad backup, which will store your contacts, photos, programs, and more, to your computer via iTunes.
I'll click don't use iCloud

Confirming that I really don't want to use iCloud.
Click don't use.

3. Create a password for iPhone
Now you need to create a password for your iPhone or iPad so that no one can take it, climb into you and watch your photos, videos, correspondence and other personal information.
First, create a simple four-digit password.

Confirm the newly created password by entering it again.

Later, you can change your iPhone passcode if you want. You can even set a complex password consisting of numbers and letters in different languages. I already wrote about this earlier in the article.
4. Diagnosis and use.
Now let's configure the "Diagnostics and Usage" item. Automatically submitting diagnostic and usage data will help Apple improve its products and services. Diagnostic data may contain geodata.

That is, you can help Apple by clicking "send automatically", then periodically your iPhone or iPad will send usage data to Apple: in which applications and how long you sit, where you are, where you click, what settings you use, what you write and so on. All this helps to understand who and how uses their products. If you do not want your data to be sent periodically to Apple, then select "do not send".
I choose "don't send".
I wrote about sending statistics to Apple and other tracking on the iPhone in an article.

iPhone. Welcome!
Click to start working.

Ready. Your new iPhone or iPad is set up and you can start using it.

5. Turn on mail on iPhone
You can first turn on mail by going to Settings > Mail, Addresses, Calendars.


In iCloud settings, click on the mail slider to enable receiving mail on your iPhone or iPad.

Now the slider is green, which means it is enabled.

6. Other first iPhone settings
3. We insert a SIM card into the phone, turn it on using the Power button, connect the phone to the computer via the cable that was included.
4. Most often, iTunes starts automatically. If not, start the program manually. She will prompt you to activate the device. We confirm the request.
5. We leave the iPhone alone and wait for the activation to occur. While there is no activation, the device displays a pending message. While the process is in progress, you can get acquainted with the features of the device that do not require communication, for example, with the camera, importing photos, menus, etc.
6. When the activation is over, try calling. If everything is in order, the phone will dial the number. This means that the full functionality of your iPhone is enabled.
How to turn on iPhone 4s
For this generation of iPhones, the activation process has been greatly simplified - it has become unnecessary to use a computer.
1. We insert the SIM card, turn on the phone using the "Power" button.
2. Choose a familiar interface language: Russian-Russia
3. The phone asks if you allow it to determine the location or not (this will be needed later for using maps, check-ins on Facebook, etc.). If these functions are needed, then we allow them.
How to turn on the iPhone if the "On" button does not work
If you hold the power button for a long time, but the phone does not respond, then the problem is most likely in the upper loop where the button is located. Then there will be problems with the headphone jack, and with the volume buttons, and with the silent mode switch.
Perhaps the power button failed, equal in height to the body. You need to check: maybe the fasteners are cracked or the screws are loose.
In any case, if the button does not work, then the phone must be carried to the service. It is better not to open it yourself.
How to turn on iPhone if it freezes
To do this, use the forced reboot mode: simultaneously press and hold the "On" buttons (at the top) and the "Home" button (the only round button below the screen) for a long time. After that, the phone will turn off. If you turn it back on, it will take longer to reboot than usual, but the problems will be automatically fixed.
October 10, 2018How to set up a Chinese iPhone 7
Have you decided to distinguish yourself from your friends who walk around with Android smartphones and bought yourself a Chinese copy of the iPhone? Well, that makes some sense. With a great appearance, the copy has all the advantages of Android smartphones: flexible settings, low power consumption, a large number of free applications, the ability to download your content to the device. And all this at a very low price.
Initial setup
So, the first thing after buying and removing the phone from the box, you need to perform the simplest manipulations necessary for further use. First you need to check the state of charge of the device. Now this is rare, but nevertheless, the device can come out of the box with a dead battery. In this case, it is worth charging. Chinese chargers differ from European ones in form factor, so you need to take care of buying an adapter in advance. Sometimes, however, the adapter can be found immediately in the box, for which the Chinese are more than grateful.
Inserting a SIM card
A SIM card is required to connect your phone to your carrier's network so that you can make calls, send SMS and surf the Internet without connecting to wireless networks such as Wi-Fi.
The SIM card is installed in a special tray, the key to which is located in the box with the device. In some smartphone models, you can also install a second SIM card or a memory card in the tray. After installing the map, you can turn on your smartphone and continue setting up.

Connecting to Wi-Fi
The next step is to connect to a Wi-Fi wireless network. During the first launch, you will be offered several networks that the smartphone will detect. Most likely, yours will be among them (if it is not there, then check the settings of the router). Select a network, enter a password if necessary.
Application installation
After completing the initial setup, you can immediately begin the full use of your smartphone. However, it will be better if you immediately attend to the issue of installing new applications. The problem with Chinese iPhones is that they are designed for the Chinese, oddly enough, market. Therefore, they initially installed an application store with Chinese applications. It does not have popular applications in Russia, like WhatsApp or Telegram.
To avoid this, you need to enable the Google.Play store on your device. First, take a close look at all the available screens: it is likely that he is located on one of them. The Chinese prefer to hide such extensions in folders called "Google".
If you cannot find Google.Play, then this means that the application is disabled. Enabling it is quite simple:
- Go to the "settings" menu;
- Find the "applications" section;
- In this section, find Google.Play;
- Select the application and click on the "enable" button.
After these manipulations, Google.Play will work again on the smartphone and you will be able to install all the necessary applications.

Personalization
In order for the phone to become truly "one's own", it is necessary to personalize it. The problem with the original iPhone is precisely that the ability to make changes to the design of the interface is very limited. At the same time, its Chinese copy has all the necessary functions that will allow you to do anything with the gadget.
Ringtones
In the original device, you have to buy ringtones in the App Store. As for the Chinese iPhone, this is easier here. You can download any ringtone from the Internet and set it as a ringtone. To do this is simple:
- Go to the "settings" menu;
- Find the "personalization" section;
- Select "sound and vibration";
- Find the "notification ringtones and sounds" section;
- Click on the item "Ringtone";
- Choose the one you want.
From now on, when incoming calls, not a standard melody will be played, but your personal one.
Wallpaper
Setting a wallpaper is not much different from setting a personal ringtone. First, find the image you need on the Internet, save it to your smartphone. Next, do the following:
- Go to the "settings" menu;
- Go to the "personalization" section;
- Item "Wallpaper"
- Choose your desired wallpaper;
- Click on the "install" button.
Having completed all these points, your Chinese iPhone will be fully prepared for active use. You can make calls, send SMS, use the Internet, download all available applications. Do not worry that the device was made in the Middle Kingdom - the technology for the production of smartphones in China is so perfect and debugged that any equipment will have all the necessary functions and will last for many more years.