Computer won't turn on after cleaning. How to clean the computer from dust and replace the thermal paste. Removing viruses and malware
Good afternoon.
Many users mistakenly believe that cleaning a computer from dust is a task for experienced craftsmen and it is better not to go there while the computer is somehow working. In fact, there is nothing difficult in this!
And besides, regular cleaning system block from dust: firstly, it will make your work on the PC faster; secondly, the computer will make less noise and annoy you; thirdly, its service life will increase, which means you will not have to spend money on repairs again.
In this article, I wanted to look at an easy way to clean your computer from dust at home. By the way, often during this procedure it is required to change the thermal paste (it often makes no sense to do this, but once every 3-4 years it’s completely). Replacing thermal paste is not a difficult and useful matter, later in the article I will tell you in more detail about everything ...
From the beginning, a couple of frequent questions that are constantly asked to me.
Why do you need to clean? The fact is that dust interferes with ventilation: hot air from a heated processor heatsink cannot exit the system unit, which means that the temperature will rise. In addition, pieces of dust interfere with the work of coolers (fans) that cool the processor. When the temperature rises, the computer may start to slow down (or even turn off or freeze).
How often should you clean your PC from dust? Some do not clean the computer for years and do not complain, others look into the system unit every six months. Much also depends on the room in which the computer works. On average, for an ordinary apartment, it is recommended to clean the PC once a year.
Also, if your PC starts to behave unstably: it turns off, freezes, starts to slow down, the processor temperature rises significantly (about temperature:), it is also recommended to clean it from dust first.
What do you need to clean your computer?
1. Vacuum cleaner.
Any home vacuum cleaner will do. Ideally, if it has a reverse - i.e. it can blow air. If there is no reverse mode, then the vacuum cleaner will simply have to be turned to the system unit so that the blown air from the vacuum cleaner blows dust out of the PC.
2. Screwdrivers.
Usually you need the simplest Phillips screwdriver. In general, only those screwdrivers are needed that will help open the system unit (open the power supply, if necessary).
3. Alcohol.
It will come in handy if you change the thermal paste (in order to degrease the surface). I used the most common ethyl alcohol (I think 95%).

Ethanol.
4. Thermal paste.
Thermal paste is an "intermediary" between the processor (which gets very hot) and the heatsink (which cools it). If the thermal paste has not been changed for a long time, it dries out, cracks and transfers heat poorly. And this means that the temperature of the processor will rise, which is not good. Replacing the thermal paste in this case helps to reduce the temperature by an order of magnitude!
What thermal paste do you need?
There are dozens of brands on the market now. Which one is the best, I don't know. Relatively good, in my opinion, AlSil-3:
Affordable price (a syringe for 4-5 times of use will cost you about 100 rubles);
It is convenient to apply it on the processor: it does not spread, it is easily smoothed out with a regular plastic card.

5. A few cotton swabs + an old plastic card + a brush.
If there are no cotton buds, ordinary cotton wool will do. Any plastic card will do: an old bank card, from a SIM card, some kind of calendar, etc.
The brush will be needed in order to brush off the dust from the radiators.
Cleaning the system unit from dust - step by step
1) Cleaning begins with disconnecting the PC system unit from electricity, then disconnect all wires: power, keyboard, mouse, speakers, etc.

Disconnect all wires from the system unit.
2) The second step is to get the system unit to free space and remove the side cover. The removable side cover in a conventional system unit is on the left. It is usually fastened with two bolts (unscrewed manually), sometimes with latches, and sometimes with nothing at all - you can just move it right away.
After the bolts are unscrewed, it remains only to slightly press on the cover (towards the rear wall of the system unit) and remove it.

Side cover attachment.
3) The system unit shown in the photo below has not been cleaned of dust for a long time: there is a rather thick layer of dust on the coolers, which prevents them from rotating. In addition, the cooler starts to make noise with such an amount of dust, which can be very annoying.

A large amount of dust in the system unit.
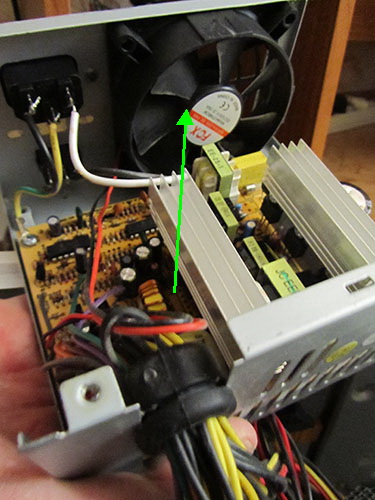
4) In principle, if there is not so much dust, you can already turn on the vacuum cleaner and carefully blow through the system unit: all radiators and coolers (on the processor, on the video card, on the unit case). In my case, cleaning was not carried out for 3 years, and the radiator was clogged with dust, so it had to be removed. To do this, there is usually a special lever (red arrow in the photo below), by pulling which you can remove the cooler with the radiator (which I actually did. By the way, if you remove the radiator, you will need to replace the thermal paste).

How to remove a cooler with a radiator.
5) After the heatsink and cooler have been removed, you can see the old thermal paste. It will later need to be removed with a cotton swab and alcohol. In the meantime, first of all, we blow out all the dust with a vacuum cleaner motherboard computer.
6) The processor heatsink is also convenient to blow with a vacuum cleaner from different sides. If the dust is so entrenched that the vacuum cleaner does not take it, brush it off with a regular brush.

Radiator with CPU cooler.
To remove the power supply, you need to unscrew 4-5 fastening screws from the back of the system unit.

Mounting the power supply to the case.
The power supply closes, most often, a small metal cover. It is held by several screws (4 in my case). It is enough to unscrew them and the cover can be removed.
Attaching the power supply cover.
9) Now you can blow off the dust from the power supply. Particular attention should be paid to the cooler - a large amount of dust often accumulates on it. By the way, dust from the blades can be easily brushed off with a brush or cotton swab.
When the power supply is cleaned of dust, assemble it in the reverse order (according to this article) and fix it in the system unit.

Power supply: side view.
Power supply: rear view.
10) Now it's time to clean the processor from the old thermal paste. To do this, you can use a regular cotton swab slightly moistened with alcohol. As a rule, 3-4 of these cotton swabs are enough for me to wipe the processor clean. By the way, you need to act carefully, without pressing hard, gradually, slowly, clean the surface.
By the way, you also need to clean the back side of the heatsink, which is pressed against the processor.

Old thermal paste on the processor.
Ethyl alcohol and cotton swab.
11) After the surfaces of the heatsink and processor are cleaned, thermal paste can be applied to the processor. You don’t need to apply a lot of it: on the contrary, the less it is, the better. Most importantly, it should level out all the uneven surfaces of the processor and heatsink in order to ensure the best heat transfer.

Applied thermal paste on the processor (it still needs to be “smoothed out” with a thin layer).
To smooth out the thermal paste with a thin layer, a plastic card is usually used. It is smoothly driven over the surface of the processor, gently smoothing the paste with a thin layer. By the way, at the same time, all the excess paste will be collected on the edge of the card. You need to smooth the thermal paste until it covers the entire surface of the processor with a thin layer (without dimples, tubercles and gaps).
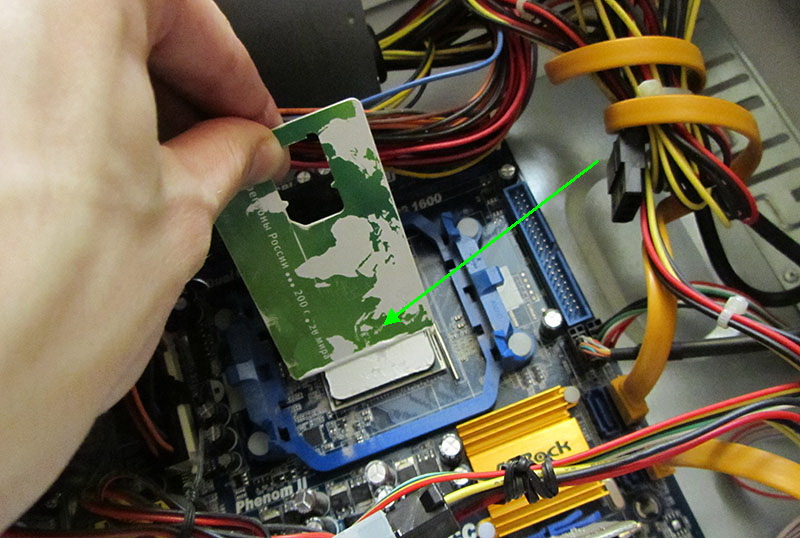
Thermal paste smoothing.
Properly applied thermal paste does not even “give out” itself: it seems that it is just a gray plane.

Thermal paste is applied, you can install a radiator.
12) After installing the heatsink, don't forget to connect the cooler to the power on the motherboard. Connecting it incorrectly, in principle, is not possible (without the use of brute force) - because. there is a small latch. By the way, on the motherboard this connector is marked as "CPU FAN".

Cooler power connection.
13) Thanks to the simple procedure done above, our PC has become relatively clean: there is no dust on coolers and radiators, the power supply is also free of dust, the thermal paste has been replaced. Thanks to such a tricky procedure, the system unit will work less noisily, the processor and other components will not overheat, which means that the risk of unstable PC operation will decrease!

"Clean" system unit.
By the way, after cleaning, the processor temperature (without load) is only 1-2 degrees higher than room temperature. The noise that appeared during the fast rotation of the coolers has become less (especially noticeable at night). In general, it became pleasant to work for the PC!

Many computer users, noticing a noticeable decrease in performance, open the system unit and are horrified by the presence of a mass of dust on the system elements. Followed by self cleaning dusty components. However, they do not hesitate to use a vacuum cleaner to remove dust. Then, it seems that you just need to turn on the computer and continue your work on the PC, but the digital friend refuses to start. is a fairly common problem.
Why is independence sometimes harmful?
Cleaning a PC from dust is not quite a simple matter, as it might seem at first glance. It would seem, what could be easier than ordinary computer care? However, the answer to this question is not so obvious. If you look at the system unit and its components from the outside, like a closed box, then the dust that has settled on its surfaces can also be removed with a vacuum cleaner.
However, we should not forget that cleaning occurs on the surfaces of a digital device, which accumulate a static charge. Therefore, removing dust from these surfaces is not enough. You also need to wipe the case with a damp cloth moistened with an antistatic solution. When it comes to the internal elements of the system unit, removing dust with a vacuum cleaner is out of the question. Here you will need the help of a specialist, otherwise the manifestation of excessive independence may result in the collapse of the system.

Preventive Maintenance
Bring it to us at SoftCompService - we will quickly deal with this problem. It must be remembered that the removal of this unpleasant substance is part of a whole set of preventive maintenance measures.
- Cleaning the system unit from dust and dirt.
- Cleaning oxidized contacts.
- Removal of static charge from computer components and from the surface of its system unit.
- Monitor maintenance.
This is only a small part of the work that the specialists of our center perform when prevention is necessary. At the same time, we do not clean the internal components with a vacuum cleaner, but with compressed air cans. Our experts have the knowledge of how to remove excess static charge from computer components so that this substance does not cause failure of PC parts.
Corroded contacts are a big problem for computer operation. They are also subject to prevention, otherwise they will soon cause the failure of many elements. It must be remembered that even a light touch with your hand on a contact on the motherboard can cause oxidation of this contact due to moisture that has accumulated on your hand.

Overheating problems
Periodic cleaning of the system from accumulating debris can not only improve the performance of the computer. This and other preventive procedures will avoid problems with overheating of the system and its parts. Excessive heat is the reason for the rapid aging of parts and their failure.
Each microcomputer is built to operate at room temperature. If the ambient temperature rises above 29.5 degrees, then there is a threat of overheating. The same problem occurs in conditions of high humidity. Therefore, in order to safely solve this problem, the user must eliminate any negligence regarding his digital pet.
Timely cleaning of dust and other types of prevention carried out by a specialist of the SoftCompService center is a guarantee of the correct functioning of the computer. The computer does not turn on after cleaning from dust - this phrase will be completely excluded if you contact our masters for timely help.
For the second time in the last week, I have been contacted with the following problem: computer won't turn on after cleaning, to be more precise, it stops starting - the system unit itself turns on, the coolers work, but the signal does not go to the monitor. The reason is the same in both cases.
This is what an AMD processor looks like:
Another angle:
 The bottom of an AMD processor
 As you can see, the reverse side of the processor is contacts in the form of "antennae" or "legs".
In both cases, the user independently cleaned the dust and removed the heatsink from the motherboard. At the same time, the processor due to the old thermal paste stuck to the cooling system radiator.
The following picture emerged:
In this case, you MUST separate processor from heatsink. As you may have guessed, they didn't, but tried to put them back in.
This is difficult to do. you can't see if you plug the processor into the motherboard socket correctly. (But there are more than a thousand contacts on the processor, a couple will still get past).
If it does not climb, then you can push harder. In the worst case, when the user is especially active, it turns out like this:

The reason why the computer stopped turning on is the crumpled legs of the processor.
I was lucky because there were few bent legs (from 5 to 15). I carefully straightened them with a needle, inserted the processor into the socket, after which the computer started working again.
Experts advise to separate the processor stuck to the heatsink with the help of alcohol. The type of dried thermal paste softens and it becomes easier to unstick them. I did it with a screwdriver, using it as a lever (hello Archimedes!). Still, the processor is quite solid and it is difficult to break it.
Take care of your computer, but rather entrust it to someone who understands this better than you
If your laptop does not start after cleaning, then the first thing I advise turn over RAM sticks ( random access memory). Usually, all this is limited. If there are no changes, then something is not collected before. Check carefully