RAM test. We test the RAM for performance Program for testing RAM windows 7
This guide will look at the main symptoms of failing memory and walk you through the steps to test your RAM to see if it's the problem using the built-in memory test utility in Windows 10, 8 and Windows 7, as well as using third party free program memtest86+.
The Memory Checker (Diagnostic Tool) is a built-in Windows utility that allows you to check RAM for errors. To run it, you can press the Win+R keys on your keyboard, type mdsched and press Enter (or use Windows search 10 and 8, starting to type the word "check").

After running the utility, you will be prompted to restart the computer to perform a memory check for errors.

We agree and wait for the scan to start after a reboot (which in this case takes longer than usual).

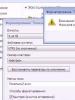
During the scanning process, you can press the F1 key to change the scan settings, in particular, you can change the following settings:
- The type of check is basic, normal, or wide.
- Cache usage (on, off)
- Number of test passes

Upon completion of the verification process, the computer will restart, and after logging in, it will display the results of the verification.
However, there is one caveat - in my test (Windows 10), the result appeared after a few minutes in the form of a short notification, it is also reported that sometimes it may not appear at all. In this situation, you can use the Windows Event Viewer utility (use search to launch it).
In the Event Viewer, select "Windows Logs" - "System" and find information about the results of the memory test - MemoryDiagnostics-Results (in the details window by double-clicking or at the bottom of the window you will see a result, for example, "Computer memory was checked using the Windows Memory Tester; no errors found."

Checking RAM in memtest86+
You can download memtest for free from the official website http://www.memtest.org/ (download links are at the bottom of the main page). Best to download ISO file in a ZIP archive. This option will be used here.
Note: there are two sites on the Internet at the request of memtest - with the memtest86+ program and Passmark Memtest86. Actually, it's the same thing (except that the second site has a paid product in addition to the free program), but I recommend using memtest.org as a source.

- The next step is to burn the ISO image with memtest (after extracting it from ZIP archive) to disk (see ). If you want to make a bootable flash drive with memtest, then the site has a kit for automatically creating such a flash drive.
- Best of all, if you check the memory, you will be one module at a time. That is, we open the computer, remove all the RAM modules, except for one, and perform its check. After the end - the next and so on. In this way, it will be possible to accurately identify the failed module.
- After the boot drive is ready, insert it into the disk reader in the BIOS, set the boot from the disk (flash drive) and, after saving the settings, the memtest utility will load.
- No action is required on your part, the check will start automatically.
- After the memory check is complete, you will be able to see what RAM memory errors have been found. If necessary, write them down so that you can later find on the Internet what it is and what to do with it. You can interrupt the scan at any time by pressing the Esc key.

Checking RAM in memtest
In case there are errors, it will look like in the picture below.

RAM errors identified by the test
What should I do if memtest finds RAM errors? - If failures seriously interfere with work, then the cheapest way is to replace the problematic RAM module, besides, the price is not so high today. Although sometimes a simple cleaning of memory contacts helps (described in the article), and sometimes a problem in the operation of RAM can be caused by malfunctions of the connector or components of the motherboard.
How reliable is this test? - reliable enough to test the RAM on most computers, however, as is the case with any other test, you cannot be 100% sure of the correctness of the result.
RAM is one of the key components for the speed of a computer. If, with a weak or faulty video card, only problems with productive games and applications arise on the computer, then if there are problems with RAM, the entire system will work slowly.
Most often, a computer has several RAM modules installed, each of which has a certain amount. In this case, even if there is a lot of memory, there may be problems with system performance, because:
- RAM is selected incorrectly;
- One or more memory sticks are installed incorrectly.
Also, we must not forget that for one reason or another, RAM can fail, both in whole and in part. If there is a suspicion of a malfunction, it is necessary to check the RAM for errors, and this can be done in two ways.
How to check RAM using Windows
 Microsoft in the development of the operating Windows systems provided for the presence in it of diagnostic utilities that will allow computer administrators to check the status of components. The RAM Diagnostic Tool is available on Windows 7 and above, including Windows 10. From time to time operating system automatically runs the memory diagnostic utility when the computer is restarted, but does not notify the user of the results unless there are critical problems. You can also run the diagnostic tool in manual mode.
To check the RAM using Windows tools, you must:
- Launch the Windows Memory Checker application. This can be done in different ways:


Important: If an error is found, it is first necessary to determine which of the memory sticks is faulty (if there are several). To do this, you need to run the diagnostic tool again and select the option to launch the utility when you restart your computer. Next, the PC needs to be completely turned off and one die left in the RAM slots. After that, the computer turns on, and the diagnostics again pass at boot. Similarly, by rearranging the memory sticks, you can determine which one is faulty.
How to test RAM with Memtest86

There are several dozen applications that are designed to "deep" check the RAM. Among them, the most popular is the free Memtest86 utility, which is diagnosed in 10 steps to identify the slightest deviation in memory operation. The application tests the RAM according to the following algorithm:
- Step 1. Problems with surface mode addressing are identified;
- Step 2. A deep memory analysis is carried out to search for addressing errors;
- Step 3: Look for hardware problems;
- Step 4. Repeating the search for hardware problems, but using a different algorithm: running an 8-bit test of zeros and ones. Diagnostics is performed according to 20 different schemes;
- Step 5. Passes 60 tests to find problems with data sensitive;
- Step 6. Faults in memory circuits are caught;
- Step 7. Time-consuming test for finding data sensitive errors;
- Step 8. Diagnosing the stability of recording information in the memory;
- Step 9. Run tests based on cache and buffering information to find hidden errors;
- Step 10. An optional test that is run manually. It is aimed at checking the safety of information in RAM. The point is that the program writes various addresses to the RAM, after which the device under test is put into sleep mode for an hour and a half. After waking up, the safety of the information is checked.
As you can see, Memtest86 is a powerful diagnostic tool and it takes about 8-10 hours to go through all the steps in the memory test.
Preparing for RAM diagnostics with Memtest86
The RAM check is performed before the operating system is loaded, so you must first download and write the installation file of the program to an external drive, as well as configure the BIOS for the specific task of launching the diagnostic utility. You can burn Memtest86 to a CD/DVD or USB flash drive. Below are both options for how to do this.
To burn Memtest86 to CD/DVD you will need:

After completing the steps above, you will receive a diagnostic disk, which can then be used repeatedly to check the RAM.
To burn Memtest86 to a USB flash drive:

Important: During the process of writing the program, all contents will be deleted from the flash drive.
Having created an external media with the Memtest86 program, you can proceed to the final preparatory procedure - setting the BIOS to run a file from a CD / DVD disk or USB flash drive. It is worth noting that different BIOS versions may be installed on different models of the motherboard. In general, the process of setting up the sequence of launching drives and reading information from them is approximately the same.
Consider setting up Memtest86 to run from a CD/DVD using one of the BIOS as an example:

Please note: The process of launching the Memtest86 program from a USB drive is no different, except for the need to select the name of the USB flash drive on which the utility is stored in step 4 of the instruction.
If you cannot figure out where in the BIOS the sequence for reading information from drives is configured, you can try starting the Boot menu. To do this, after restarting the computer, instead of Del, you must press F8, which will launch the menu for setting the reading sequence from the drives. 
Important: Not all motherboards know how to launch the Boot menu in this way.
Checking RAM with Memtest86
When the necessary preparatory work for running Memtest86 has been completed, it remains to insert the drive into the computer: install the USB flash drive into the USB port or the disk into the drive. After that, you need to perform a planned system boot and the Memtest86 test will start automatically.
The progress of the test can be monitored in the upper right corner, where the percentage shows the completion of the general diagnostics and each step separately.

When the tests are completed, a message will appear at the bottom of the screen prompting you to press ESC to restart your computer.

If Memtest86 detects errors during testing, they will be displayed on the screen in red. Also, information about their number will be duplicated at the end of the test.

As noted above, each plate is recommended to be tested separately to determine exactly which one is faulty. If the Memtest86 utility detects errors in the operation of the RAM, it will need to be replaced with a new one. In rare situations, cleaning the contacts of the RAM or installing it in another slot on the motherboard helps to get rid of the error.
”I described the tools available in the System Recovery Options menu and promised to talk more about them in future articles. I recently had to use the Windows Memory Diagnostic tool, so I decided to start there.
So, if you are experiencing application and operating system crashes or STOP errors, the cause may be defective RAM. The Windows Memory Diagnostic Tool allows you to test your RAM modules for problems. In this article, I'll show you how to get it up and running.
Running the Windows Memory Diagnostic tool
You can run the Windows Memory Diagnostic Tool in a variety of ways, depending on your situation. As I mentioned in the previous article, it can be accessed from the System Recovery Options menu. But if the operating system boots normally, and problems arise only occasionally, then everything is much simpler.
Click the Start button, open the Control Panel, and click the System and Security icon. In the window that opens, select the "Administrative Tools" item and click on the "Windows Memory Diagnostic" icon. Or you can simply open the Start menu, type "memory" in the search bar, and select "Windows Memory Diagnostic" from the results.
The Windows Memory Diagnostic window (Figure A) will appear. Select the Restart Now and Check for Problems option. The dialog box will close and the system will automatically reboot.
Figure A To run memory diagnostics, select the "Perform reboot and test" option.
Running and checking memory
Regardless of the startup method you choose, after rebooting, the Windows Memory Diagnostics screen will appear and the test will begin. The progress of the operation is indicated as a percentage and indicated by a progress bar (Figure B). During the diagnostic process, the utility repeatedly writes certain values to memory and then reads them to make sure that the data has not changed.

Figure B The test starts immediately after the Windows Memory Diagnostics blue-and-white screen appears.
By default, the Standard test is used, but two other options are available. To select one of them, press the button to bring up the Options screen, shown in Fig. C.

Figure C The Windows Memory Diagnostic Tool options allow you to select a Basic or Extended test.
In the Test Mix section, you can choose between the Basic test, which includes a limited set of tests, or the Broad test, which offers an extended range of tests - extended so much that the test can take eight hours or more.
Each test suite has default cache settings that are optimal for this test case. But you can use the key to go to the "Cache" section (Cache) and set your own settings. Cache in this case refers to the microprocessor cache, which is used to store data received from memory modules. Some tests enable the cache, while others disable it to force the processor to access the memory modules directly.
Each test is run twice by default. But you can use the key to go to the "Pass Count" section and specify how many times the test should be repeated. After changing the settings, click to save the settings and start testing.
As it progresses, the Status section displays information about detected faults. But it is not at all necessary to closely monitor the process, since the Windows Memory Diagnostic tool is able to identify the problematic sector of the chip and exclude it from use. Thanks to this, Windows 7 will start normally without crashing.
After Windows boot and logging in, a message about the results of the check will appear in the notification area (Figure D).

Figure D You can view the test result report in the pop-up notification.
The report can also be viewed using the Event Viewer. Open the "System" log and find "MemoryDiagnostics-Results" in the "Source" list. The "Event ID" column should show "1201" (Figure E).
RAM is a very important component of any computer system. Thanks to it, information is loaded and exchanged between the hard drive and the processor.
Therefore, in the event of a malfunction of this component, the computer or laptop may become unstable or not work at all.
In this article, you will learn how to effectively check the RAM of your computer using the built-in tools of Windows 7, as well as the super-efficient program.
When should memory be checked for errors?
Problems with RAM can appear on any computer or laptop. And it can happen quite spontaneously.
The first and most common symptoms of RAM failure are:
- Frequent blue screens with different error codes;
- Blue screens during Windows installation;
- Various errors issued by various programs;
- One short and one long when turning on the PC.
How to check RAM for errors in windows 7?
Windows 7 has a built-in tool that allows you to test the RAM of your computer or laptop.
To start the scan, you need to go to the control panel, for example, through the menu " Start«.
We go to the control panel
There select " Administration«.

Administration in the control panel
Here you need to double-click on " Windows Memory Checker«.

Windows Memory Checker
A window will appear in which we select " Restart and verify (recommended)«.

Performing a reboot
After that, the computer will restart and the memory test will begin.

Memory testing process
At the end of the check, you will see the result, which will say whether errors were found or not.
Checking RAM with MemTest86+
If, according to the results of the RAM check using Windows 7, no errors were found, then we recommend that you run the check with the program MemTest86+.

RAM errors identified by memtes86+
This program checks "from under the BIOS", writing to a USB flash drive, which it creates itself in the right way.
Thanks to this program, you can test the memory even if windows is not installed or does not start.
Detailed instructions for downloading and running the Memtest86+ program can be found in.
One of the most important indicators of the performance of a computer system is the parameters of RAM. Therefore, when errors are present in the functioning of this element, this has a very negative effect on the operation of the OS as a whole. Let's see how to perform a RAM check on computers with Windows 7 (32 or 64 bit).
First of all, let's look at the symptoms in which the user should consider performing a RAM test. These manifestations include:
- Regular crashes in the form of BSOD;
- A significant slowdown in the speed of the system;
- Graphics distortion;
- Frequent crashes from programs that intensively use RAM (for example, games);
- The system does not boot.
Any of these symptoms may indicate the presence of errors in the RAM. Of course, these factors are not a 100% guarantee that the reason lies precisely in RAM. For example, graphics problems can also occur due to malfunctions of the video card. However, it's worth doing a RAM test anyway.
This procedure on a PC with Windows 7 can be done both using third-party applications, and using only the built-in tools. Next, we will look at these two verification options in detail.
Attention! We recommend checking each RAM module separately. That is, at the first check, you need to disconnect all the RAM sticks, except for one. During the second check, change it to another one, and so on. Thus, it will be possible to calculate which particular module is failing.
Method 1: Third party software
Let us immediately consider the implementation of the procedure under study using the application third party programs. One of the simplest and most convenient applications for such tasks is Memtest86+.
- First of all, before starting testing, you need to create a boot disk or USB flash drive with the Memtest86+ program. This is due to the fact that the check will be performed without loading the operating system.

- After the bootable media is prepared, insert the disk or USB flash drive into the drive or USB connector, depending on the type of device you are using. Restart the computer and enter its BIOS to register the USB or disk drive there as the first boot device, otherwise the PC will start in normal mode. After performing the necessary manipulations, exit the BIOS.

- After the computer restarts and the Memtest86+ window opens, press the number "one" on the keyboard to activate the test if you use free version programs. For those users who have purchased the full version, the verification will start automatically after a ten-second timer countdown.
- After that, Memtest86+ will run algorithms that will test the PC's RAM in several parameters at once. If the utility does not detect any errors, after the completion of the entire cycle, scanning will be stopped and a corresponding message will be displayed in the program window. But if errors are detected, the check will continue until it is stopped by the user himself by pressing the key Esc.
- If the program detects errors, then they should be written down, and then search the Internet for information about how critical they are, and also learn about ways to eliminate them. As a rule, critical errors are eliminated by replacing the corresponding RAM module.


Method 2: Operating System Toolkit
You can also organize a scan of RAM in Windows 7 using only the tools of this operating system.
- Click "Start" and go to point "Control Panel".
- Open section "System and safety".
- Choose a position "Administration".
- From the list of tools that opens, click on the name "Memory Checker...".
- A window will open where the utility will offer two options to choose from:
- Reboot the PC and start the verification procedure immediately;
- Run a scan at the next system boot.
Choose your preferred option.
- After restarting the PC, the RAM scan will begin.
- During the verification process, you can set the preferences by clicking F1. This will open a list of the following options:
- Cache (disabled; enabled; default);
- Test set (wide; regular; basic);
- Number of test passes (from 0 to 15).

The most detailed check is performed by choosing a wide set of tests with the maximum number of passes, but such a scan will take quite a long time.
- After the test is completed, the computer will restart, and when it is turned on again, the test results will be displayed on the screen. But, unfortunately, they will be visible for a short amount of time, and in some cases they may not appear at all. You can view the result in "Windows Journal", for which we should go to the section already familiar to us "Administration", which is located in "Control Panels", and click on the element Event Viewer.
- In the left part of the window that opens, click on the name of the section "Windows Logs".
- In the list that opens, select the name of the subsection "System".
- Now in the list of events, find the name "MemoryDiagnostics-Results". If there are several such elements, see the last one in time. Click on it.
- In the lower block of the window you will see information about the results of the check.


You can check for RAM errors in Windows 7 both using third-party programs, and exclusively by the means provided by the operating system. The first option will probably provide more testing opportunities and for some categories of users it is easier. But the second one does not require the installation of any additional software, moreover, in the vast majority of cases, the capabilities that the system provides are enough to get all the necessary information about RAM errors. The exception is the situation when the OS cannot be started at all. That's when third-party apps come to the rescue.