"Compress this drive to save space": what is it? How expedient is it to perform such an operation? How to Shrink and How to Create a Volume or Partition in Windows Shrinking a Disk Partition
Since Vista and 7, operating system Windows has a feature that allows you to shrink (or expand) the size of your primary partition and logical drives. This feature can be useful if you find yourself in a situation where you need an extra partition and don't have enough extra disks. Shrinking a volume will free up disk space; this unallocated space can then be used to create other necessary partitions. Today we will learn how to shrink a basic volume or partition using the Windows GUI, and for more advanced users, we will also describe a method using the command line.
Before starting, make sure you back up all your important data.
Shrinking a Volume or Partition Using the Disk Management Tool
If you have Windows 7, go to the Start menu, type "disk management" in the search field and press Enter. If you are a Windows 8.x user, right-click in the lower left corner of the screen (or press the Win+X keyboard shortcut) and select Disk Management.

"Disk Management" is where you will find all the drives connected to your computer (hard drives, USB sticks, CD/DVDs, etc.)
Select the primary partition you want to shrink, right-click on it, and select Shrink.
As a result, the operating system will begin the process of determining the available space for compression.

Specify the amount of space you would like to reclaim and click Compress. Remember that the amount of space is entered in megabytes: for example, 1 GB equals 1024 MB.

You can use the freed (or unallocated) space in this way to create a new partition.
Shrinking a volume or partition using the command line
To open a command prompt in Windows 7, go to the start menu, type "cmd", in the search results, right-click on cmd.exe and select "Run as administrator". In Windows 8.x, right-click on the bottom left corner of the screen and select "Command Prompt (Admin)".
Enter diskpart and press Enter.

In the DISKPART line, enter list volume. This command will display a list of all drives on the computer.

Now enter the select volume command and the number of the volume you want to compress. For example, enter select volume 1 and press Enter.

Enter shrink querymax and press Enter. This command will allow Windows to determine the maximum amount of space that can be compressed.

You now have two options: first, you can simply type shrink, and then Windows will compress all available space; secondly, you can specify the desired volume for compression. In the second case, you need to enter the command shrink desired=volume_in_megabytes (for example, shrink desired=2048). You can enter any number that does not exceed the value specified in the "Maximum reused bytes" line. So with this command, you can specify the exact amount of space to compress.

If you do everything correctly, then after the operation is completed you will see a message:
DiskPart has successfully reduced the volume by: number_in_megabytes
That's all! To shut down DISKPART properly, type exit and press Enter.
What to consider:
- When you try to shrink a primary partition or a logical drive, you will not be able to shrink the partition beyond the location of non-movable files (for example, shadow copy storage, hibernation, swap files, etc.) Let's assume if there is a "first" empty space on the Windows drive , followed by non-removable files followed by a "second" blank space, you can only shrink the partition to the end of the second blank space, since the non-removable files are in the middle.
- If a large number of bad clusters are found, the compression will fail.
- You can use compression for primary partitions and logical drives or NTFS partitions.
And now I want to show you how you can use the unallocated disk space and create a new volume or partition using the Disk Management tool or using the command line.
How to create a new volume or partition through Disk Management
Open the Disk Management tool. To do this, open the Run dialog (Win + R), type diskmgmt.msc and press Enter.
Right click on the unallocated space and click "Create Simple Volume".
In the New Simple Volume Wizard window, click Next.

Enter the amount of space you want to use for the new volume (or partition) and click Next.

In the next step, you can change the formatting options, but this is optional, especially if you are satisfied with the default settings. Additionally, you can change the volume label to any name you prefer, but it's better to use something descriptive: for example, "Movies", "Documents", "Backups", etc. You can also enable the option to compress files and folders. When all settings are selected, click "Next".

Review your selections. If you want to change something, click "Back" to return to the previous steps. If everything suits you, click "Finish".

After that, a new partition should be successfully created on your computer.

How to create a new volume or partition via command line
Open command line with administrator rights.
Enter diskpart and press Enter.

In the DISKPART line, enter list disk. This command will list the drives on your PC. It will also help you determine the number of the disk with unallocated space.
Now enter the command select disk with the volume number and press Enter: for example, select volume 0 .


Advice: you can manually specify the size of the new partition. To do this, to the team create partition primary need to add size=x(where x– partition size in megabytes). The whole command will look like this: create partition primary size=1000
Now that the partition has been created, enter the command list volume and press Enter. As a result, you will see a volume (in my case, volume 3) with a RAW file system. However, it would be more correct to say that this is a volume without a file system.

Next, you need to format the partition to the NTFS file system. Enter command format fs=ntfs quick(where quick is an indication of what should be used fast way formatting) and press Enter.

You have just successfully created and formatted a partition. The last thing to do is assign a drive letter to the new partition. This is also a pretty simple task.
Enter command list volume, note the number of the new partition and enter the command select volume Don't forget to include the section number. For example, in my case the command would look like this: select volume 3 .
You now have two options to assign a drive letter: you can simply type assign, but then the DiskPart tool will automatically assign one of the available letters to the new partition (this is what is shown in the screenshot below); or you can enter the command assign letter=f, where f is the drive letter. If you choose the second option, make sure that the letter you want to assign is not already assigned to another drive.

That's all! Everything written above works in Vista, Windows 7 and 8.x.
contemplativeDisk Management tools can reduce the hard disk volume to create a new partition.
Windows 7 includes several tools for managing computer configuration and various aspects of the operating system. Sometimes it may be necessary to reduce the amount of volume - the allocated space on the hard disk, in order to free up space for creating another partition. Until recently, you would have to use third-party utilities to do this, but with the advent of the Disk Management tool built into Windows 7, the need to install special software has disappeared.
Volume compression
First you need to run the Disk Management tool with administrator rights. Open the Start menu, type "diskmgmt.msc" without quotes in the search bar, right-click on the "diskmgmt" link in the search results and select the "Run as Administrator" option from the context menu (Fig. A).
Figure A Run the Disk Management tool as an administrator.
The window shown in Fig. b.

Figure B. Disk Management tool window.
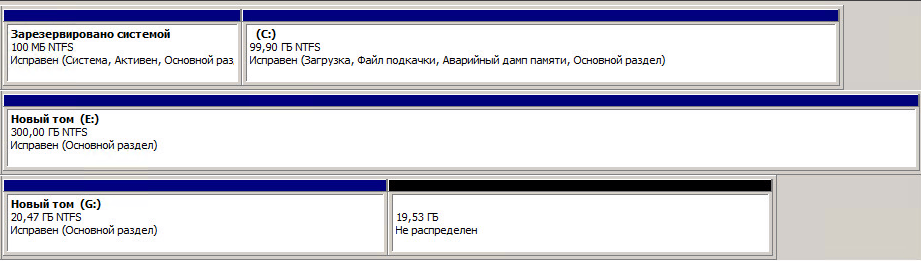
As you can see, my computer has a data recovery partition, a system partition, and a Data partition. It is better not to touch the system partition, so for example, let's compress the "Data (D:)" partition.
Click on the partition you want to shrink with the right mouse button and select the Shrink Volume option (Figure C).

Figure C From the context menu, select the Shrink Volume option.
The system will take a few seconds to analyze the disk, after which the dialog box shown in Fig. D.

Figure D After the analysis, a dialog box appears with general information about the volume.
In this window, you can only change the value in the field “Size of space to Shrink in MB” (Enter the Amount of Space to Shrink in MB). For example, let's reduce the "D:" volume by 5000 MB (5 GB), as shown in Figure 1. E. When you're ready, click the Compress button.

Figure E Shrink the volume by 5000 MB.
When the operation is completed, a new unallocated space will appear on the hard drive (Figure F). Its actual size will be slightly less than what was specified during compression, since a small part of this space will be allocated for the file Windows systems.

Figure F. New unallocated space.
Using unallocated space
Now you need to create a partition on the unallocated space that the operating system can use. This is not difficult at all, but it is done in several stages, so I will talk about creating a new volume in the next article.
Most users are accustomed to using two partitions on one hard drive, usually a drive called C and D. Many have become interested in the question of how to change the disk size in Windows 10 using the built-in system tools (with Windows installation or after) and third-party free programs.
Use the Disk Management utility
- Open the utility by right-clicking on the "Start" menu, select "Disk Management".
- In the Start menu search bar, type "Control Panel" and open it.

Select "System and Security".
In the window that opens, in the "Administration" item, click on the "Create and format" sub-item hard drive».

Shrink volume, free up space to create a new partition in Windows 10
In order to create a new volume in the utility, you first need to take free space somewhere for this, you can get it by compressing space on an existing volume. In the Windows operating system, no more than 4 partitions can exist on one physical HDD, including system partitions (for example, the Recovery Partition). Usually there are two local drives C and D.

To create a third volume, you need to right-click on a partition with more free space, in our case it is drive D. An explorer window will appear, click on the “Compress volume” item to free up free space, change it to unallocated.

Section D to create a new volume.
After that, the message “The volume is being polled to determine the available space for compression. Wait…". The process can last from a few seconds to several tens of minutes.
When the system finishes polling the volume, a window will appear, in the "Size of the volume to be compressed" column, you need to specify how much space must be separated from the donor disk to create free space for now. It will not work to allocate more space for the new partition than specified. In the example in the screenshot, the limit is 78880 MB, a little more than 77 GB.

You can specify any other number less than the above, for example, setting the value to 51200 MB will allocate exactly 50 gigabytes for the new volume. After selecting the “Compress” item, no result will be noticeable for some time. To check if the compression process is in progress, you need to hover over the utility window, a spinning blue circle should appear. When a black bar with unallocated space appears at the bottom of the window, this will indicate that compression has occurred.

This freed up space to create a new volume on the HDD in Windows 10. Now the unallocated space must be turned into a full-fledged hard disk partition.
- Create a hard disk partition from unallocated space
You must right-click on the area labeled "Unallocated", select "Create a simple volume".

The "New Simple Volume Wizard" will open, click "Next", in the next window you will need to specify the size of the new volume. You can leave the value unchanged or, if you want to create two partitions or more, specify a value less. Click "Next".

After that, select the Latin letter that will denote the disk, for example, F. Select the letter, click "Next".

You will then be able to format the new partition if necessary.

Continue by clicking "Finish".

After a few seconds or minutes, the partition is formatted and the new hard disk partition Windows disk 10 will be created. When choosing the amount of memory that you want to allocate for the formation of a new one, you must take into account that a small amount of compressed space will be taken by Windows for system needs.
So when choosing 50 GB of memory, we got a volume of 49.9 GB.

Create Partitions When Installing Windows 10
When installing Windows 10 on a computer from a USB flash drive or disk, you can divide disks into volumes. For those who reinstall the operating system, be aware that this will delete data from the system partition.
During Windows installation, after entering (or skipping entering) the activation key, select the "Custom installation" item, after which it will be possible to select a partition for installation, tools for configuring partitions are available.

In our case, drive C is partition 4.
To make two partitions from one HDD, you need to use the "Delete" partition button, as a result it will be converted to "Unallocated disk space" (point 4).
Then select an unallocated space, click the "Create" button, set the size of the future "Disk C". After its creation, free unallocated space will remain, which will need to be converted into the second disk partition in the same way.

After creating the second partition, it is recommended to select it, click "Format" (otherwise it may not appear in Explorer after installing Windows 10 and you will have to format it and assign a letter through "Disk Management"). Then select the volume that was created first, click the "Next" button to continue installing the operating system on drive C.
Programs for partitioning disks into partitions
In addition to the built-in Windows tools, there are many programs for working with partitions on disks. Some of the best free programs are Aomei Partition Assistant Free and Minitool Partition Wizard Free.
First you need to download the Aomei Partition Assistant program from the official website, install it on your PC and run it. The application has a Russian language, we select a non-system drive, in our case it is "E".
Right-click on it, click "Resize Partition".


The selected amount of memory will appear, in our case - 15 GB.
Right-click on the system local drive C, select "Resize partition" from the context menu.

Again, drag the slider to the right to the desired size, or set the desired space for expansion in the "Unallocated space after" field. A warning will appear to make a Windows 10 system recovery image or backup using third-party tools, click "OK". To save the changes, click "Apply" in the upper left corner.

A message will appear that there will be several reboots, during which drive C will merge with unallocated space, select "Go". A message will appear that the program will work in PreOs mode, click "Yes".
Windows 10 will restart.
The first boot will start AOMEI Partition Assistant PreOS Mode.
The task execution process will start.
Hello everyone today I want to tell you how compress volume in Windows Server 2008 R2. Shrinking a Windows volume means freeing up free space from the local drive and turning it into unallocated space. This may be required when, for example, you want to make two local disks, one for the system and the second for data, it is very important when you want to reinstall Windows with all your information saved, without the need to transfer it to external media.
This method of compressing a local disk is suitable for absolutely any Windows versions from Windows 7 to Windows 10 to Windows Server 2012 R2 and Windows Server 2014 R2. To solve our problem, the Disk Management snap-in will help us. Open Start-Administrative Tools-Disk Management.

Go to the Disk Management snap-in. We see a list of local drives that you have in your operating system..

An even easier way to open the Disk Management snap-in is to press Win+R and type diskmgmt.msc.

I have a G drive with 40 GB files.

Go to the snap and right click on the G drive that we want to compress. We choose to compress the volume.

We see the allowable size of the compressible space, I want to compress by 20 GB.

Compression will begin, and we see that unallocated space has appeared, which we can use to create a new disk or expand another.
We check disk G and see that all files are alive and the disk size has decreased by 20 GB. I want to note that it will not work with the C: \ system drive, in view of the specifics of the operating system, but you can use additional utilities.

This is how easy it is to shrink a volume in Windows Server 2008 R2.
In the days of my youth, it was almost the most appealing function to it - disks of 7 - 20 GB could not contain all the necessary information. And that's what compression is for: freeing up space on your hard drive. When you compress a file or folder, the data is overwritten using a special Windows algorithm and takes up fewer clusters after the operation. When you access the file in the next session, the system reverses the process before you can see even a bit of the information you need. And this, as you know, takes time and resources of the system.
The file compression feature has been part of Windows since the advent of Windows. disk cleanup utilities. But since the time of Windows 7, it has migrated into a separate stream: the developers considered that there were fewer problems with the lack of computer space, and compressing a huge number of files greatly slows down the functionality of Windows: when this function was activated, the system compressed all the files in a row, which means there could be vital parameters that are immediately accessed during the current session ... Now freeing up space is easy with the help of other utilities that work in the other direction, and / or by swiping. In the end, any archiver program can do much more than the described function. However, it is, let's get to know it.
By the way
The function and approach to compression in Windows 10 has seriously changed and, it seems (so far, at least) in a much better way. But about this in a separate article.
A couple of paragraphs of theory ...
The NTFS file system uses the “ compression unit” to determine the degree of splitting, granularity of the byte range stream, as well as their alignment or grouping into blocks. The size of this very unit depends only on the size of the cluster in the NTFS system. Until the last moment, the following table is used to calculate the cluster size:
As you can see, starting from a certain moment, exceptions begin: “native” NTFS compression stops working on volumes and partitions whose cluster size is chosen to be more than 4 KB. For sizes over 8 KB, compression is used to sparse files. Such files are another strong point of the NTFS file system, which allows applications to create files of very large sizes, which, oddly enough, can exceed the size of the parent directory. This is because the lion's share of the contents of such files (and sometimes completely) is filled with zeros or null strings. At the same time, the file system does not provide logical clusters for such chains. And NTFS only creates a “pointer to where to fill the virtual number of clusters”. And what about the compression? NTFS, working on compressing a file or folder, separates the data stream in the same way. In this case, the compression process for each file is individual; the degree of compression and subsequent operations with the file are very dependent on its actual size.
Compressing files and folders
The function is available from the context menu by right-clicking on the desired file/folder. She's here:

We activate the function, the compression has begun. After that, it will be possible to force Windows to highlight compressed files. It's easy to do the same with a whole disk. We will find in windows explorer list of volumes and also call the context menu with the right mouse:

Compress disks and files. What do you need to know?
- Compression is ONLY available for the NTFS file system
- If the file is moved from ordinary folders in compressed OTHER DISK folder, it also goes through the compression procedure
- If the file is moved from ordinary folders in compressed folder on the SAME DISK, compression is canceled and the file/folder returns to its original size
- Files compressed using NTFS compression cannot be encrypted: duplication of procedures in any form in Windows is excluded, and therefore ...
- Compressing an already compressed file will not work either)))
- Do not confuse with archiving (in zip, rar, etc.)
Compression. What can not be done.
As you have already understood, Windows compression is not a feature to play around with. However, understanding the compression function (at least within the paragraphs at the top of the article) can help you determine the root of the errors that have appeared. The most typical of them, and this may be the fault compression functions:
- Not enough disk space. This error can lie in wait for you exactly at the moment of copying a file / folder or at the stage of creating a backup
- Error copying large files to a compressed folder
- Compressed VHD virtual disk files slow down virtual machine performance
Do not compress the disk with the operating system installed on it! System disk FROM: cannot be subjected to this procedure. Most often, device drivers suffer from this, refusing to start a whole set of devices that just seemed to work. After the compression procedure is completed, the operating system in the new session will most likely no longer boot. But if - I don't know what made you - you decide to do it, do not touch at least root directories.
After compression, the system does not boot ...
If I am late with advice, and you have already encountered a failure to start the system after compression, be aware that those few, but archival files for booting the system, turned out to be compressed. And during system startup, the “de-compression” procedure is not provided. As a result: the system does not start or Windows is constantly restarting. Possible type errors
“Some kind of file” is compressed
Press Ctrl+Alt+Del to restart
In such cases, I always use the universal option - this is an external box with a hard drive installed inside, on which a whole bunch of Windows boot disk images of any model and bitness are always ready: from Windows XP to Win10 32 and 64. And I'm not worried about countless disks and flash drives.
Read: 7 455