How to install a Joomla template - Troubleshooting. How to install your template on ucoz - A program that you did not know about, we are learning to connect! We also choose a niche How to download and install templates for joomla
How to Install a Joomla Template - Troubleshooting - 4.5 out of 5 based on 2 votes
Choosing, installing and configuring a template is one of the most important steps in creating a Joomla site.
In this tutorial, we will look at how to install a Joomla template, what are the ways to install Joomla templates, and how you can solve some problems that may arise when installing a template.
Before we start looking at the ways and features of installing a Joomla template, I will give you a couple of tips.
#1. After you, make sure that the template is in this archive, and it has everything you need to install it. For automatic installation, it is necessary that the archive with the template has the ZIP extension, and inside it, there must be files:
templateDetails.xml - which contains parameters for setting the template;
index.php - contains the entire structure of the template.
In addition, make sure that the archive contains folders:
css - contains style files;
images - contains the images used for the template.
These are not all files and folders that may be present in the template. The set of files and folders depends on the template, here are only those without which the template cannot work. It often happens that the archive you downloaded contains several more archives, therefore, according to the above signs, you need to determine which of the archives is a template and extract it for subsequent installation.
#2. In order to select the required template, it is best to install demo data, or create several sections, categories, menus and materials so that your site has at least some kind of look. It's just that if you install a template on Joomla, which does not have a menu, materials and necessary modules, then you will not be able to see how this template looks like. Therefore, I advise you to install Joomla with demo data, specifically to select a template, and then, after you decide on a template, install a clean Joomla and a selected template, and start creating the necessary elements.
There are several ways to install a Joomla template.
Installing a Joomla template using the standard Joomla installer.
To install the template using the installer, in the Joomla administration panel, select the item: "Extensions" >> "Install/Remove". Then, through the "Browse" button, find and select the archive with the theme, then click on the "Open" button.


Now click on the button: "Upload File & Install".

If everything is fine, then you will see the following message:

But that's not all, now you need to specify that this particular template should be used for your site. To do this, go to the item: "Extensions" >> "Template Manager" and from the list of templates presented there, select the one you want to use and click on the "Default" icon.

As a result, a yellow star will appear next to the template you have chosen.

After that, you can go to the site and see what it looks like.
Sometimes it is not possible to install a template using the installer. In most cases, this is due to the missing templateDetails.xml file or errors made in it. Therefore, if you failed to install the template in the first way, try installing it manually.
To do this, create a folder with the same name as the template archive and unpack it into this folder. After that, you need to move this folder to the following location: folder_with_your_site/templates. If your site is local, then just copy the folder, if hosted on the Internet, then upload the folder via FTP.
After moving the folder, go to the Joomla admin panel in the item: "Extensions" >> "Template Manager" and assign this template as the default.
There is another way to install templates, which for some reason, few people mention. This method will appeal to beginners who do not really understand how to customize the template. Some studios that release templates, in addition to the usual archive with a template, offer to use quick launch packages. A quick launch package is a regular Joomla distribution of a certain version, in which this template has already been implemented and all the necessary settings have been made, as well as all the necessary extensions have been installed if they are needed for the correct functioning of this template.
That is, you just have to install the proposed Jomla assembly with the already embedded template, as well as the usual Joomla, and as a result, you will immediately get a ready-made site using the template you need. You can find such templates on the section.
But there are two problems here that can be easily solved.
#1. All studios that produce such templates are foreign, so in this package, they provide the English version of Joomla. You can solve this problem by installing Russian localization for the front and administrative panels of Joomla. You can get localization by going to joomlaportal.ru. There, in the right sitebar, there will be links to download language packs.
#2. The second problem is that the theme will not always be integrated into Joomla. latest version, especially if the template was released a long time ago. To solve this problem, you can install this version of Joomla, and then update it to the required version. You can download update packages on the same joomlaportal.ru.
Now a little about the problems that may arise after you have installed the template and decided to see how it will look.
The thing is that the look of the Joomla template largely depends on the location of the modules, and therefore if they are located on your site differently than their location in the template was intended, then it will look different, or even clumsy.
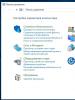
Who does not know, with the help of modules in Joomla, most of the information is displayed. There are modules that display menus, popular content, additional content, login form, etc. Each of these modules is published in a specific position. Therefore, in order to customize the template, you need to find out where and how the positions of the modules are located. You can see this by adding the following to the main site address: ?tp=1, for example: http://your_site.ru?tp=1 and pressing Enter. For example, applying this to a standard Joomla template, we get the following picture:

Another way to find out the location of the modules is to go to the Joomla admin panel in the item: "Extensions" >> "Template Manager" click on the required template from the list and click on the "View" icon.
Everything before the curly braces, i.e. top, left, user3, user2, etc., is the module position that must be specified for each module.
Now, having looked at how the modules are arranged in the template demo, and comparing them with the position in which each of the modules should be, you need to change the positions for certain modules.
To do this, in the administrative panel of Joomla, go to the item: "Extensions" >> "Module Manager" select the required module and from the drop-down list: "Position" select the desired position, then save the settings.

In some templates, it is possible to change various template parameters. To check if your template has this feature, go to the Joomla admin panel in the item: "Extensions" >> "Template Manager", select the desired template and click on the icon: "Edit".
As a result, on the loaded page, on the right, the block will be displayed: "Parameters" where various settings can be placed. You can change these settings and see how the look of your site will change. Often, with the help of such settings, you can change the template width, color, fonts, the width of individual blocks and solve certain problems with the display of the template.
This installation method can be used if you already have an existing Joomla and just want to change the look and feel of your site with a template.
1. Open the Joomla control panel and go to the menu "Extensions > Extensions Manager".

2. Using the button Package File (Theme File) "Browse" find the file "theme###.zip" in folder joomla template. Click the button to install the Joomla template.

3. Install all modules from the folder 'sources_XXX.zip'(this folder must first be unzipped according to the instructions in the file 'info.txt').
4. The next step is to install demo data.
To install demo data, follow these steps:
Step 1. Download demo images.
Connect to the server using an FTP client. To download a demo image, open the folder "sources" in template.
Here is the folder "to_the_root_directory", which contains the files to be placed in the Joomla root folder.
Step 2 Import SQL file.
The last and most important step in setting up the demo data is to import the SQL file using the database management tool (phpMyAdmin ).
SQL file - dump. sql» is in the folder "sources" template.
DO NOT import the SQL file if you have a live website, as it will completely overwrite existing data!
Note: Before importing the SQL file, make sure that the prefix of the database tables matches the prefix in the SQL file.
The table prefix can be checked directly in the database through the database management tool. Notice the table names. The prefix is the set of characters before the table name. ( for example, in the "jos_assets" table, the prefix is "jos_"). Also, the database prefix can be found in the "configuration.php" file in the Joomla root folder. Line 19: public $dbprefix = "jos_"; ( where "jos_" is the prefix)
If the table prefixes do not match, open the "dump. sql" in a text editor and using Find and Replace (shortcut CTRL+F or CTRL+H), replace the prefix "jos_" ( in SQL file) database prefix. You can also follow the detailed video tutorial on how to change prefix in SQL file.
or how to import SQL file using phpMyAdmin tool
Refresh your browser window. Send us an inquiry if you have any questions.
Hi all!!! In today's article, we will consider installing a template on the joomla 3 engine. And also talk about the most common mistake that beginners make when installing a template on joomla 3.
After installing joomla 3 on denver , work on creating a site is just beginning. And one of the first steps is to install the template. I want to be honest that in the installation, there is nothing complicated. But the search for a template that is suitable in design and functionality can take more than one day. Before you start searching, you need to learn how to install a template. To immediately check it in work.
Installing the joomla 3 template. The downloaded template is in most cases archived. And it looks like this. Frequent The mistake of beginners is that they immediately try to install this template. Naturally, nothing comes out: (The thing is that there are several more archives in this archive. And first you need to unzip it into a separate folder.
Now we see these four archives, there may be more or less of them. It all depends on what the developer provides with the template.
The first two archives contain a template with demo data for joomla 2.5 and 3.1. Ask how I found out, everything is simple from the name: "yoo_square_demo_package_j25" where " demo_package" means demo package, and " j25" means for version joomla 2.5. But the third and fourth archives are pure templates. For joomla version 3, you need the last one with "j31" at the end. Also pay attention to the weight of the archive, the first two weigh about fifteen megabytes, since in the whole site is packed in it, and the third and fourth are only one megabyte each, which means that they are clean.
So, we have the necessary archive with the template, I highlighted it in a green frame. Now let's go to the admin.
1. Extensions > Extension Manager: 
2. Next, click "choose file", and find the archive with the required template on the computer.
3. After you have chosen the archive with the template, you must click "download and install". 
If everything was done correctly, a message should appear: Template installation completed successfully.
4. After installation, the template must be activated. That is, make it the default template. To do this, in the admin panel, go to: Extensions > Template Manager. 
5. Here you will see the template you installed. To make it the default, just click on an asterisk in front of him.
Now you can open your website and see what your new template looks like!
As you can see, there is nothing complicated in installing a template on joomla 3. This is the time to end the article. Read also editing joomla 3 template. All good mood and success in creating your site.
Installing a custom template
The best way to install a custom template is to use the installation instructions that come with the template. If not, then use our universal instructions.
Installing a template consists of several steps:
Uploading files to the site
The first step is to upload the files that come with the template to the site. It is important to observe the nesting of files in folders. So, all images can be in the folder img, and the scripts are in js.
To create a folder, use the Add Folder button:
Drag the files to the download area and wait for it to finish. When all the template files are uploaded to the site, you can proceed to the next step.
Installing the site skeleton
Allows you to generate a homogeneous structure for all sections of the site. It is usually supplied in .txt files and may have an arbitrary name ("Framework.txt", "Template Builder.txt", "tmpl.txt", etc.).
In some cases, the site frame of the template may be missing, then you can proceed to the next step.
The site framework has its own unique variables that will help distinguish it from other template files:
Try searching for a string or . If they are found in the text, then most likely this is a wireframe file.
To install the frame, go to the "Design" section, select "Framework" in the menu on the left, paste the code from the text file, click the "Save" button and confirm the action:
You will see a message that the operation was successful. So you can move on to the next step.
Installing site templates
Each site module contains its own unique templates that are responsible for displaying pages. Depending on the set of connected modules, the number of templates required for installation may vary.
Templates are delivered in text files and to place them on the site, you just need to copy the contents of the file into the template editor of the corresponding module. Go to the "Design" section, select "Editor" in the menu on the left. Find the template you want to add code to and copy it into the editor. Save your changes.
Repeat this step for all text files that come with the template. When you're done, move on to the next step.
Don't be discouraged if some file is missing from the supplied template. This may mean that the developer has provided customization of the template using the framework.
Setting up modules and extensions
It is not always necessary to repeat this step when installing a template. It may also be that at this stage the template is installed completely and the installation can be completed.
Publication date: 01/09/2016
Greetings, dear readers of the site! 🙂
With this article, we continue the series of publications dedicated to self-creation.
As a general information, let me just remind you that this product is included in the top 10 free engines for creating online stores and is one of the best solutions for quick start small resources, without requiring the creators of any special skills and knowledge.
So, in my previous article, I helped you get past the first step in getting the engine installed. As a result, you already have a ready-made online store, which remains to be configured so that the resource is more complete and attractive to customers.
And the first step on this path that we will overcome is installing an OpenCart template.
There are a lot of templates today - both paid and free. In this situation, as usual, there are pluses and minuses 🙂 On the one hand, there are plenty to choose from, and on the other, your eyes run wide.
To the complexity of the choice is added the fact that the template (aka "theme") is desirable to choose one, because. due to the peculiarities of installing the OpenCart template, it will be problematic to remove it from the store later. And when installing a lot of themes, they can lead to crawling errors in the storefront and conflicts in its work.
How not to get confused in this variety and choose the right one?
To answer this question, I decided to compile a small list of criteria that will help you in choosing.
And in the second part of the publication, we will talk about how to install the OpenCart template and activate it.
Choosing a resource for installing an OpenCart template - 5 options
Before considering the criteria for choosing a template for Opencart, I want to say a few words about how to choose the right resource from which to download.
The choice of a resource for downloading should be approached no less responsibly than when choosing the template itself, because. on some of them, you can download virus-infected files or fragments may be introduced into the product code that allow their developers to hack or harm your resource.
These situations when installing OpenCart themes, modules and other extensions, unfortunately, are not uncommon and are especially common in the case of free products.
Therefore, be sure to search the Internet with an antivirus enabled, which will help you weed out potentially dangerous resources. When downloading files, pay attention to the size and extension.
If the size is suspiciously small (a few bytes) or has a non-standard extension, then it is better to refuse such a file and look for something similar elsewhere. The modules themselves, in most cases, the files are packed in rar or zip archives, so everything else - .exe, .xyz, .something short - is a potential virus software that must be removed immediately.
Well, it will also not be superfluous to scan the downloaded files with an antivirus.
However, even these measures will not help protect against malicious files by 100%. Sometimes, unintentional or intentional errors in the code of the modules themselves can cause very serious consequences - up to the loss of information and control over the resource. The antivirus does not recognize this kind of danger.
However, you can also protect yourself from this by downloading OpenCart templates from resources where files are manually moderated. At the same time, add-ons can even be free 🙂
These resources have been personally verified by me. I actively used and continue to use them, downloading and uploading my developments to them, so you can safely use them 🙂