Ability to use dynamic content with php. PHP. Dynamic page creation. Project: page generator
Last update: 1.11.2015
Now we will create a small site, which is designed to give an initial understanding of working with PHP.
To create programs in PHP, we need a text editor. The most popular program today is Notepad++.
Let's move on to the previously created directory C:\localhost , which will store all the site's documents. Let's create a text file and name it index.html. Open it in a text editor and add the following code to it:
Enter your details:
The html code contains a form with two text fields. When the button is clicked, the form data is sent to the display.php script, as it is specified in the action attribute.
Now let's create this script that will process the data. Add to folder c:\localhost new text file. Let's rename it to display.php. By default, php program files have the extension .php. So let's add the following code to the display.php file:
Here already in the html markup there are blotches of PHP code. Tags are used to add PHP expressions to a page, between which there are instructions in the PHP language. In the php code, we receive the form data and display it on the page.
Each individual PHP expression must end with a semicolon. In this case, we have three expressions. Two of them receive the submitted form data, for example $name = $_POST["firstname"]; .
$name is a variable that will hold some value. All variables in PHP are preceded by a $ sign. And since the form on the index.html page uses the POST method to submit, we can use the $_POST["firstname"] expression to get the value that was entered in the text field with the attribute name="firstname" . And this value gets into the $name variable.
With the echo statement, you can display any value or text that comes after the statement on the page. In this case (echo "Your name: ".$name . " " . $surname . ""), using a dot, the quoted text is concatenated with the values of the $name and $surname variables and displayed on the page.
Now let's turn to the input form by going to the address http://localhost:8080:
Enter some data and click on the submit button:
So, the script worked for us display.php, which received and displayed the submitted data on the page.
There are a huge number of websites on the Internet. All these sites can be divided into two types: static and dynamic. Today we will talk about creating dynamic pages, but first I would like to tell you what a static and dynamic site (page) is.
Static sites
Static sites are made up of static web pages. This means that no matter what the user does, the page always looks the same. Such pages are stored on the server as HTML documents. make up static pages manually. If you need to change the content of a page, then you have to edit the HTML code for each page.
Advantages:
- Simplicity and cheapness of creation, undemanding to hardware resources;
Flaws:
- Large time spent on editing content;
- Not suitable for large projects.
Dynamic sites
Dynamic sites consist of dynamic web pages that can respond to user actions and change. Such pages are formed by the web server from several files (templates). All information is stored in a database. When a user requests a page, the relevant information is retrieved from the database, inserted into the template to form the web page, and sent by the web server to the user's browser. Thus, when updating the content of the site, you just need to add the text for the new page, which is then inserted into the database using a certain mechanism.
Advantages:
- Content management is done through special forms where you can easily add, edit and delete information;
- Maximum efficiency when adding new content to the site;
- When adding or editing content, no special knowledge of web-mastering (HTML, CSS) is required;
- Ability to create large multifunctional projects;
- Great opportunities for promotion.
Flaws:
- High cost of creation and maintenance;
- You need to have the appropriate knowledge to maintain the performance of the site.
Now I think you understand that it is best to make a website using dynamic pages. it is the best and convenient choice. Well, now let's talk about creating dynamic pages.
Simple Links
Before studying PHP language I think you should already know HTML and of course creating hyperlinks. I would like to remind you:
$link = "example.php"; print"<а href = \"$link\">An example of a dynamic hyperlink.
\n"
This is how easy it is to create a dynamic hyperlink using the php language.
The process of creating a dynamic page
The process of creating a dynamic page consists of several stages:
Laying out the frame of the page. Let's call the page index.php - it will consist of parts: header (header), footer (footer), left menu(leftmenu). In this example, I will show how a table-based page is laid out, but you can also use a block verst.
1. Forming a file header.php.
Site header |
2. We form a file leftmenu.php.
- Link 1
- Link 2
- Link 3
- Link 4
- Link 5
3. We form a file footer.php.
Site Footer |
Create a folder called template to which you will copy the resulting files. If you need to edit the header, left menu or footer of the site, you will know that the templates of these parts of the site are in this folder.
Let's connect the received files (templates) to the site using the include statement on the example of the index.php page.
Hello!This is the first dynamic page in PHP. |
This is how the index.php page is a dynamic page, it will be formed from several files (templates). You can make any number of such templates. If you need to change any part of the site, just find the desired template file and edit it.
This completes the creation of dynamic pages. I think you understand the meaning and practicality of dynamic sites and based on my example, you can create a large project. And don't forget to comment your code - it's very important friends! Good luck to you!
P.S. Small changes from 07/06/2019:
Since programming is always evolving, therefore, it must evolve at the speed of light. The tabular layout shown above is little used in practice nowadays and is only necessary for studying by novice programmers.
If you want to create new and effective websites, then we recommend using block layout instead of tabular layout. Let's consider in more detail.
Tables were invented specifically for displaying tabular data, and not for marking up page elements. What is in the table:
| text |
can be represented as a block (div) layout:
it takes up much less disk space.
Consider the advantages of block layout compared to tabular:
- A significant reduction in page size, usually 2-3 times, which significantly reduces the loading time of the website. At the same time, the size of the file will increase slightly, but due to the fact that it is cached once by the user's browser and is read from his computer when accessing other pages, as a result, the site loads much faster than a tabular one.
- It is much more convenient to change the design of the site pages, rendered in a CSS file. In this case, there is practically no need to edit the -code.
- Thanks to the possibilities of block layout, it is possible to ensure that the main content of the page goes first in the code, and only then the header, left and / or right columns. The appearance of the page will not change at all.
- The transparency of the block page code is visually pleasing - there are no heaps of tags, everything is very beautiful and compact.
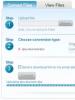
Hello! Now we will try to implement the simplest registration on the site using PHP + MySQL. To do this, Apache must be installed on your computer. How our script works is shown below.
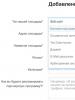
1. Let's start by creating the users table in the database. It will contain user data (login and password). Let's go to phpmyadmin (if you create a database on your PC http://localhost/phpmyadmin/). Create a table users, it will have 3 fields.

I create it in mysql database, you can create it in another database. Next, set the values, as in the figure:
2. A connection to this table is required. Let's create a file bd.php. Its content:
$db = mysql_connect("your MySQL server","login to this server","password to this server");
mysql_select_db ("name of the database to connect to", $db);
?>
In my case it looks like this:
$db = mysql_connect("localhost","user","1234");
mysql_select_db("mysql",$db);
?>
We save bd.php.
Great! We have a table in the database, a connection to it. Now you can start creating a page where users will leave their data.
3. Create a reg.php file with content (all comments inside):
Registration
4. Create a file, which will enter data into the database and save the user. save_user.php(comments inside):
{
}
//if the login and password are entered, then we process them so that tags and scripts do not work, you never know what people can enter
// remove extra spaces
$login = trim($login);
$password = trim($password);
// connect to the database
// check for the existence of a user with the same login
$result = mysql_query("SELECT id FROM users WHERE login="$login"",$db);
if (!empty($myrow["id"])) (
exit("Sorry, the username you entered is already registered. Please enter another username.");
}
// if there is none, then save the data
$result2 = mysql_query ("INSERT INTO users (login,password) VALUES("$login","$password")");
// Check if there are errors
if ($result2=="TRUE")
{
echo "You have successfully registered! Now you can enter the site. Main page";
}
else(
echo "Error! You are not logged in.";
}
?>
5. Now our users can register! Next, you need to make a "door" to enter the site for already registered users. index.php(comments inside):
// the whole procedure works on sessions. It is in it that the user's data is stored while he is on the site. It is very important to launch them at the very beginning of the page!!!
session_start();
?>
Main page
// Check if the login and user id variables are empty
if (empty($_SESSION["login"]) or empty($_SESSION["id"]))
{
// If empty, we don't display the link
echo "You are logged in as a guest
This link is only available to registered users";
}
else
{
In file index.php we will display a link that will be open only to registered users. This is the whole point of the script - to restrict access to any data.
6. There is a file with verification of the entered login and password. testreg.php (comments inside):
session_start();// the whole procedure works on sessions. It is in it that the user's data is stored while he is on the site. It is very important to launch them at the very beginning of the page!!!
if (isset($_POST["login"])) ( $login = $_POST["login"]; if ($login == "") ( unset($login);) ) //put the login entered by the user into the $login variable, if it is empty, then we destroy the variable
if (isset($_POST["password"])) ( $password=$_POST["password"]; if ($password =="") ( unset($password);) )
//put the password entered by the user into the $password variable, if it is empty, then destroy the variable
if (empty($login) or empty($password)) //if the user has not entered a login or password, then we issue an error and stop the script
{
exit("You did not enter all the information, go back and fill in all the fields!");
}
//if the login and password are entered, then we process them so that tags and scripts do not work, you never know what people can enter
$login = stripslashes($login);
$login = htmlspecialchars($login);
$password = stripslashes($password);
$password = htmlspecialchars($password);
// remove extra spaces
$login = trim($login);
$password = trim($password);
// connect to the database
include("bd.php");// the bd.php file should be in the same folder as everyone else, if it's not then just change the path
$result = mysql_query("SELECT * FROM users WHERE login="$login"",$db); //retrieve all data about the user with the entered login from the database
$myrow = mysql_fetch_array($result);
if (empty($myrow["password"]))
{
//if the user with the entered login does not exist
}
else(
//if exists, check passwords
if ($myrow["password"]==$password) (
//if the passwords match, then we start the session for the user! You can congratulate him, he entered!
$_SESSION["login"]=$myrow["login"];
$_SESSION["id"]=$myrow["id"];//this data is very often used, so the logged in user will "carry" them
echo "You have successfully logged into the site! Main page";
}
else(
//if passwords don't match
Exit("Sorry, the login or password you entered is incorrect.");
}
}
?>
OK it's all over Now! Maybe the lesson is boring, but very useful. Only the idea of registration is shown here, then you can improve it: add protection, design, data fields, upload avatars, log out of your account (for this, simply destroy the variables from the session with the function unset) and so on. Good luck!
Checked everything, it works fine!
Create a file called hello.php in the root directory of the web server (DOCUMENT_ROOT) and write the following into it:
Example #1 First PHP script: hello.php
"
Hello World!
" ; ?>Open this file in a browser by typing in the name of your web server and /hello.php. When developing locally, this link might be something like http://localhost/hello.php or http://127.0.0.1/hello.php, but it depends on your server settings. If everything is configured correctly, this file will be processed by PHP and the browser will display the following text:
hello world
This program is extremely simple, and you don't even need to use PHP to create such a simple page. All she does is inference hello world using PHP statement echo. Please note that the file does not have to be executable or otherwise different from other files. The server knows that this file should be processed by PHP because the file has a ".php" extension, which the server settings say such files should be passed to PHP. Think of it like a regular HTML file that is lucky enough to have a set of special tags (available to you too) that can do a lot of cool stuff.
If this example does not display anything for you or displays a download window, or if you see this entire file in text form, then most likely your web server does not have PHP support or was configured incorrectly. Ask your server administrator to enable this support. Offer him installation instructions: the Installation section of this documentation. If you are developing PHP scripts at home (locally), then also read this chapter to make sure you have everything set up correctly. Also make sure you are requesting the file from the server via the http protocol. If you just open the file from your file system, it will not be processed by PHP. If problems still persist, feel free to ask for help from one of the PHP Support Receipts.
The purpose of the example is to show the format of PHP special tags. In this example we used as the opening tag, followed by PHP commands ending with the closing tag ?> . Thus, you can "jump" and "jump" anywhere from PHP mode to HTML file. You can read more about this in the Basic Syntax section of the manual.
Comment: A note about newlines
Line breaks mean little in HTML, but it's a good idea to keep HTML readable by wrapping it on a new line. PHP automatically removes newlines immediately after the end tag ?> . This can be extremely useful if you are using many blocks of PHP code or including PHP files that should not output anything. At the same time, it can be confusing. You can put a space after the closing tag ?> and then the space will be output along with the newline, or you can specifically add a newline to the last echo/print call from the PHP code block.
Comment: A few words about text editors
There are many text editors and integrated development environments (IDEs) where you can create and edit PHP files. For a list of some editors, see » List of PHP editors. If you would like to recommend an editor, please visit this page and ask for an editor to be added to the list. Using an editor with syntax highlighting can be a great help to your work.
Comment: A few words about word processors
Word processors (StarOffice Writer, Microsoft Word, Abiword, etc.) are in most cases not suitable for editing PHP files. If you still want to use either of these for your test script, make sure you save the file as plain text(plain text), otherwise PHP will not be able to read and run your script.
Comment: A few words about Windows Notepad
When writing PHP scripts using the built-in Windows Notepad, you must save files with a .php extension. (Notepad will automatically add the .txt extension if you don't take the following steps.) When prompted for a filename when saving a file, type the filename in double quotes (for example, " hello.php "). In addition, you can click on the dropdown menu " Text Documents" in the save file dialog box and select "All files" in it. After that, you can enter the file name without quotes.
Now that you've successfully created a working PHP script, it's time to create the most famous PHP script ever! Call a function phpinfo() and you'll see a lot of useful information about your system and setup, such as available predefined variables, loaded PHP modules, and setup options. Take some time to study this important information.
Example #2 Getting system information from PHP
Many readers in any book about computers will skim through everything that is not of immediate interest and go on to what they really want know. Personally, I do exactly that. However, there is nothing to worry about - rarely there are technical books that need to be read from cover to cover. Or maybe you did exactly that - skipped the eight initial chapters and took up this chapter because it had the most interesting title? And who wants to waste time on details when another project is on fire at work?
Luckily, this haste won't stop you from getting the hang of the second part of the book, which is about using PHP to build websites and interact with the Web. In this chapter, you will learn how to easily modify the content of web pages and navigate the Web using links and various standard functions. The next chapter will complement the material presented - it discusses in detail the means of user interaction in HTML forms. Chapter 11 describes the organization of the interface with databases. The rest of the chapters in Part 2 cover the non-trivial aspects of web programming in PHP.
However, it should be remembered that the material of part 1 absolutely essential for normal knowledge of PHP. It is assumed that you have read the first part, so the examples will use many of the concepts discussed earlier. So, if you have skimmed through part of the book, you will have to go back to previous chapters from time to time and catch up.
Simple Links
<а href = "date.php">
$link = "date.php";
print"<а href
= \"$link\">View today's date
\n"
You might be wondering why there is a backslash (\) before quotes (") in the link code? This is because quotes are special characters in PHP and are used as string delimiters. Therefore, quotes are literal strings in strings. must be shielded.
If the need to escape quotes annoys you, just turn on the magic_quotes_gpc mode in your php.ini file. The result is all apostrophes, quotes, backslashes, and null characters. are automatically escaped in the text!
Let's develop the given example. To quickly display a list of links in the browser, you can use an array:
// Create an array of sections
$contents - array("tutorials", "articles", "scripts", "contact");
// Loop through and output each element of the array sequentially
for ($i = 0; $i< sizeof($contents; $i++)
print " ".$contents[$i]."
\n";
// - special designation of marker point endfor;
File components (templates)
We've come to one of my favorite PHP features. A template (as applied to web programming) is a part of a web document that you are going to use in several pages. Templates, like PHP functions, save you the hassle of copying/pasting fragments of page content and program code. As the scale of the site increases, the importance of templates increases, as they allow you to easily and quickly make modifications at the level of the entire site. This section will describe some of the possibilities that open up when using the simplest templates.
Typically, common pieces of content/code (i.e. templates) are stored in separate files. When building a web document, you simply "include" these files in the appropriate places on the page. PHP has two functions for this: include() and require().
include() and require()
One of the most outstanding aspects of PHP is the ability to build templates and programming libraries and then insert them into new scripts. The use of libraries saves the time and effort of using common functionality across different websites. Readers with
programming experience in other languages (eg C, C++ or Java), familiarity with the concept of function libraries and their use in programs to extend functionality.
Including one or more files in a script is done using the standard PHP require() and include() functions. As will be shown in the next section, each of these functions is used in a specific situation.
Functions
PHP has four functions for including files in PHP scripts:
- include();
- include_once();
- require();
- require_once().
Despite the similarity of names, these functions perform different tasks.
The include() function includes the contents of a file in a script. The syntax of the include() function is:
include (file file]
The include() function has one interesting feature - it can be conditionally executed. For example, if a function call is included in an if statement block. then the file is included in the program only if the condition i f is true. If the includeO function is used in a conditional command, then it must be enclosed in curly braces or alternative delimiters. Compare the syntax differences in listings 9.1 and 9.2.
Listing 9.1. Incorrect use of include()
if (some_conditional)
include("text91a.txt"); else
include("text91b.txt");
Listing 9.2. Proper use of include()
if (some_conditional) :
include("text91a.txt");
include("text91b.txt");
All PHP code in the include file Necessarily is in PHP tags. Don't assume that simply storing a PHP command in a file will ensure that it is processed correctly:
Instead, you must enclose the command in the appropriate tags, as shown in the following example:
print "this is an invalid include file";
The include_once() function does the same as include(), with one exception: it checks to see if the file has already been included before it is included in the program. If the file has already been included, the include_once() call is ignored, and if not, the file is included by default. In all other respects, include_once() is no different from include(). The syntax of the include_once() function is:
include_once (file file)
In general, the require() function is similar to include() -- it also includes the template in the file containing the call to require(). The syntax of the require() function is:
require (file file)
However, there is one important difference between the require() and include() functions. The file specified by the require() parameter is included in the script, regardless of the location of require() in the script. For example, if you call requirere() in an if block with a false condition, the file will still be included in the script!
In many situations, it is convenient to create a file with variables and other information that is used across the site, and then include it as needed. Although the name of this file is arbitrary, I usually call it init.tpl (short for "initializaion.template"). Listing 9.3 shows what a very simple init.tpl file looks like. In Listing 9-4, the contents of init.tpl are included in the script with the require() command.
Listing 9.3. Example initialization file
$site_title = "PHP Recipes";!}
$contact_email = " [email protected]";
$contact_name = "WJ Gilmore";
Listing 9.4. Using the init.tpl file
\"mai1 to:$contact_email\">$contact_name."; ?>
Passing a URL when calling require() is only allowed if the "URL fopen wrappers" mode is enabled (this mode is enabled by default).
As the size of the site increases, it may happen that some files are included in the script more than once. Sometimes this doesn't cause problems, but in some cases re-enabling the file resets the changed variables. If functions are defined in an include file, name conflicts can occur. With that said, we come to the next function, require_once().
The require_once() function ensures that the file will only be included in the script once. After a call to requi re_onse(), all further attempts to include the same file are ignored. The syntax of the require_onse() function is:
You'll likely use the file include functionality more often as your web applications grow in size. These functions are often used in the examples in this book to reduce code redundancy. The first examples are discussed in the next section on the principles of building basic templates.
Building Components
When defining the structure of a typical web page, I usually break it down into three parts: a header, body, and footer. Typically, most well-organized websites will have a heading that doesn't change much; the main part displays the requested content of the site, so it changes often; Finally, the footer contains copyright information and navigation links. The footer, like the header, usually remains unchanged. Don't get me wrong - I'm not trying to stifle your creativity at all. I've seen a lot of great sites that didn't follow these principles. I'm just trying to come up with a general structure that can serve as a starting point for further work.
header
A header file (like the one in Listing 9.5) is present in almost every one of my PHP-enabled websites. This file contains
site-wide information, such as the title, contact information, and certain components of the HTML page code.
Listing 9.5. Header File Example
// File: header.tpl
// Purpose: Header file for the PhpRecipes site.
$site_name = "PHPRecipes";
$site_email=" [email protected]";
$site_path = "http://localhost/phprecipes";
|
// Display current date and time print date("F d, h:i a"); It is quite common for visitors to restrict access to include files, especially if the files contain sensitive information (such as passwords). In Apache, you can prevent certain files from being viewed by editing the http.conf or htaccess files. The following example shows how to disable viewing of all .tpl files: order allow,deny Allow from 127.0.0.1 PHP and site security issues are covered in detail in Chapter 16. Running titleHeader (footer) is usually called the information located at the bottom of the pages of the site - contact details, links and copyright information. This information can be placed in a separate file and included as a template in the same way as a header. Let's say that with the advent of the new year, you needed to change the copyright information and bring it to the form "Copyright © 2000-2001". There are two ways: spend Christmas Eve feverishly editing hundreds of static pages or use a template like the one in Listing 9.6. One simple change and you can be back to holiday chores. Listing 9.6. Footer file example (footer.tpl)
|