How to fix bad sector. How to recover bad sectors of HDD. Fixing file system problems on your hard drive
The question that arises from users is how to restore HDD, in fact, you can allow it without the help of various computer wizards who offer to return your hard drive to a working state for a fee. Developers software offer several options for recovering broken sectors, which can be used by a person with almost any level of computer literacy.
What are bad sectors?
To understand what bad sectors are, you need to understand the order of work hard drive and organization of information storage.
The hard drive consists of several rotating magnetic disks, over which the reading heads move. When recording, these heads magnetize certain areas of the disk, writing information to them. The disk itself is divided into tracks, and they, in turn, into sectors.
If information from the disk cannot be read, it is considered broken. The cause of such a problem may be a power failure, physical wear of the disk, mechanical stress or overheating.
Depending on the cause, two types of unreadable sectors can be distinguished:
- Mismatch between recorded information and checksums at the end of the sector. It usually occurs when the power is turned off during an operation. A similar problem is solved by erasing incorrectly stored information and writing the correct checksums.
- Physical damage to the disk. A more difficult problem to resolve, resulting from mechanical impact on the hard drive or its overheating. In this case, bad sectors are transferred to the spare area of the disk, but if there are too many of them, then the data processing speed is significantly reduced.
In any case, it is worth trying to restore unreadable sectors, if only to make sure that the hard drive is completely inoperable and, with a clear conscience, replace it with a new storage device.
HDD Regenerator
First, let's figure out how to restore a hard drive using a simple but functional HDD Regenerator program. This utility works with hard drives at a low level, that is, it has exclusive access not only to sectors and hard drive clusters, but also to its mechanisms and controllers.
HDD Regenerator, unlike other similar utilities, does not block access to bad sectors, but tries to restore them by remagnetization.
Other programs simply block access to the sector, which leads not only to the loss of information stored on it, but also to a decrease in the size of the hard disk. Recovering deleted files after such a procedure is very difficult. Another question is that this approach allows you to quickly deal with an idle disk, but if you have a small number of bad sectors (up to 100), then it is justified to use the HDD Regenerator program. 
The latest versions of the utility are distributed for a fee, but you can use the demo version to get acquainted with the capabilities of the program. In addition, HDD Regenerator belongs to the type of programs, the payment for which is beaten off by their functionality and usefulness.
Working with HDD Regenerator
Download the utility to your computer from the official website. Install it on your computer and, if necessary, Russify (all the necessary files can be found in the public domain).
Russification applies only to the program interface. The DOS mode, in which the main work of the utility takes place, will still be presented in English, and this cannot be corrected.
After launching HDD Regenerator, you will see a window like this: 
To start testing and subsequent recovery of the hard drive, click on the top menu "Click to fix". You may see a warning on the screen that you need to reboot and configure the BIOS by setting the SATA controller to IDE mode. If these words don't mean anything to you, click No. This will not affect the performance of the program in any way.

In the next window, the program will display all hard drives connected to the computer. In the "Select disk" field, you need to double-click on the hard drive that you want to return to life, or select it and click the "Start" button. 
The utility will try to start DOS - a working environment through which direct access to the equipment is carried out. Since you are working with the program on a running system, a message will appear on the screen stating that HDDR could not gain exclusive access to the hard drive partitions.
To fix this error, close all applications and end the processes running on behalf of the user through the "Task Manager".
Click "Retry"; if the error reappears, restart your computer and try to end all running tasks again. 
Another way is to start the system in safe mode, marking it in the boot type selection menu (F8 key when starting the computer). In extreme cases, you can simply click the "OK" button, ignoring the warning. The program will continue to run, but its performance will decrease slightly.
Sector Recovery
In the DOS window that starts up, you will see several lines, the purpose of which must be said separately. In total, you will be offered four options for the program:

When you first start the program, it is recommended to select item number 2. To do this, press "2" on the keyboard, and then "Enter". The following window will appear, prompting you to select the scan order. You can specify a specific sector span, enter a disk size, or simply start testing from the beginning. 
If you have a rough idea of which section the bad sector is located in, then you can try to specify a specific interval. However, it is more convenient to start checking the disk from the beginning, so as not to miss anything. Such a scan will take much longer, but its result will be the most complete. 
After selecting the test mode, a disk check will start, during which the screen will display the number of checked and detected bad sectors. You can stop the scanning process using the Esc key.
The system may freeze during the check - this means that HDDR has found bad sectors and is trying to determine the extent of their damage.
After testing is completed, the trial version of HDDR will give you a message about the need to purchase a licensed copy of the program in order to continue disk recovery. You will be shown the number of detected bad sectors, based on which you can decide which is better - buy the full version of the utility or go straight to the store for a new hard drive. 
If you bought the full version of the program, connect a USB drive - you will need it during the sector recovery process. After starting the program, select the "Bootable USB flash drive" item and select the connected media. 
All data will be erased from the drive. Instead, the program will write its files to the USB flash drive, making it bootable.
When you boot into DOS, you will see the same windows as when working with the demo version. This time, you need to choose the first option - scanning and repairing sectors.
The recovery process itself can take a long time, so if you need to pause it, press the Esc key and be sure to wait for the prompt to exit the program. In this case, a program stop point will be written to the USB flash drive, from which scanning will start at the next start. Why these difficulties? In order not to sit in front of the computer for days, but to check it in several approaches. For example: recovery of 100 bad sectors may require several days of continuous HDDR operation.
Victoria
One of the most popular methods among users is hard drive recovery using Victoria. This program, unlike HDDR, is distributed under a free license.
Victoria can work both in Windows and in DOS mode, allowing you to view the SMART table, scan the disk surface for bad sectors, restore them, and also perform low-level formatting.
Training
Before proceeding to check the disk, you need to configure the hard drive controller in the BIOS. On the "Main" tab, set the "SATA Mode" parameter to "IDE". After that, you can start using the bootable Victoria flash drive. 
After booting from the drive in DOS mode, select the IDE channel you want to work with. To do this, press the P key and check the item "Ext. PCI ATA/SATA" (if the drive is connected via the SATA interface). For IDE drives, select the appropriate port. 
A list of channels will appear on the screen, which will be numbered in order. To select your hard drive, press the number that corresponds to its number, and then press Enter. 
You can also detect errors without scanning - just look at the SMART table of the hard drive. You can call it with the F9 key. Note two points in the table:

The more bad sectors, the less chance that the disk can be restored. However, you can try to restore it to working capacity by starting the scanning process.
To call up the disk scan menu, press the F4 key. Select "BB: Erase 256 sect" using the arrows on your keyboard and press Enter. The scanning process will start, which will be quite lengthy. You can stop scanning with the Esc key. 
When a sector is found, the program will try to erase it. If it is physically sound, then the attempt will be successful and you will get rid of the broken parts of the disk. In this case, the information will be deleted, but you should not worry much about this - it would still be problematic to pull it out.
If the sector is damaged at the physical level, then an attempt to erase it will fail. An error message will appear on the screen. However, this does not mean that you need to stop scanning the disk.
If sectors cannot be restored, try moving them to a spare area. Press the F4 key and use the arrows to select "BB: Classic REMAP". The scanning process will start again. This time, bad sectors will not be restored, but transferred to the backup area. 
After the disk scan is completed (provided that the sectors are restored), it is advisable to check the file system using the chkdsk utility.
A hard drive is a rather fragile device. Bad sectors are damaged cells for storing information on a hard drive. After some time of using the hard disk, a problem with bad sectors may occur. Therefore, it is so important to deal with the restoration of bad sectors from time to time.
This is easily done using various programs, but first you need to determine if there are bad sectors. About this, as well as how to restore the boot sector of a hard drive, our article.
How to repair bad disk sectors
There are many ways to recover bad disk boot sectors. Let's look at some of these methods in detail.
How to restore sectors through Windows
If it is possible to enter the OS, then restoring the hard drive will not require much effort. For this you need to call context menu hard drive and select Properties.
In the new window that opens, select the "Service" tab, where we click on the "Perform verification" item. Check the boxes next to "Automatically fix system errors" and "Check for and repair bad sectors." After that we start the check.
If the disk is a system drive, then a reboot will occur and the verification process will begin. If the drive is not a system drive, then the check will pass without rebooting.
The system itself will find all errors and carry out recovery. Then it will display the statistics of the work done.
But sometimes it happens that the OS does not boot due to bad sectors.
How to recover bad sectors if the OS does not start
If Windows does not start, then you can take a disk with a virtual system and load a virtual OS. In it, all actions for restoring a hard disk are performed in the same way as in the previous section.
If you do not have a virtual disk with the OS, then the installation will help Windows disk. After downloading it, you must select "System Restore". The recovery console will appear, where you need to select the local disk with your OS. This is usually the "C:" drive.
After the reboot, a console will appear where you need to enter the command "CHKDSK [drive:]", where:
- /F is a disk check and error correction,
- /R is a search and repair of bad sectors.
After that, press "Enter", wait for the recovery to begin. Then exit the console and restart the computer. All is ready.
How to restore sectors using programs
To repair bad sectors on a hard drive, there are many programs that can be easily downloaded from the Internet. Consider their principle of operation on the example of the HDD Regenerator program.
The program restores broken sectors by remagnetizing them again. This is achieved by creating a virtual flash drive.
After installation, run the program. In the window that opens, several options will appear in Russian. You can recover bad sectors both in the Operating System itself and using a flash drive or a regular disk from the console.
The program will check bad sectors (broken) and restore them. For the most efficient use of the program, it is better to use a bootable USB flash drive or disk that is created after installing the program.
Restoring bad sectors will help extend the life of your hard drive and even recover some previously lost files. However, you should remember that this is a responsible and rather risky business, since by clicking on the wrong buttons, you can completely ruin your hard drive. Follow strictly the instructions provided in this article and you will be able to recover some bad sectors. Before starting work, select the software with which you will restore sectors. There are many convenient programs for you to choose from: Victoria, HDAT2, HDDregenerator.
How to repair bad sectors of a hard drive using HDAT2
Working with this utility implies the presence of a boot disk or a bootable flash drive. How you can write them down, you will learn in another article. You must have Daemon Tools or Ultra ISO installed on your computer.
- Download the HDAT2 program from the official website https://hdat2.com.
- You need a "CD/DVD Boot ISO" partition.
- Download the latest version, which comes in ISO format, not SFX.
- Find your file in the downloads folder and open it with Daemon Tools or other image mounting software.


- Take a blank disc and click on the "Burn image to disc" field.

Please note that all your further work with this utility will take place entirely in BIOS. Read the fields you click on carefully.
- First, turn off your computer and enter the BIOS. Each brand of computer has its own login buttons. Try holding F12 or F7, or better yet, read about it on the Internet.
- After entering the BIOS, select the system boot method - CD / DVD, and then enter the HDAT2 command, as in the screenshot below.


- After that, you will see a menu with hard drives that are connected to your computer. If he is alone, then you should not have any problems with the choice. Click on your hard drive and press Enter.
- In the window that appears, select the line “Hidden areas menu”.


- Now test your computer for bad sectors. Even if you know their exact number, you still have to run the test, as the program needs it to further fix the problem. Click “Powerful test READ/WRITE/READ/COMPARE”


- That's all. Click on the very first line, as shown in the screenshot, to repair your sectors. Keep in mind that this will take quite some time, so you can move your laptop aside and go about your business. As soon as the program finishes working with Bad sectors, do not forget to return the system boot not from CD, but from the hard disk.

How to recover bad sectors of a hard drive using HDD Regenerator
Getting started with this utility, you can read a voluminous article about its work in order to roughly imagine the structure of the program: . The advantage of the utility is that you do not have to create a bootable USB flash drive or disk and go from under the BIOS. Experienced users note that this program actually fixes the problem by degaussing, and not just disabling bad sectors.
Download the program on the Internet, keep in mind that only its first use is free. If you want to treat broken sectors again, then you will have to buy the software.
Installing the program takes a matter of seconds.

Look carefully at the window interface:
- The left button "Bootable USB Flash" will help you create a bootable USB flash drive to work with the program in BIOS.
- The right "Bootable CD/DVD" creates a bootable disk for the same purpose.
- The topmost line allows you to work from under the Windows axis, which saves a lot of time.
Click on the top line.


Select your hard drive. The model, the amount of memory and all sectors will be written on it. Just double click on it.


Please note that all windows must be closed and all processes stopped. Only then can you start working with sectors - the hard disk must be unloaded as much as possible.
Select the second item in the menu that appears - “Normal Scan (with / without repair)”. This option repairs bad sectors right in the process of scanning all sectors of the hard disk. Please note that the mouse does not work in this program. You need to enter the number 2 and then press Enter.


Now you need the “Scan and repair” item to confirm your intention to fix all sectors. Enter the number 1.
You can also enter the number 3 to activate the “Regenerate all sectors” item. This option carries out the prevention of absolutely all sectors, even if they are not broken. This is more suitable for experienced users who can independently deal with possible problems during the regeneration process.


Now you have to choose the start of the scan:
- Item number 1 “Start sector 0” starts the scan and treatment from the very beginning.
- The second option “Start sector ***” continues the previous scan if it was interrupted for one reason or another.
- And the third item “Set start /end sectors manually” allows you to enter the range of checking sectors manually.
It is better to start from the very beginning by selecting the first item.


The process will start instantly, you just have to wait.


Bad sectors are found on almost all HDDs. Especially those that are actively used for a long time. Sometimes the problem gets out of control and turns into a real disaster, destroying all data on the HDD in any partitions. To prevent this from happening, learn how to repair bad sectors of your hard drive at home.
What are bad sectors and why do they appear?
You can imagine a bad block in the form of a book with the last chapter torn out. You can read it up to a certain point. But as soon as there is a gap in the pages, you will not be able to finish reading. The same goes for the HDD. The magnetic head reads information within the track, but in some area it encounters a damaged surface or an empty bit of information, which makes it impossible to extract the information to the end.
Almost all hard drives have broken partitions. It can be one or more, and in most cases it is not scary. But over time, there are more and more of them, and they make it more and more difficult to operate information on the HDD. Such areas can be identified by scanning the hard disk for bad sectors with special utilities.
There can be many reasons for the appearance of bad sectors:
- hitting the disc or using it in the wrong conditions;
- interrupt recording by turning off the power;
- overheating and temperature jumps;
- natural wear of the heads and writing disc;
- poor quality products.
You can immediately divide bad sectors into non-recoverable and recoverable. The first are those caused by shock or overheating. They are destroyed once and cannot be restored, and information, as a rule, disappears forever. The second type of bad sectors appears as a result of a break in the recording process. They can be reanimated by simply overwriting the disc.
Over time, write and read speeds may decrease. And after a slight fall of your laptop, the disk may even refuse to work. Everything would be really bad if there was no way to regenerate bad blocks in some way. The fact is that hard drives have a certain reserve area, which means a potentially larger volume than stated in the receipt. You can use the extra space to transfer content from damaged areas to it. How to recover bad sectors of a hard drive in this way is indicated below.
Danger is near
You can notice the problem not only after a hard drive failure, but also at the initial stages. You should be wary of the following signs:
- Decreased write / read speed of the disk;
- an unusual noise is heard when accessing the HDD;
- began to overheat;
- subjected to mechanical stress;
- the system often falls off, and at startup chkdsk starts on its own.
As a rule, these reasons indicate the beginning of the end of your HDD. In order not to lose data, the first good solution is a backup. Transfer all the necessary files to another computer, flash drive, disk, and if possible, set up synchronization with the cloud.
Most modern hard drives are checked for bad sectors themselves, without user intervention. This is both good and bad, since you cannot influence the elimination of bad blocks and find out about their appearance on system partitions.

When to scan?
You can scan the hard drive for errors at a certain frequency, which depends on the frequency of using the computer and is calculated individually. Someone conducts scheduled maintenance of the computer once a month, someone - once every six months.
To do this, you can use system utilities or programs to repair bad sectors of the hard disk. Scan should be performed as soon as the problems listed above are detected.
Scanning with standard tools
Starting with Windows 8, the system itself is able to scan disks on a schedule and thereby prolong the operation of the HDD. You can set up a scanning schedule at: "My Computer" / "Management" (a tab will appear in the main menu when the section is active). AT Windows check hard disk into bad sectors can be done with the standard chkdsk program. The utility can be launched in several ways:

The work is not fundamentally different, so consider the first option:
- Open command prompt as administrator. Right-click on the Start menu icon or just in the lower left corner on Windows 8 and select "Command Prompt (Admin)" from the list.
- If you want to scan a non-system drive, enter the chkdsk /f /r command to scan and fix the entire drive at once, and chkdsk D: /f /r to fix only partition D or any other of the existing ones. Additionally, you can enter the /x key to disable the scanned volume for the duration of the scan. In the case of diagnostics of a working disk, the program will prompt you to reboot in order to complete the work without logging in.
- If chkdsk finds errors in the partitions in use, it will offer to reboot and fix the sectors before the system starts.
Type help chkdsk to display all options. A list will appear showing all available keys with explanations. You can use any combination at your discretion, if you understand the essence of what is happening and the possible consequences. At the end of the scan, all data about the operation will be displayed in the log.
Third Party Programs
In addition to the built-in chkdsk, you can use third party programs. There are many software that can repair damaged partitions.
Among the popular free software, I would like to highlight Victoria. This program for recovering bad sectors of a hard disk is well known and at one time was very popular with masters. The Victoria program is able to work both in windowed and in DOS mode, which allows you to use it even on dead systems to recover information.

Victoria Interface
The program is perfect for recovering bad sectors of a hard drive. Victoria is intended rather for experienced users, since it practically does not contain an interface and does not even have a crack in the kit. But this does not prevent it from working correctly with hardware and file systems.
There are quite a lot of settings, switches and different numbers, and when you open the program for the first time, it can be difficult to navigate. But by following the instructions below, let's find out how to repair bad sectors on your hard drive.
Testing and analysis
In the Smart tab of this program, you can quickly assess the overall health of the drive. The score is set based on the analysis of the various values given in the table. You can also view the status of each parameter individually.

For simple testing, go to the Tests tab. There are quite a lot of settings in each section, so for the initial analysis, you can leave everything by default. Click on the Start button and wait for the test to complete. A full check of the hard disk for bad sectors takes a long time. Therefore, you can safely leave testing for the night and go to bed.
Additionally, the window contains a speed graph or color indication of sectors. You can switch the view with the Grid flag next to the timer.

Sector fix
If there is no time to wait for several checks, then after assessing the condition, you can immediately begin to treat the bad sectors of the hard disk. To rewrite blocks, Victoria uses the Remap method. It remaps the bad blocks to normal ones from the spare disk space. To remap bad sectors, do the following:

During the check, the log will display all the errors found and a report on the measures taken. It also indicates on which part of the disk problems were detected.
How to cut?
Often, bad partitions predominate at the beginning or end of the disk. The thought immediately comes to mind: “And if you don’t use space with broken sectors?” Yes, it can be cut off and not used again. You can find out which partition of disk space is better to cut off like this:

You should only work with the system disk in DOS mode until the OS is loaded. While a backup or restore can be marked up directly from under Windows. This method is good for large HDD. But it does not help to restore broken partitions on the hard drive, as it happens during the remap process.
Prevention
So that the hard drive does not “die” in your hands, it is advisable to carry out some preventive maintenance. depending on the type of technology.
If you have a laptop:
- try not to hit him;
- do not shake strongly, especially during working hours;
- Do not expose to vibrations or temperature changes.
If you have a desktop computer:
- do not post system unit in a damp place;
- do not overheat the components;
- although the HDD itself is sealed, the board can be damaged by a layer of dust, so get rid of it;
- install additional cooling on the hard drive if the computer is actively used or the hard drive is unable to cool itself.
A useful preventive measure for all hard drives is defragmentation. For its implementation, there are a lot of programs, both regular and third-party.
Now you know how to repair bad sectors on your hard drive and you may even be able to save valuable information on it in case of problems.
Often, personal computer users encounter hard drive problems that affect the operation of the system. The main causes of hard drive failure are: bad sectors in HD D and bad file system. In this article, we will describe a detailed HDD troubleshooting process, and also describe methods of data recovery on hard drives if it is defective or completely out of order. I would also like to note that problems that are associated with the hard drive should be given special attention. For example, if the HDD becomes completely faulty, then you are unlikely to be able to recover information from it. That is, all your documents, personal videos and photos, as well as other files can be permanently lost.
We read the SMART readings from the hard drive
If files are not copied on your computer, programs freeze after opening, then a possible reason for this may be bad HDD. Usually this behavior operating system related with bad sectors in the hard drive. To be sure that the problem is related to bad sectors of the HDD, and not to malware The first step is to confirm this conjecture. If the situation described above is observed on the computer, we will install the utility on it CrystalDiskInfo. This utility describes the status of all hard drives installed on your computer. You can download CrystalDiskInfo from its official website http://crystalmark.info. The utility supports Windows operating systems from XP to Windows 10.
To check information about the hard drive, the utility uses self-diagnosis technology SMART. SMART technology is used on all manufactured HDDs. Below is an example of checking SMART readings using the CrystalDiskInfo utility in a hard drive WD1200JS. From this window, you can see that the program has detected its status as " Good" - this means that this hard drive is in perfect order and you should not worry about it.
In the following image in the SMART readout, CrystalDiskInfo utility detected the status of the screw with the message " Anxiety". This message means that there are already bad sectors in the hard drive or it is overheating.

If you see the message " bad”, then this will mean that all bad sectors have been reassigned on the hard drive and soon it will completely shut down.

In both cases, when the program found the messages " Anxiety" and " bad”, you should make a backup copy of all data on the computer, as soon the screw will become unusable.
One solution that can temporarily fix your screw is the utility Victoria. This utility can do REMAP BAD sectors, that is, it will reassign bad sectors to backup ones. In the next section, we will describe in detail the process of REMAP BAD sectors using the Victoria utility.
Recovering a hard drive using Victoria
Utility Victoria created by a Belarusian programmer and distributed free of charge. You can download the utility on its official website hdd-911.com. The Victoria utility is distributed in two versions for Windows and DOS. In our case, we will download the Windows version. After running the Victoria utility on Windows, we will get into such a window.

To fix the hard drive, we need to go to the "Tests" tab. On this tab, we are interested in the area with the radio buttons Ignore , Erase , Remap and Restore , as well as the button Start . To fix it, we need to select the Remap radio button and click Start.

After these steps, the Victoria program will begin the process of correcting sectors, which can take quite a long time.

After reassigning the sectors, it is possible that Victoria will be able to restore the bad sectors, and the CrystalDiskInfo utility will display the value "Good". But the magic fix may not happen, as the reserve sectors may simply be missing and Victoria will not be able to help. In this case, there is only one way out - do a full HDD replacement. In addition to screw treatment, Victoria also provides verification of testimony SMART tab SMART».
I would like to note that all the operations that you perform with the help of Victoria, you do at your own peril and risk. Using the utility, an inexperienced user can damage the hard drive, as well as deprive it of warranty service.
Fixing file system problems on your hard drive
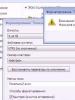
Many users on Windows computers often experience problems related to file system errors NTFS. File system problems are caused by malicious utilities and various software. Also, most often problems in the file system occur out of inexperience the PC user. For example, improper handling of the utility Acronis Disk Manager. To solve this problem, Windows itself will help us. Windows provides file system fixer. To fix the file system on a specific partition, you need to go to its properties. In our case, this is the system partition of the operating room. Windows systems 10. To start the fix, we need to go to the tab " Service».

This tab has a Check button which we will click.

After this action, a window will appear in which you need to confirm our actions.

After confirming the action, Windows will scan this partition.

After scanning, the system will display a message with the results of scanning the partition for errors.

Using this method, many users have restored their operating system to normal without having to reinstall it. If the problems lie in the HDD itself, then no disk check and reinstallation of the OS will help in this case. The only option in this case is that you can resort to the Victoria utility or do a complete replacement of the screw with a new one, while reinstalling Windows.
Recovering disks with Acronis True Image 2016
The software is the perfect tool to create a full backup all local partitions, including the system one. This opportunity is used by many administrators around the world. The created backup of local disks can be restored in a very short time. For example, if the system has been infected with a virus or the HDD is broken, in this case you will restore all OS disks in a short period of time. You can find Acronis True Image 2016 on its official website www.acronis.com. By running the program in question, we will get into such a window.
First of all, we will show our readers how to back up local partitions of Acronis True Image 2016. On the first tab "Backup", you can see that the entire computer is selected for backup. That is, a full backup of all local partitions, including the system partition, will be carried out. In the next block, you need to select a location for the backup. In our case, this is the local disk E. After choosing the type of backup data and where to save it, click the button Create a copylocated in the lower right corner.
Depending on the amount of data to be saved, the time to create a backup will depend.
Having completed the backup, we will describe the process of restoring the computer. To do this, we need to create a boot disk or flash drive Acronis True Image 2016. You can do this by going to the tabs " TOOLS/BOOT DRIVE WIZARD". Below is a wizard that should open.
In this wizard, we will select the first item and continue. In the window that appears, select where we will save the boot drive: into the image or to a flash drive.
After saving the boot drive, the wizard will display a final window.
By creating a bootable flash drive or optical disc with Acronis True Image 2016, you can start data recovery. To do this, boot from a bootable USB flash drive when you start the computer. After booting from the boot drive, we get to the Acronis True Image 2016 menu. We select the first item in this menu, after which we get to the main Acronis True Image window.

In the program window, go to the "" tab and find the backup copy of the entire system that we previously created.

Now, to restore the system disk with Windows and local disks, click the button Disk Recovery.

In the wizard that appears, select the item " Recover disks and partitions and continue.

In the next window, select all local drives and continue the wizard.

In paragraphs " Destination» for the first and second disks, select the original HDD. If there are many hard drives installed in the system, then be careful not to mix up the screws. In the final window, click the Proceed button.

The backup recovery time depends on the size and speed of the HDD. In our case, it took 10 minutes.

The example shows how easy it is to back up the entire computer, so if you master the Acronis True Image 2016 software package, you can easily restore it to working capacity in cases where the system is infected or the hard drive is broken. Also, after mastering the program, you will not have questions about how to recover data from a hard drive.
Data recovery with Recuva
There are times when, when reinstalling Windows or using Acronis software, users mistakenly erase all information from the hard drive. If you have exactly this situation, then you should not be upset, since all the information can be reestablish. A free utility will help us with this task. Recuva. You can download the utility on its official website www.piriform.com. After starting the utility, the user enters the wizard, which will help you restore all the data. Below is the sequential work of the wizard.
The example shows that data recovery using Recuva is a fairly simple process and almost any PC user can handle it.
Summing up
From this article, it can be emphasized that restoring a hard drive is not a very simple task, but depending on the situation, even an ordinary PC user can handle it. I would also like to advise laptop owners to handle it as carefully as possible. For example, if the laptop is dropped or subjected to a strong impact, it may damage the HDD. In addition, if you yourself have identified a problematic screw, then do not be afraid to open the case of a laptop or desktop computer yourself, since replacing the HDD is a fairly simple task. And we, in turn, hope that our material will be useful to our readers and will allow you to restore your hard drive.
Related videos