How to add (transfer) all your contacts to ICQ. How to add (transfer) all your contacts to ICQ How to add all your contacts to ICQ: step by step instructions
ICQ Information Center:: Quick transfer of a contact list from one number to another. Quick transfer of a contact list from one number to another.
Most likely, you often "moved" from one number to another and you always had a desire to somehow quickly transfer your contact list. There are many ways to do this, both ineffective and quite normal and fast. I will now briefly describe how this can be done. We will assume that our vine with the contact is called "A", and the vine where we need to transfer the contact is called "B"
Method #1:
The simplest and most effective for small contacts up to 50 people. Just take and add number B in number A and number A in number B. Now we climb on the number "A", select the number "B" that we just added, click on it and call the dialog box of the Send Contact procedure. With it, we forward the contact to the number "B". Please note that this procedure has a limitation. It does not allow you to send more than 20 people at a time. That is why it is suitable for small contacts. After you complete this operation, calmly log in to the number "B" and add all the contacts that came.
Method #2:
Have you ever thought that you can make a "visual" back-up of your contact list? Then just download the ICQr Information v1.5 program from our Downloads section. It allows you to export a contact sheet to HTML. Moreover, each number will be given a link to the ICQ server, by clicking on which the person will be entered into contact. Hence the second way - just export the contact "A" to HTML, then go to the number "B" and click on the links in the html document. This way you can add only the people you need.
Method #3:
Useful when transferring large contacts. Doesn't require anyone to be added. The most efficient, in my opinion. If number B is not yet registered on your computer - do it. Let's open the folder with the user's dat files. In order to find it, press F3 ("Search"), select "Search on ALL Hard Disks" in the menu, enter in the search box: YOUR_NUMBER.dat, such a file will be found in the folder we need. Find the .dat .idx files of your number "A", let's call them A.dat and A.idx, make copies of them, you will get the files "Copy A.dat" and "Copy A.idx". In the same directory there should be B.dat and B.idx files, delete them and rename the resulting copies to B.dat and B.idx, i.e. actually replace existing files with copies. Now launch DataBase Converter. A link to it is in the same "ICQ" folder that appeared after installing the client in the "Programs" menu. Select number "B" from the list of convertible accounts. Carry out the conversion process. Please note that when you first login to number B, the password may not be suitable, since it will be from number A. It's okay, just put the correct one and click "OK". Only with such a transfer, none of the users who appear in your new contact list will know about it. Don't forget to send them relevant messages.
Very often before reinstallation operating system we forget, in addition to the necessary files, to transfer the history of correspondence of Internet messengers and the WebMoney wallet, sessions and bookmarks of browsers, as well as accounts and email messages of mail clients. After several losses of this data, I stopped forgetting about this need and made a small instruction for myself, and without thinking twice, I decided to publish it on the blog. I hope the instructions will be useful to you too...
Transferring the WebMoney key file, history of operations and correspondence
For some, this is not important, but for me, WebMoney is practically the only source of my income, money goes there from various services and wallets, then I withdraw it through online exchangers to a plastic card and get real money. You probably know that WebMoney has the ability to communicate with other participants through personal correspondence. Very often there are situations when it is necessary to remember the "interlocutor" by viewing the correspondence with him or the history of operations. For this, special files are provided that store all this data and protect wallets from unauthorized access by other persons. The loss of these files is highly undesirable and I would even recommend periodically saving copies of them on removable media such as a “flash drive” in case the computer breaks down, burns HDD, or other circumstances arise that make it difficult to recover this data.
The main file for accessing the WebMoney wallet is a key file with the .kwm extension. The first step is to save a copy of it. If you no longer remember the file storage location that you indicated during the WebMoney installation, then use the search by entering your WMID number with the extension, including a dot (for example, 333555777999.kwm) into the search box. If you don't remember your WMID, just enter ".kwm".
This file is extremely important, without it you cannot log into the keeper, and restoring it is a rather laborious task, so it’s better to save it to a second hard drive in advance, if you have one, and write a copy of it to a disc or throw it on a “flash drive”.
If you wish, you can restore the history file of internal correspondence and operations. It has a .pwm extension and is located in C:\Document & Settings\PCUser\Application Data\WebMoney.
Transferring ICQ chat history

With ICQ, everything is much simpler - all correspondence is stored in one messages.qdb file, which is located here: C:\Document & Settings\PC_User\Application Data\ICQ\your UIN. UIN is called ICQ number. I draw your attention to the fact that this method is working for version ICQ 7.7. Perhaps the file paths will be saved in new versions of the client, but for versions below seven, this method is not valid.
Transferring Accounts, Contacts, and Messages from Thunderbird Email Client

Naturally, all the listed data is stored in different files, but in a specific folder. Therefore, it is necessary to copy it in its entirety. It is impossible to say the exact name of this folder, since it does not have an exact name and is individual on different computers. You need to go to C:\Document & Settings\PC_User\Application Data\Thunderbird\Profiles and find a folder with the same name as gn5DhPfv.default. The only thing that will allow you to recognize the necessary folder is the unchanged “.default”. If you find something similar, feel free to copy it.
After reinstalling Windows. Reinstall mail client, run it and close it immediately. The program will create the folder we need, but with a different name. Now you just have to replace the contents of the new folder with a similar name with the old one.
Transferring Skype conversation history

The situation is simple. It is necessary to transfer a folder with a name identical to the user's login to Skype. The folder is located here: C:\Document & Settings\PCUser\Application Data\Skype.
After installing the messenger, launch it, log in and close it. The program will create an empty folder with your login, which must be replaced with the old one.
Transfer bookmarks, sessions and passwords saved in the Opera browser

In this article, I will not consider other browsers, since I use Opera exclusively. If you are looking for instructions for Explorer, Firefox, Chrome, etc., then I am sure that you will find it without problems using search engines.
Sessions first- these are tabs of open pages (sites) that you did not close as needed. First, let's save them by following certain steps: in the upper left corner, click on the "Opera" tab to call context menu and select "Tabs and windows" in it, then "Sessions" and "Save this session ...". Enter a session name and click OK. Now go here C:\Document & Settings\PC_User\Application Data\Opera\Opera\sessions\session_name.win, where "session_name" is the value you specified when saving.
If you save passwords from visited sites in Opera, you can also transfer the password file available at: C:\Document & Settings\PC_User\Application Data\Opera\Opera\wand.dat.
To save bookmarks click again on the "Opera" tab and select "Bookmarks", then "Manage bookmarks ...". You will see a list of bookmarks that you saved and several standard ones created automatically during the installation of the browser. You can remove the ones you don't need and export the ones you don't want to lose. To do this, click on the bookmarks page "File" and "Export Opera bookmarks ...". Now give the export file a name and specify where to save it.
In order to import bookmarks back into Opera, on the Manage Bookmarks page, click File, then Import Opera Bookmarks and select the saved file, specifying the save path. That's all.
P.S.: "User_PC" - username ( account). On your computer, it may differ from what I have indicated above.
Note:
Since there are many social networks, people tend to sign up for all or some of these projects. As a result, the average user has several profiles in different in social networks which are not related to each other in any way. In order, for example, to check messages on VKontakte, a person has to go to VKontakte, but to view the same innovations in Odnoklassniki, you need to open the page with Odnoklassniki. And it's extremely inconvenient.
In the example above, we considered the case when the user has only 2 profiles (VKontakte and Odnoklassniki), but in fact there can be many more such profiles. For example, many of our compatriots use the means of Facebook, Mail.ru, Google with interest. After all, everyone who has a modern mobile phone based on Android is one hundred percent likely to work in the Google system, which is a prerequisite for using all the functions of a mobile phone.
Isn't it easier to combine all these contacts in one single ICQ client? Isn't it more convenient to manage all your profiles from just one program? Wouldn't it be better to keep track of new messages with the help of a practical ICQ messenger? The answer is obvious, and in this step-by-step instruction we will learn how to combine all our contacts within ICQ.
By the way, from ICQ, if you add social network profiles to it, it is much easier to send messages to all ends of the Internet, since the messenger is designed for this. The program, developed taking into account many years of testing, is almost guaranteed to simplify the task of live communication without having to visit social networks, checking every minute for new messages.
How to add all your contacts to ICQ: step by step instructions
Step #1
To get started you will need the Russian version.
Step #2
After installation, you will either have to do it on social networks. All these procedures have already been discussed in the previous step-by-step instructions of our site, and the interested reader can always return and read them again.
Step #3
After logging into ICQ, it is important to pay attention to the social network buttons located directly below the user's avatar (photo). By clicking on the arrow icon, you can open additional lists with available social networks.
Step #4
By clicking on the appropriate icon of the social network in which we have contacts, you must enter the profile by entering the Login and Password from the specific social network. Simply put, if we add contacts from Facebook, then the Login with the Password must be from Facebook, and not from ICQ.

Step #5

Step #6
A similar procedure for adding contacts is carried out with all social networks in which you have profiles. If the program asks additional questions (for example, "Do you agree to allow access to personal data"), everything must be agreed. When all your contacts are collected within ICQ, the task will be completed and you will get simultaneous access to all your friends, comrades and colleagues. And any incoming messages to your profiles will be directly redirected to ICQ.
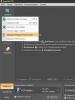
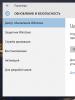
a) Click on the "Menu" button (at the bottom of the program) and select the "Program settings" item.

b) Go to the "List of contacts" tab and check the box "Show only online contacts".

c) Confirm the settings through the "Apply" or "OK" button.
As a result of completing all the steps in this step-by-step instruction, you will receive:
- Consolidated list of contacts from different social networks, collected in one place.
- Free and quick access to any of the contacts added to the system.
- Displayed list of contacts, consisting only of those people who are actually in touch and can immediately receive your message.
Modern social networks and instant messengers have long contained all user correspondence on their servers. ICQ can't boast of it. So in order to find the history of correspondence with someone, you will need to delve into the computer's memory.
ICQ and related messengers still store the history of correspondence on the user's computer. At the moment, a similar approach is already considered obsolete due to the fact that the user will not be able to access correspondence with interlocutors using a different device on which this conversation was originally conducted.
However, it is believed that such a system has its advantages. For example, in this way, information is more protected from outside access, which makes the messenger more closed from unauthorized access to the secret of correspondence. Moreover, now the developers of all clients are working not only to hide the history of correspondence deeper into the bowels of the computer, but also to encrypt the files so that it is difficult not only to read, but even to detect them among other technical files.
As a result, the history is stored in the computer. Depending on the program that works with the ICQ service, the location of the desired folder may be different.
History in ICQ
Things are very difficult with the official ICQ client, because here the developers have done their best to keep personal correspondence files safe.
It is impossible to find out the location of the file with the history in the program itself. Here you can only set the folder for storing downloaded files.
But the carriers of the history of correspondence are stuck much deeper and more complicated. Tellingly, the location of these files changes with each version.
The latest version of the messenger in which the message history can be obtained without any problems is 7.2. The required folder is located at:
C:\Users\[Username]\AppData\Roaming\ICQ\\Messages.qdb
In the new version, ICQ 8, the location has changed again. According to the comments of the developers, this is done to protect the information and correspondence of users. Now the correspondence is stored here:
C:\Users\[User Name]\AppData\Roaming\ICQ\[User Number]\archive\
Here you can see a huge number of folders whose names are the UIN numbers of the interlocutors in the ICQ client. Of course, each user has their own folder. Each contains 4 files. File "_db2" and contains the history of correspondence. All this is opened with the help of any text editor.

Any communication here is encrypted. You can extract individual phrases from here, but it will not be easy.

It is best to use this file in order to paste it on the same path to another device, or use it as a backup in case you delete your program.
Conclusion
It is highly recommended to have backup copies of dialogs from the program if they contain important information. In case of loss, you will simply need to insert the file with the correspondence where it should be, and all messages will be back in the program. This is not as convenient as reading dialogs from the server, as is done in social networks, but at least something.