Turning on two tablets via usb. Connecting tablet to pc. Connecting an Android tablet to a computer via USB
A tablet would be a pretty useless gadget if it couldn't interact with a computer. Still, it is a household stationary computer that is the center of our information space. Mobile devices, despite their rapid progress, are still inferior to the computer in terms of the sum of their merits, although in some indicators they overtake it by an order of magnitude.
We will discuss how to connect via usb tablet to the computer, because it is this method that guarantees the greatest efficiency of the connection. We get real local network, with all its benefits. Wireless WiFi is not so convenient when you need to transfer data between devices.
Despite the fact that the file systems of an Android tablet and a Windows computer have different formats, network software circumvents this incompatibility.
The USB connection does not interfere with the transfer of files from the tablet to the computer and vice versa. Data is sent via an ordinary USB cable, and you can manage it using Windows Explorer or any other file manager. How to connect the tablet to a PC via USB so that the described becomes possible? In order not to use the Internet and services like Yandex.Disk to transfer files?
External Disk Mode
Microsoft and tablet manufacturers are vying to offer users special software for organizing the PC-tablet tandem. As planned by the developers, the user must install special programs on a Windows PC, and USB connection drivers on the tablet. This way of connecting devices to each other is not the most optimal. It is best to connect the gadget as a so-called. "external drive". This will be enough to transfer files. External storage mode is not enabled by default. To activate it, go to the device settings, select the "For Developers" item there and set the "Debugging via USB" option. A confirmation window will appear - click "Ok" in it. That's all you need to do to connect the tablet via USB as an external drive. Naturally, provided that the devices are physically connected with a USB cable.
We complete the procedure
Now we need to connect the computer and the tablet with a USB cable. It will transfer files from one file system to another. And the firmware of the devices will be responsible for shipping and hosting them. There are two types of cables: microUSB and miniUSB cables. One or the other must be included with the gadget. If you don't have one, or if you've lost it, the mentioned cable names will help you find them on sale.
What happens when we connect a computer to a gadget using such a cable? Exactly the same thing happens if you connect a new device to your computer: in a second, a standard message will appear in the Windows tray about the discovery of new hardware and you will be prompted to install a driver for it. Reject this polite offer by clicking the "Cancel" button.
 Our further actions will be related to the gadget. In the lower right corner of his screen, you will find a wireless connection icon - click on it with the mouse. In response, a message will appear stating that the connection has been established and another window in which you will need to click the "Enable USB storage" button. A warning will appear about the termination of certain applications - ignore them and click on "Ok".
That's it - your gadget has turned into a regular flash drive! All files of the user of the Android file system became available through the file manager in Windows as belonging to a separate flash drive. Connecting the device in this way is as easy as shelling pears, there is no need to fuss with additional software. So you can connect a Samsung device or a device from another manufacturer.
Our short story has come to an end. We hope you found it useful.
In order to transfer your favorite films, books, programs, music from a computer to a tablet, do you need to connect these tablets to a computer? There are three main connection methods: Bluetooth, Wi-Fi, USB. The last one is the simplest. But this process can be different, since not all tablets have the same operating system. Working with Android OS is different from working with iOS OS. The first is installed by most tablet manufacturers. The second is found only in Apple products. Consider how to connect a tablet to a computer via USB with each of them.
Connecting an Android tablet
The connecting cable usually comes with the tablet. Use it to connect your laptop and computer. In order to synchronize both devices, you need to make certain settings.
On a tablet:

In computer:
After completing all the settings on the tablet, click on the "Computer" section in the "Start" menu. If the previous steps were performed correctly, then two new removable drives will appear in the row of available drives. One of them is the memory section of the tablet itself, the second is the memory card section.
Connecting a tablet to iOS
If it's an iPad? It is these laptops that are synchronized with only through a special program, but they are computers. On the iPad, just like on the iPhone, you can transfer files using iTunce, a special software product developed by Apple. It is available online for free download. To connect an iPad, you also need to have a USB connection cable.
Download and install iTunes.
Connect the cable between your computer and iPad.
Launch iTunce if it's not set to autostart. Click on the icon that appears in the upper right corner that says "iPad". The program window will change. In the lower right corner, the inscription "Synchronization" will appear.
Synchronize your tablet with your computer. From the same menu, you can update the software, create a backup copy of the working state of the laptop.

And only after synchronization the tablet is ready to exchange files with the computer. For each type of multimedia: sounds, music, movies, as well as various information: calendars, Accounts mail - iTunce has its own menu sections. Such a connection seems initially complicated, but this program is good because without the participation of the tablet, you can organize all the data and various files by simply adding them to it. And by synchronization in a few minutes, update the contents of the iPad.
As you can see, such a question of how to connect a tablet to a computer is easier to solve with Android laptops than with iOs. But it is with the latest operating system that time is saved.
Happy connection!
Many owners face the problem when the computer does not see the tablet, and if you are one of them, do not worry, in 90% the problem can be solved with improvised means. The remaining 10% of cases are due to a physical malfunction of a device and require repair.
Software bugs
Users who use the device for the first time may encounter a connection problem. Lack of experience, and ignorance of the basics of tuning operating system Android can play a role.
Access methods
The most common way to connect the device to a PC is, of course, via the USB cable that comes with the kit. However, the Android OS makes it possible to choose one of the modes, which has its own advantages over the others.
Settings menu
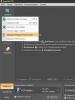
To do this, we pick up the gadget and connect it to the PC via a USB cable. The message “Connecting to USB” will appear on the screen or in the notification panel of the device, click on it. Next, an additional menu will open, where you need to select one of the modes, in our case, this is the first item.
Please note that depending on the Android version, the list of items may differ, in this case, use the MTP mode.

Mode activation
We return to the notification panel again and activate the USB storage mode, as shown in the image above. The PC should make a characteristic synchronization sound and the computer tablet folder on the desktop will open.
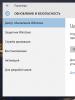
Developer Mode
Due to the specific features of the Android OS, minor conflicts may occur. In this case, you can activate USB debugging - this is an advanced device communication feature. When additional options are opened up to the user, for example, direct copying of files. We launch the settings and go to the "For Developers" item, as shown in the image below.

Device Settings
We scroll through the list of parameters and put a tick in front of the selected item, then a request will appear, where we confirm our intentions. Now we freely connect the tablet to the computer, just be careful when interacting with system folders.
Problem with drivers
If you were unable to connect the gadget via USB, then the problem is in the drivers. That is, the personal computer could not install them automatically and you will have to perform the procedure in manual mode.

To do this, go to the official website of your manufacturer and look for drivers for your tablet in the technical support tab. If the manufacturer for some reason forgot to post it, you can use the universal drivers for Android: http://androidp1.ru/drviver-for-android/.

If the computer does not see the tablet even now, then specialized programs for tablets will come to the rescue:
- Samsung-KIES;
- Lenovo-IdeaTool;
- HTC - Sync Manager;
- Sony-Media Go.
Moreover, some of the programs allow you to connect the tablet not only via USB, but also via a wireless connection.
Firmware problem
Another very common problem with device synchronization can be a recent update of the Android operating system or the installation of custom firmware (unofficial). Most likely, during official updates, errors could occur when downloading or installing files.
How to connect the tablet to the computer in this case? The only way out in this case is to reset the settings to factory settings or roll back the system to its previous state, unfortunately, there is no universal instruction.

The reason may also be earlier installed programs, which have extended access to system management. And in this situation, the best and proven way is to restore the factory settings.
Hardware problems
If you've tried all of the setup suggestions above, then you most likely have a hardware problem. That is: the connection cable failed, the USB port on the tablet or computer does not work, and more. Many owners in a panic start looking on the Internet for an answer to the question: how to connect a tablet to a computer not via USB? Forgetting that it is necessary, first of all, to diagnose the malfunction.
Initial Diagnosis
The main malfunction is the failure of the USB cable, which is very susceptible to mechanical stress. For example, they crushed or interrupted the cord, pulled it hard and damaged the inside, perhaps they broke the connector. These are common issues that most users face.

Initially, it is necessary to inspect the cable for external damage, as shown above. If none are found, then we take the same working cord from friends or acquaintances and try to connect the tablet. If the attempt was successful, then the problem lies in the cable itself.
USB standards conflict
In our time, computer technology has gone very far, and equipment manufacturers simply do not have time to release the appropriate devices or updates to them. Most modern laptops already have several USB 3.0 ports (shaded in blue), the use of which causes conflict with older devices.

Then you need to connect through version 2.0, repeat the driver installation and the conflict of standards will be resolved. In case of a negative result, most likely, the micro-USB connector on the tablet itself has broken and an urgent trip to the nearest service center is required.
Alternative connection methods
Going to a service center is a good thing, but what to do if you urgently need to transfer the necessary information? Then let's try to transfer data over a wireless connection:
- WiFi.
The main thing at the same time is to be as close as possible to the receiving device, then the signal will be more reliable, and the speed will be much faster.
Data transfer
Bluetooth is a very popular and very useful wireless interface through which files can be exchanged over relatively short distances. It is worth noting that the Bluetooth standard appeared long before the Android OS, but in recent years it has acquired a lot of useful functions that are not limited to data transfer only.

Settings menu
Open the tablet settings, go to the Bluetooth item and activate it. Now we put a tick so that extraneous devices see us and select one of the found devices.
Please note that the menu items may vary slightly depending on the tablet and Android version, but general instruction this does not change.

Verification code
A verification code will appear on both devices, which must match, if so, then click "Yes". You have just paired and a sharing channel has been automatically created, now all you have to do is go to your files and transfer them.
WiFi connection
This method is only suitable for Samsung tablets; using a special KIES program, you can organize wireless data exchange. To do this, go to the official website of the manufacturer and download the application, install it and run it.

Synchronization settings
We connect the tablet to the Wi-Fi network and launch the settings menu again, where we go to the advanced option, as shown in the image above. We go down to the “KIES” item and click on it, a window will appear with devices that are on our network - this is an IDEA-PC computer.

Main window
A notification with a code will appear on the tablet screen, you need to write it out in the window that appears in the program - this is a kind of check similar to a Bluetooth connection.

Now, while both devices are connected to the same network, you can perform:
- Data exchange;
- Create backups;
- Perform updates and more.
FTP server
This method is very similar to the previous one with the KIES application, but it is applicable to absolutely any Android device. First of all, we need to find out the internal IP of the device, for this we install the Speedtest program from PlayMarket.

Go to the Setting tab and find the internal IP item, in our case it is 192.168.0.101. Yours may be different, so don't worry. Now install a program called FTPServer on the tablet and fill it in, in accordance with the image below.

Server Tuning
Install the Total Commander application on the PC and connect to the server, as shown in the image below.

Main window
In the window that appears, click the Add button and fill in the fields:
- Any name;
- Server - tablet internal IP and port number from FTPServer;
- The account is the same as in the program.

Adding a server
Now we run the utility on the tablet and connect via Total: network-> connect with FTP-> connect. If everything is done correctly, a menu of two windows will appear.

Now you can transfer absolutely any files, interacting directly with the file systems of devices.
Formal connection
How to connect a tablet to a computer if all the previous methods do not suit you? Of course, with the help of an external flash card, a slot for which is available in almost all popular tablets.

The scheme is very simple:
- We insert into the tablet and move the necessary files;
- We take out and connect to the computer;
- Move again and vice versa.
The method is very easy to perform, but takes a lot of time to reconnect.
Synchronization of Android with PC
One of the main advantages of Android is the open file system. And this means that you can not only copy, delete and archive files directly on the device itself, but also transfer them from a computer to a tablet and back using the usual Windows Explorer. To do this, simply connect the tablet to the computer via a USB cable and perform a few simple steps.
Setting up a connection on a tablet
Undoubtedly, for free file management, it will be most convenient to connect the tablet in external disk mode. However, today most manufacturers offer their own file sharing software that requires both the PC client and tablet drivers to be installed. It is for this connection mode that most modern android devices. Therefore, the first step is to disable this mode.
To do this, go to the “Settings” of the tablet, select the “For Developers” item and activate the “USB Debugging” mode by checking the box next to it. Then, in the window that appears, which just informs us about the inclusion of the external external drive mode, click “OK”. If the item of this item is not in the menu, then it must first be activated. How to do this, read. Well, now your tablet is ready to be connected.

USB connection
Connect your tablet and computer with a cable. This is usually a microUSB-to-USB or miniUSB-to-USB cable that came with your device. After connecting, Windows will immediately give you a message about a new device detected and offer to install drivers. You can safely ignore this message by simply clicking the "Cancel" button. Now take the tablet, in the lower right corner click on the USB connection icon and click on “USB connection established”. In the new window that appears, click on the "Enable USB storage" button. The system will immediately issue a warning about a possible stop of some applications, to which click “OK”.

Thereafter, inner memory tablet, including an external microSD card, will be available in Windows Explorer as external drives. Now you can perform any action with tablet files - edit, delete, copy, archive and much more, just like you do with files on your computer.
Turning off the tablet
To turn off the tablet, click on the USB drive icon again, select "Disable USB drive" and in the window that appears, click the same button. After that, the internal memory of the tablet will become unavailable in Windows again, but do not rush to pull out the wire from the USB connector. First, in the tray of your computer, click on the “Safely remove devices and drives” icon and in the list that opens, select the drives that appeared after connecting the tablet. After that, Windows will display the message “Hardware can be removed”. Now you can disconnect the wire from the tablet or computer.
Often there is a need to connect an Asus device to a computer. For example, you need to copy files to a tablet or computer, and transferring each file via bluetooth is inconvenient and time consuming.
How to connect ASUS to a computer via USB
Before working with the device, carefully read the instructions for connecting the device to a PC, which comes with the kit. The algorithm for connecting different devices may differ.
In order to connect the tablet to a computer via USB, you need the USB cable that comes with the tablet. ASUS devices sometimes come with two seemingly identical cords for connecting via USB, but only one can be suitable for connecting to a PC, the second one works normally from charging, but the tablet does not connect to the computer.
- So, turn on the computer and tablet.
- Connect the usb cable to the computer. The computer may have usb-like inputs, for example, hdmi or ieee, be careful.
- Now we connect the second end of the cord to the usb connector of the tablet.
- A green screen should appear on the tablet with an android icon and a question about whether to connect the tablet via USB. We click "Connect". The screen changes color and "Connected" appears.
- After a couple of seconds, usb drives will be detected on the computer.
In rare cases, the computer may display a message stating that no drivers were found or the device simply is not detected.
In this case, you need to install the drivers yourself. Some tablets come with a disk with device drivers or programs for work. They can also be downloaded from the official website.
You can go to the official ASUS support service at the link - asus.com. Here you can enter the name of your device in the search bar and in the window that opens, click on "Drivers and Utilities" and download the driver or program for your device. There you can also download manuals and documentation and ask any questions.
How to connect ASUS to a computer via WiFi
In order to establish a connection between an Asus tablet and a computer via WiFi, you need to download a couple of additional programs.
- We download and install any FTP client on the computer, for example FileZilla, you can download it by clicking on the link - filezilla-project.org.
- And on a tablet google play install, for example, WiFi transfer.
- We start WiFi transfer and see the ftp address.
- Launch an ftp client on the computer.
- We press the connection to the ftp server and enter some name, the ftp address specified in the WiFi transfer and from there, enter the WLAN status as the username.
- Click connect and we can transfer data between devices via ftp.
This program allows you to exchange data only through a computer interface. In order to do this directly from the tablet, you can use other programs.