How to stop the automatic download of applications in android. How to disable auto-start applications on Android: methods and recommendations. An easy way to remove programs from automatic loading
Indicates that the topic of receiving the ACTION_BOOT_COMPLETED message remains relevant to this day. As you can see, many beginners face the problem that they do not receive the ACTION_BOOT_COMPLETED message in their applications. In this article, I will try to summarize the data from the official documentation, the experience of many developers from stackoverflow.com, as well as my own experience. So, how to defeat this "insidious enemy" called "ACTION_BOOT_COMPLETED"?
1. Theory
Looking at examples from an official source (such as this one and this one) and studying the recommendations on stackoverflow.com, the following rules can be distinguished:- In the manifest, in the "manifest" element, specify the permission:
- In the manifest, in the "application" element, register your receiver to receive the ACTION_BOOT_COMPLETED message:
or
Use the correct fully qualified or relative class name for your broadcast receiver. In the description of the receiver, do not specify the attributes "enabled", "exported", etc. without necessity. The default settings and attributes are enough. - Your broadcast receiver code:
Public class BootCompletedReceiver extends BroadcastReceiver ( public BootCompletedReceiver() ( ) public void onReceive(Context context, Intent intent) ( if (intent.getAction().equals(Intent.ACTION_BOOT_COMPLETED)) ( // your code here ) ) )
If your receiver is only used for the ACTION_BOOT_COMPLETED message, then the "if" check is optional. However, sometimes developers use the same receiver for different messages. In this case, filter the messages by checking them inside the onReceive method. - The application must be installed on the internal memory. The Android OS is designed in such a way that the ACTION_BOOT_COMPLETED message is sent to applications before external memory is mounted. Therefore, applications installed on external memory will never receive this message. To tell the system not to install an application to external memory, you do NOT need to set the "@android:installLocation" attribute to "auto" or "preferExternal" in the manifest. By default, i.e. if this attribute is not specified, the OS will only install your application on internal memory. However, according to the official documentation, it's better to explicitly specify the value "internalOnly" so that you and other developers are not tempted to specify a different value in the future.
- After installation or forced stop (force stop), the application must be launched at least once so that the system "remembers" this application to send it the ACTION_BOOT_COMPLETED message. This behavior was implemented in Android 3.1 for security purposes. What is the point? All just now installed apps are in the "stopped" state (not to be confused with the activity, because the OS manages this state for applications and activities in different ways). The application “leaves” to the same state when the user forcibly stops it in the phone settings. While the application is in this state, it will not be launched by the system for any reason (for example, via ACTION_BOOT_COMPLETED), except, of course, if it is started by the user himself. Thanks to this innovation, a large part of the "viruses and Trojans" stopped working, because. It is no longer possible to start automatically after installation.
The exception is system applications: see the note from user kolipass .
- Features of the Fast boot mode in HTC devices. It is known that HTC devices do not reboot in the classical sense, but use the so-called. Fast boot mode (this is a form of hibernation), saving the state of the OS to disk. Therefore, the ACTION_BOOT_COMPLETED message is not sent by the system because no reload actually occurs (). Instead of ACTION_BOOT_COMPLETED, the system may send the following messages:
In your application, include the above messages in addition to ACTION_BOOT_COMPLETED in the "receiver" tag. In addition, it is necessary to register permission in addition to clause 1:
2. Practice: errors and features of operation
Let's analyze the mistakes that beginners make when setting up the application and in the code.
3. Debugging the receiver in the emulator and on real devices.

Results
In order for your application to run on boot on all devices, the manifest should at least look like this:
The receiver code will usually look like this:
Public class BootCompletedReceiver extends BroadcastReceiver ( public BootCompletedReceiver() ( ) public void onReceive(Context context, Intent intent) ( if (intent.getAction().equals(Intent.ACTION_BOOT_COMPLETED)) ( Toast toast = Toast.makeText(context.getApplicationContext( ), context.getResources().getString(R.string.your_message), Toast.LENGTH_LONG); toast.show(); Log.d("myapp", context.getResources().getString(R.string.your_message) ; // your code is here ) ) )
I hope this article will help beginners overcome the "insidious enemy" called "ACTION_BOOT_COMPLETED".
Surely many are familiar with the situation when a brand new smartphone, just purchased in the salon, made the owner’s heart beat faster not only from the appearance, but also from the extraordinary speed and amazing responsiveness. But as soon as all the necessary programs are installed on the device, Andryukha begins to act up and can hardly be called smart and responsive now.
And the reason for this metamorphosis lies in the fact that in many programs and services the autoload function has been added and, starting simultaneously with the launch of the operating system, they continue to work in the background, literally eating up system resources and battery power. Startup Android and how to get rid of it - that's what our today's material is about.
Unfortunately, not all device models have built-in tools that could manage this process. But this does not mean that for owners of other devices the problem is unsolvable. There are a sufficient number of special programs that successfully cope with the task. Now we will consider all options.
Using standard tools (for version not lower than Android 4.0)
In the main menu of your device, go to "Settings". Select "Application Manager" (or "Application Manager"), click:

In the appeared list of applications that are installed on our gadget, select the one you need (for example, we chose "ChatOn"). By tapping on the line with the name, we will open the parameters of this program, where you need to click the "Disable" button. A system warning will appear and you will be prompted to confirm the command. We answer in the affirmative. Now, when you open the list of applications, you can see that the line with "ChatOn" indicates the state - "Disabled":

This method is good because if for some reason you suddenly need a disabled program again, you can always activate it by returning to the list and clicking the "Enable" button:

One very important point should be taken into account. You, going through the list of applications step by step and turning off unclaimed ones, may encounter a situation when opening the "Application Details" section you will encounter the "Turn off" button to be inactive (in our example, this is the G-mail application):

This means that it will not be possible to deactivate it, and it is impossible in any case, because we are talking about system applications, and removing any of them can lead to an imbalance in the system at best.
In general, what is allowed - we can turn it off as unnecessary, and what is not allowed - no forced shutdowns if you don’t know why you need it and how it can end.
Information video:
Autostart control using the application (without ROOT)
As mentioned above, on Android devices versions less than 4.0, there are no built-in tools that can be used to stop programs from starting automatically. This does not mean at all that the situation is hopeless. Special software will come to the rescue, normally coping with the solution of the tasks.
One such utility is AutoStart - No root . This is an understandable, without any "troubles" manager of autorun programs, which will allow you to determine those applications that start automatically when you turn on the gadget.
Working with Autostart is extremely simple: there are two switches on the working screen, which allow you to either activate or (if necessary) disable the autoload mode. The choice of the desired software will occur through the application browser call button:

On the working screen, you can see a switch that allows you to activate or, conversely, turn off the autoload mode of a particular software. The choice of the software itself occurs through the call button of the application browser.
In order to display notifications about running applications, you need to check the box next to the item "Show notification at boot-up". The program does not autoload system applications.
Autostart control with ROOT (AutoStarts)
Autostarts is one of the most proven and longest-running programs of its kind on the market. The great functionality of Autostarts and the need to have ROOT rights impose significant risks on the user, since with the help of this program the owner of the Android device gains power over almost all processes operating system, incl. and systemic.
There are paid and free versions. It is clear that the second option will win in terms of functionality, but the tools of the budget version are enough to complete the tasks.
So, . And after Autostarts is installed and running, we press the icon on the desktop, after which the program will begin to examine all installed applications. After scanning, you can see everything that causes autostart. We choose what we don’t need (for example, in the screenshot, the application “Serials”). After enabling the "Deny" button, a request for the rights of the "Superuser" will appear, click "Grant" and the selected program will be deactivated:

Disabled programs are displayed in a separate list as a crossed out name.
Learn more about how Autostarts works:
In conclusion, we can say that the correct setting of the functioning software gives excellent results in terms of battery savings, as well as system resources. However, you need to understand that rash actions to disable autorun can lead to not only an imbalance in the operation of certain programs, but also the device as a whole. Good luck!
Disabling auto-start applications should undoubtedly speed up the start in a smartphone or tablet. It doesn't matter android 5 or android 6 and you can do this trick without root.
To disable a system element, it must be removed from the autorun list (automatic loading when the gadget is turned on).
You can add other elements that do not start loading at startup, if necessary, and not just remove them.
NOTE: for some system applications in android it is impossible to make a ban at startup, more precisely, after that the phone may not work at least with full functionality.
The first way to cancel autorun applications on android
NOTE: this option is not very effective, with its help a forced blocking is done, but it is not a fact that after a reboot the application will not automatically start, especially if it was built by the manufacturer.
Therefore, this option is not worth much hope, but there is nothing else to use in android - it is not provided by the developer.
As they say, we have what we have - if the attempt was unsuccessful, do not write in the comments it didn’t work out (I’m powerless to help), but go to the second option.
The second option is much more preferable, more efficient and faster, it only requires the installation of the program.
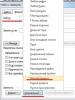
In the first method, enter the settings, open applications and go to the application manager (it may not be on older versions).
Choose which one you want to disable and click on it. For example, on android 5.1, I choose the newly installed "Klondike".
On the left, I click "disable", and then click on "Force disable".
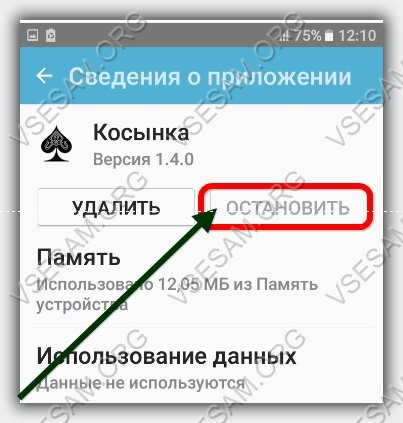
Now I reboot the Samsung Galaxy smartphone and see what happens.

As you can see, the blocking turned out to be successful - it was possible to stop the “Kerchief” in autorun. Everything is done without root and additional programs.
NOTE: I won’t write how things are on older versions of android now, since there are no such devices now. Only android 5.1, 6.0.1 and with android 7.0.
The second way to disable autorun applications on android
For this option, you will need to install an additional program that can disable autorun.
There are many such developments. Some require root, others can do without it (a lot depends on what to disable). I have my own collection.
Simple and choose for yourself as you wish. Everything is in Russian.
If the goal is achieved, great. If there is no comment form to help, we will decide together.
The Internet, as always, is not silent about the topic of how to stop android applications in autorun so that the device becomes more frisky.
Everyone agrees on one thing - this requires third-party programs, in particular Boot Manager - there are no system tools.
Undoubtedly - an option, with Boot Manager it will work with android versions 2.3, 3.4, 4.4 and so on, only root, you will also need it.
NOTE: getting root access on versions 4.0 and below is very easy, but when trying on android 5, not to mention android 7, the barriers are insurmountable, except to do a re-graft.
Who got root, after installing Boot Manager, you will need to run Xposed Installer and activate Boot Manager, then restart your tablet or smartphone.
After starting the phone, we launch Boot Manager, we see the list of applications in autorun and you can quickly disable the required ones.
The first is paid - the second is free and, most importantly, the name says - you can turn it off without root rights.
The functionality of the first is simply impressive, however, as for a paid program, this is quite normal.
ATTENTION: the fewer programs there are in autorun, the faster the device will start, the system memory will be kept in reserve and the battery will last longer.
IMPORTANT: having super-rights, you do not intend (out of ignorance) to disable unnecessary things - the result: at best, some functions fail. Be careful. Good luck.
Year 2, we already see how much the Android system has changed and how seriously Google has improved it, making it convenient, fast, with a smooth interface, with great opportunities. Now we can confidently say that Android is in no way inferior to its main competitor iOS.
However, sometimes it can be noted that an Android smartphone or tablet starts to work more slowly. This is especially common if you work with the device for a long time. If we compare the operation of the device immediately after purchase and after a few months, we can admit with unpleasant surprise that the difference is obvious. Switch between running applications is already slow, launching the application makes it wait a few seconds, which was not the case before. Everything can be hidden in a very simple reason - too many applications are launched when the device is turned on and then they continue to work in background clogging the memory.
Often this can be seen on Android smartphones and tablets with 1GB random access memory or even less, since this becomes the minimum necessary for Android to work normally. Do not be upset, as there is a simple solution to the problem. There are many applications from independent developers who are actively promoting their own solutions to optimize the operation of the operating system.
We decided to choose for example a very useful BootManager application, the name of which already speaks for itself. We can manage all applications that are loaded together with the system itself at the start. In BootManager, you can manually set the choice on those applications that really need to be loaded, and which simply take on additional memory and resources. By editing the list of automatic download applications, you can offload the system well and improve performance.
Do not be afraid to work with BootManager. First you need to install the Xposed framework, which can be downloaded from this link. You will also need root permissions to install. It is worth worrying about this in advance.
Once you have everything installed, run the BootManager program and you will see a complete list of applications that automatically load when you turn on your Android device. It is worth noting that in free version BootManager does not display system applications and you can edit the startup list of only those applications that were installed by yourself.
Deleting an application from the automatic download list is very simple - click on the name of the application and that's it, it will no longer be loaded when you turn on your Android smartphone / tablet. All disabled applications from startup in the list will be highlighted in red.
The above method offers a tool available to many to disable unnecessary applications from startup, which will help to significantly improve the performance situation, there will be more free RAM, which is more needed for multitasking and for working with really necessary applications.
You can download the BootManager application from Google Play market at this link.
Updated 2015.02.29: an alternative program to disable system applications is Autostarts. Also, with its help, you can monitor the resource consumption of all processes and already decide which ones to disable and which ones to leave.

It is worth noting that you carry out all actions at your own peril and risk, and the consequences of insufficient knowledge or inattention may be the following: unstable system operation, stop application errors, application crashes.
Found an error? Select it and press Ctrl+EnterIndicates that the topic of receiving the ACTION_BOOT_COMPLETED message remains relevant to this day. As you can see, many beginners face the problem that they do not receive the ACTION_BOOT_COMPLETED message in their applications. In this article, I will try to summarize the data from the official documentation, the experience of many developers from stackoverflow.com, as well as my own experience. So, how to defeat this "insidious enemy" called "ACTION_BOOT_COMPLETED"?
1. Theory
Looking at examples from an official source (such as this one and this one) and studying the recommendations on stackoverflow.com, the following rules can be distinguished:- In the manifest, in the "manifest" element, specify the permission:
- In the manifest, in the "application" element, register your receiver to receive the ACTION_BOOT_COMPLETED message:
or
Use the correct fully qualified or relative class name for your broadcast receiver. In the description of the receiver, do not specify the attributes "enabled", "exported", etc. without necessity. The default settings and attributes are enough. - Your broadcast receiver code:
Public class BootCompletedReceiver extends BroadcastReceiver ( public BootCompletedReceiver() ( ) public void onReceive(Context context, Intent intent) ( if (intent.getAction().equals(Intent.ACTION_BOOT_COMPLETED)) ( // your code here ) ) )
If your receiver is only used for the ACTION_BOOT_COMPLETED message, then the "if" check is optional. However, sometimes developers use the same receiver for different messages. In this case, filter the messages by checking them inside the onReceive method. - The application must be installed on the internal memory. The Android OS is designed in such a way that the ACTION_BOOT_COMPLETED message is sent to applications before external memory is mounted. Therefore, applications installed on external memory will never receive this message. To tell the system not to install an application to external memory, you do NOT need to set the "@android:installLocation" attribute to "auto" or "preferExternal" in the manifest. By default, i.e. if this attribute is not specified, the OS will only install your application to internal memory. However, according to the official documentation, it's better to explicitly specify the value "internalOnly" so that you and other developers are not tempted to specify a different value in the future.
- After installation or forced stop (force stop), the application must be launched at least once so that the system "remembers" this application to send it the ACTION_BOOT_COMPLETED message. This behavior was implemented in Android 3.1 for security reasons. What is the point? All newly installed applications are in the “stopped” state (not to be confused with activation, because the OS manages this state for applications and activities in different ways). The application “leaves” to the same state when the user forcibly stops it in the phone settings. While the application is in this state, it will not be launched by the system for any reason (for example, via ACTION_BOOT_COMPLETED), except, of course, if it is started by the user himself. Thanks to this innovation, a large part of the "viruses and Trojans" stopped working, because. It is no longer possible to start automatically after installation.
The exception is system applications: see user.
- Features of the Fast boot mode in HTC devices. It is known that HTC devices do not reboot in the classical sense, but use the so-called. Fast boot mode (this is a form of hibernation), saving the state of the OS to disk. Therefore, the ACTION_BOOT_COMPLETED message is not sent by the system because no reload actually occurs (). Instead of ACTION_BOOT_COMPLETED, the system may send the following messages:
In your application, include the above messages in addition to ACTION_BOOT_COMPLETED in the "receiver" tag. In addition, it is necessary to register permission in addition to clause 1:
2. Practice: errors and features of operation
Let's analyze the mistakes that beginners make when setting up the application and in the code.
3. Debugging the receiver in the emulator and on real devices.
Results
In order for your application to run on boot on all devices, the manifest should at least look like this:
The receiver code will usually look like this:
Public class BootCompletedReceiver extends BroadcastReceiver ( public BootCompletedReceiver() ( ) public void onReceive(Context context, Intent intent) ( if (intent.getAction().equals(Intent.ACTION_BOOT_COMPLETED)) ( Toast toast = Toast.makeText(context.getApplicationContext( ), context.getResources().getString(R.string.your_message), Toast.LENGTH_LONG); toast.show(); Log.d("myapp", context.getResources().getString(R.string.your_message) ; // your code is here ) ) )
I hope this article will help beginners overcome the "insidious enemy" called "ACTION_BOOT_COMPLETED".