Interesting icons for folders. File, Folder and Shortcut on a computer: what is it? Change app shortcut icon
In order to start using a computer, the user needs at least a little idea of what he is working with. Therefore, first you need to understand the standard concepts.
What is a file - these are all the icons that you see on the monitor, any information on the computer is considered to be files.
A photo is a file, a song is a file, a movie is a file, and everything else is a file.
But among the files there may be folders, and you need to be able to distinguish them. What is a folder?
A folder is a repository for your files. Initially, a folder is an empty storage where you can store your files. This will help you clean up your computer, because using folders you can arrange music for music, photos for photos. Thus, you can create at least a whole media library with your own files and easy navigation. Let's look at this clearly.

We are looking at how we can make convenient navigation, for example, we called main folder my computer, so as not to throw everything into it in a row, in it we create a few more necessary folders, documents and a gallery.
In the gallery folder, we create several more folders, photos and music, in order to separate photos (Figure - 3.4) and music (Figure - 5) separately.
In the documents folder, we still have one direction of abstracts in which we add text files (Figure - 1.2).
Thus, you can create an entire library on your computer by sorting files into folders. On different computers, the folders may look different, but the standard ones are as in my pictures.
So, a folder is a storage in which we add our files so that they do not lie in one heap. But sometimes, the folder we need is very far away in our gallery and we have to click on other folders for a long time to get to it, which makes the work a little inconvenient and long. However, this is not necessary, for quick access to any folder, you can create a separate shortcut and then you can get to the folder we need in just one click. (Click - one click of the mouse)
What a shortcut is is a shortcut to your file or folder. A shortcut is, as it were, a mirror image of your file or folder, which can be placed in any convenient area of \u200b\u200bthe computer, usually shortcuts are placed on the desktop to get instant access to the necessary information.
For example, my entire computer is divided into 6 parts (main folders):

These folders are located on your hard drive, which means you have to make a lot of clicks to get to them. But I often use the picture folder, because I have a photo gallery in it and I want to have instant access to it. What do I need to do?
We right-click on the folder we need, in the pop-up menu we look for the send item, then go to the “Desktop (create shortcut)” tab, press select using the left mouse button.

Now if we look at the desktop, we will see a shortcut on it that allows you to move to the picture folder with a single click.

Agree, this is very convenient, over time you will get used to it, and your desktop will contain shortcuts to all folders and files that you use. And remember, a shortcut is just a mirror image, if you delete the shortcut, the folder or file itself will not be affected in any way. How to distinguish the original folder from the shortcut? Very simple, look at the bottom left of the icon, if you see an arrow, then this is a shortcut.

I want to immediately draw your attention to the grossest mistake of all beginners. Almost all novice users do not pay due attention to the correct creation of folders and do not use shortcuts at all.
They just create the necessary folders right on the desktop, because while they do not yet know that all the folders that are located on the desktop are saved on the hard drive that contains the operating system, so each new folder will slow down your computer, as a rule this leads to to errors and failures.
Therefore, never create folders on your desktop without special need, be literate from the very beginning, set up shortcuts for convenient work and do not clog your operating system.
Previous lesson
Ask a Question
On the screen of your monitor there are a large number of different folders and icons that have a standard look. Perhaps you are tired of their usual look, and you would like to change it. It's possible! But in order to do this, you need to download some collection of different icons for files and folders. For example this one.
Download icon set. In this set of icons in two formats.
How to change folder icon.
To replace the folder icon, hover over the desired folder and press the right mouse button. A list will appear. Select "Properties" in it.


An icon window will appear. You can choose your favorite icon for the folder from this list, or choose an icon from among the downloaded icons.

If you want to choose an icon among the icons you downloaded, then click the "Browse" button, go to the folder with icons, select the one you like among them and click "Open", then click "OK" in the windows that appear. The icon you like will be applied to the folder.

For example, I bring the folder that I got.

How to change file icon?
Let's do it the same way! Right-click on the file, go to the "Properties" section, but here go to the "Shortcut" tab, click "Change Icon".

By following these simple rules, you can gradually change all folder and file icons to the ones you like best. Folder icons are all the same, so they are most likely to be replaced. Then you can distinguish them not only by name, but also by color and shape.
Now that you've got your folder icons in order, you need to figure out how to use them as well. Some programs are best used in a portable version, so that in case of emergency you always have them at hand, namely: on a flash drive. However, at the same time, folders with programs become like a dump, and it becomes inconvenient to search for an .exe file in them to run. You can solve this problem by creating separate shortcuts placed at the root of the flash drive. These "smart guys" run everything on their own necessary programs absolutely on any computer, no matter where you put the storage device.

2. Return to its root and click on an empty space with the right mouse button. Now select the "Create" and "Shortcut" functions.

3. After that, we need to specify the path to it in a similar way:
%windir%\system32\cmd.exe /C start /B /D \*path to the folder with the program* \*path to the folder with the program*\*file name.exe*
When you prescribe it, do not forget to include the backslash "\". In our case, it looks like this:
%windir%\system32\cmd.exe /C start /B /D \Soft\OpenOffice \Soft\OpenOffice\X-ApacheOpenOffice.exe

A small footnote: if you decide to place all the shortcuts in a separate folder, creating an additional one in the root of the flash drive, indicate on the command line that it will need to go back to this folder. Just put the first slash dot "." In our particular case, it looks like this:
%windir%\system32\cmd.exe /C start /B /D .\Soft\OpenOffice .\Soft\OpenOffice\X-ApacheOpenOffice.exe


6. To window command line was not displayed at startup, select the "Minimized to icon" function in the "Window" field:

7. Right on the tab at the bottom of the window, click the "Change Icon" button, and then in the window that appears, open the program's executable file, since it is on it that we create a shortcut. We mark it and click "OK" - just like on the properties window.

8. Now the shortcut will change the icon on its own, and we will be able to launch the program from the root of the flash drive. You can easily transfer this folder, along with the program and shortcut, to any convenient place. At the same time, they will work normally while maintaining the relative path from the shortcut to the working executable file.

We hope that each of our articles helps you become more confident and not be afraid of any actions in working with a computer. Have a positive working mood!
Some of the basic computer concepts are things like file, shortcut, and folder.
Each of these digital units interacts with each other in one way or another, and any user needs to understand the differences between one and the other.
This article will help you figure out what packages, folders and shortcuts are for, as well as what is generally meant by these names.
What is a file
It is worth starting the analysis of this concept with an explanation of how the file system computer.
So, everyone hard drive there is a volume, calculated in computer measures - bytes.
Relatively speaking, these bytes are cells, each of which is occupied by information.
The number of these cells, which is needed to install the program or transfer any data to the media, is also indicated as a number - volume.
However, the whole point is that the PC does not perceive interconnected cells as different data. It compiles them into packages.
In other words, a file is a group of interconnected cells of information that take up space on a hard disk.
It is very important that in order for the computer to perceive the occupied area as a whole, it must be named the same - and that is why we cannot create two documents with the same name.
Each file has its own format, which determines its content, as well as the application in which it will open.
Here are examples of the most common ones:
- .exe is the so-called executable file. Its task is to simultaneously launch the work processes specified in the program.
- .doc - format text documents applications Microsoft Word. For versions older than 2010, the format has been modified to .docx.
- .mp3 is an audio format.
- .avi is a video format.
- .dll is a format of operating system functions that cannot be opened by the user.
- .jpg is a format for images and drawings.
- .pdf is an image format for the Adobe Acrobat Reader application.

These are the most common formats, but in fact there are many more.
It is worth making a note that the user can create files with the same name, but different formats.
In addition, it is worthwhile to understand that the shortcut and folders, which will be discussed further, are also files, but they are private options that differ from others.
What is a folder
In fact, this is the same program, only in its functions it is very different from the rest of the features of ordinary information packages.
They were created specifically to make it easier for users to structure information on their hard drive.
A folder is a special type of file that serves as a container for larger layers of information.
It is displayed in any operating system as an image of a stationery package, and also has its own names.
Also, like regular packages, folders cannot have the same name, but here the restriction is softer - two identical names cannot exist only within the same creation place.
If, say, you create one on disk C, and the other on D, then you can name them whatever you like.
The entire folder system is divided into levels. The very first one that needs to be opened to access the files is indicated first.
If there are more similar containers in it, then they are indicated by the second level, and so on.
Although most often these packages are created by the user himself, go at his request, there are applications that create folders without the knowledge of the user.
The following are examples of such folders:
- Spacekace is a place that is created by a special driver update program. Most often, it appears in the root directory of the system drive. The software is called DriverDoc, and if it is not already installed, then you can safely delete this container.
- NNU is another file that appears after installing third-party software without the knowledge of the user. This is also the place where updates are stored, but for another program - the Navigator.
In addition, there are system folders that are created by the OS itself. These include winevt, which stores the information needed to run Windows.
It is highly not recommended to remove or carry out any manipulations with them, since this can cause malfunctions and the subsequent need to reinstall the system.

What is a label
A shortcut is also a special type of package that was made to make it easier to launch software or open containers of information.
Also, its task is to remove the need to constantly delve into the contents of the hard drive, and instead keep the buttons to launch the application in one place.
In fact, a shortcut is a pointer through which the computer understands which program in this case should be launched.
In the properties of each such package, there is a clearly defined path to the place and a specific indication of what needs to be launched.
This way you can quickly open folders and programs. Usually shortcuts are created immediately when you install a new one. software, or are formed by the user independently as needed.

In general, this is all that can be said about the differences between files, shortcuts and folders.
You need to understand that the first is a collective concept that refers to all the information stored on a PC, while the second and third are special cases that facilitate and structure work with a computer.
Therefore, if you need to quickly launch your favorite game, then you should create a shortcut, and if you want to structure the document repository, then in this case you cannot do without containers.
If you want to give the folder an original look, then change the folder icon. I'm not talking about those that are already in the system, namely my icon from my photos or from any images.
You can make an icon (icon) of a folder from your photo in a standard program - Paint, which everyone should have in the operating room windows system 7
Trust me, with your own icons, it will be much more convenient and faster for you to find the desired folder without reading the text (folder name)

Here is a small example. This type of folder speeds up the search among a large number of similar folders.
Find program “Paint “ You can through “Start” and “All Programs” Run it and drag the picture into the program window. And even easier, it is to call the context menu by clicking on the image that you want to put as an icon with the right mouse button. Select the item “ Change" The program will open" Paint"
Create an Icon in Paint
And first of all, what we have to do is cut out the desired part of the image. In addition, they should be cut so that all sides are the same size. If you do not adjust the proportions of the sides, then the icon will turn out to be square, and the image will be flattened.
We cut. On the program panel, select the tool “ Select"In the selection options, specify the shape" Rectangular area” With the left mouse button, select a fragment of the photo. Holding down the key, we look at how the size changes in the bottom panel of the program.

Adjusted the size, click the "Crop" button

Now the photo is square, continue.
After cropping, we change the size of the future icon. Click " Resize" Change in pixels and enter the size 64 vertically and horizontally. Save "OK"


Put your icon on the folder
All the blank is there, apply it to the folder. Hover over any folder and right-click to bring up the menu. At the very bottom of the list, go to the item “ properties" Further " Settings" And at the bottom the button" Change icon .. "

A window with system icons will open. But we do not need them, we want to apply our image. Then we go to the overview and look for our newly created icon.

By the way, you may not find it in the explorer, since our image is not a format icon “ ico” To see it, select display “All files *.* “

Now everything is in order, click " OK“

It's that simple. The folder has become different from the rest, and it will be easier for us to navigate when searching for it.
But that's not all. Custom icons can also be applied to shortcuts. See how they look on my desktop.

A trick that will make your computer immortal!
Today, my colleagues from the ClubProfi team, for the first time, talk about a trick that makes your computer invulnerable to any adversity:
Thanks to this trick, your computer will be in perfect condition after each reboot.
At the same time, even if the day before you caught a virus, deleted system folders or broke operating system, it will be enough to restart the computer, and it will work again as before.
Using this approach, you will never again have to regularly clean your computer, reinstall the Operating System, call a wizard, etc. The computer will always be in the same state after each reboot.
To learn how it works and how to implement this technology already on New Year's holidays, see here.
Over time, the appearance of the "Desktop" can be pretty boring. Many users are limited to a simple change of wallpaper. The fresh picture of the main window, however, can be supplemented with new shortcut icons. How to change different types of icons, we will consider in this article.
Standard or third-party icons in ico format
First you need to decide which icons you need: classic ones from Microsoft, which are already stored in the PC's memory, or third-party images. In the second case, you must first create a picture yourself or find an image on the Internet. The main condition is that it must be small and have an ico extension.
You can find ready-made icon files with various designs on third-party resources and download them from there, and then install them using any of the methods below, depending on the type of icon (folder, application shortcut or main Windows icon). To search, use Google or Yandex services: enter the query "Desktop icons for Windows 10" in the line. The variety of icons available for download on the Internet is quite large: copyright, thematic, standard for certain Windows versions And so on.
You can change the icons for all shortcuts at the same time using an icon pack - a separate collection of icons packaged in a single file with the dll extension. Such packages can also be downloaded from various sources. However, be careful when searching for and downloading such files: trust sites that indicate that the files have been checked by antivirus. Otherwise, you run the risk of downloading a malicious program along with the file.
Photo Gallery: Desktop Icon Sets
Desktop shortcuts can be non-standard, but they must be in ico format. On the Internet, you can find many original icons for folders. The Aero icon pack is suitable for users who love modern design.
How to change the appearance of the main icons on Windows 10
The main Windows icons on the "Desktop" are icons with the names "Recycle Bin", "My Computer", "Network", "User Files", "Control Panel" and some others. They are placed on the "Desktop" by default after installation. You can independently determine which of them should be present on it and which should not. You also have the right to change their appearance in the "Settings" system window or using third-party utilities.
Through the Windows Settings window
The easiest way to change the appearance of the main icon is to go to the system settings window:
- In order for the “Options” window to appear on the display, the easiest way is to simultaneously press two keys: Win + I. But this combination may not work. In this case, there is another way: click on the "Start" button in the lower left corner of the screen, and in the menu itself, select the second icon from the bottom - the gear.
 Click on the gear icon in the start menu
 - We find ourselves in a large menu "Options" with many sections. We need the last tile in the first row - "Personalization".
 In the "Settings" window, click on the "Personalization" section
 - The tabbed section will open. You can launch the same window in a different way: click on the "Desktop" in the area free from icons, and in context menu select the very last item - "Personalization".
 Click on the item "Personalization" in the context menu of the "Desktop"
 - Go to the "Themes" block.
 Immediately go from the "Background" tab to "Themes"
 - In the right column with links to other windows and sections, click on the line "Desktop icon settings".
 Click on the "Desktop Icon Settings" link on the right side of the window
 - A small window will open on top of the "Parameters" - select the desired icon from the menu with the left mouse button, for example, "This computer". Next, click on the "Change Icon" button.
 Click on the icon you want to change and click on the "Change Icon" button
 - In the third window, select an icon from the list of standard Windows icons or upload your own using the "Browse" button.
 Select an icon from the available ones or upload your own using the "Browse" button
 - If you chose the second option (upload your own icons), the File Explorer window will appear. We are looking for a folder with the desired icon file in ico format. Click on the "Open" button, and then click OK.
 Find the desired ico file in the "Explorer" and click on "Open"
 - In the "Icon Options" window, first click "Apply" for all changes to take effect. If you want to change the icon for the other main Windows icons, repeat the same procedure for each of them. Click Apply again and then OK to close the window.
With the help of special utilities
There are many applications from various developers that allow you to change the icons of both the main shortcuts and other icons, such as folder icons, beyond recognition. In programs, you can change both individual icons and all icons at once, that is, install the whole package.
IconPackager: convenient and fine-tuning of icons appearance
IconPackager is a product from Stardock, which develops utilities for customizing the Windows Desktop interface. There are several icon packs preinstalled in this utility. It is also possible to upload your own and change the icons in the available collections, that is, create your own unique packs.
The utility supports versions of Windows above the "seven". Its disadvantage is that it is paid, but at the beginning it offers a month of free testing. Although the interface is in English, using the application is quite convenient:
- Open the official website of the app developer. To download the installer, click on the blue Try It Free button.
 Click on the blue Try It Free button to download the installer
 - Run the installer and install the program by following the simple instructions in the window.
- Click the Finish button to bring the application window to the display.
 Click on Finish to close the "Installation Wizard" and open the program window
 - To start using the trial version, click on the Start 30 Day Trial button.
 Click on Start 30 Day Trial to start using the program for free for a month
 - If you want to upload a third-party icon that you have previously downloaded from the Internet, in the Look & Feel tab, click on the Icon Package Options drop-down menu. We select in it the penultimate item Add Icon Package, and then - Install from disk.
 Click on Add Icon Package and then select Install from disk to download your collection
 - In "Windows Explorer" find the file with the icon pack and click on "Open" - the collection will be added to the list of currently available ones.
- You can also select a theme from the list. Let's try to put, for example, Delta.
 Click on the Delta package below
 - Click on Preview to see a preview of all the icons in this pack. If you like them, close the second window and boldly click on the Apply icons to my desktop button.
 Click on Preview to preview the entire collection of icons
 - If you want to get old Windows icons back, just apply the first theme in the list - Windows Default Icons.
- In the Colors tab you can change the color, hue, brightness of the icons.
 In the Colors tab, customize the color scheme of the available icons
 - With the item I want to adjust the color of my Icon Package, you can adjust the icons to the theme of your "Desktop" and the color of the "Taskbar". For example, they can completely change the color to red if there is a theme on Windows with such a shade. After all the changes, click on Apply icons to my desktop.
 Icons can take on the color of the current Windows theme
 - In the Live Folders section, you can put separate icons for folders - live icons. To do this, check the box to the left of Always use the Live Folder icons selected below. Then just select the type of folders.
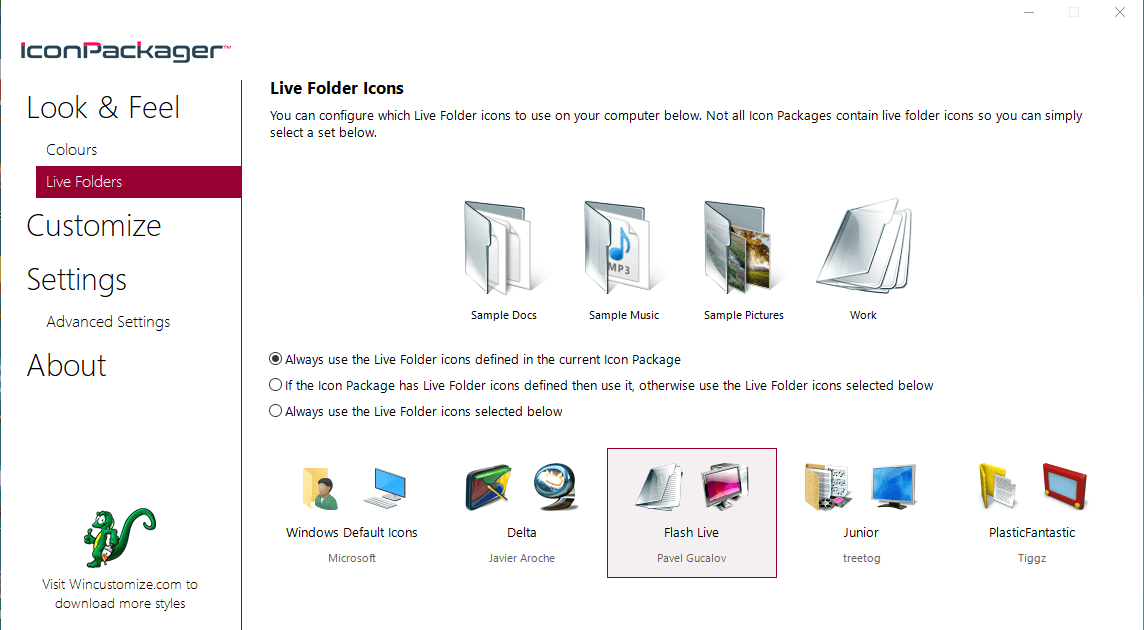 In the Live Folders block, select individual folder icons
 - The Customize tab allows you to create your own icon packs. To change a specific icon, click Change this Icon.
 The Customize section allows you to create your own collections and change those presented in the program
 - In a new small window, select among the available ones or add your own icon using the Browse button.
 In the Change Icon window, select an icon from the available menus or upload your own using the Browse button
 - When all changes to the package have been made, click on Save Icon Package.
 Save changes to the icon pack using the Save Icon Package option
 - In the small window, confirm that you want to make changes to the package. After that, all settings should be saved successfully.
 Click "Yes" to confirm your intention to save changes
 - There are additional settings in the Settings section. In particular, you can determine which Windows icons should be changed and which should not be touched. Here you can enable Cursors to change the mouse pointer.
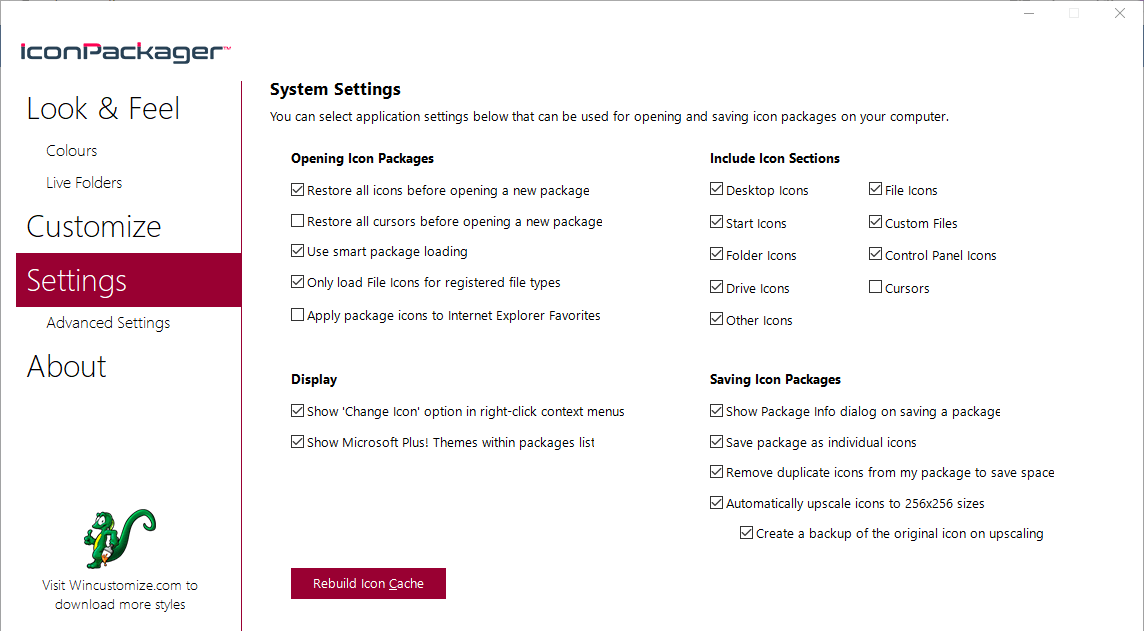 In the Settings tab, you can configure the change for certain types of icons: folders, files, main Windows icons, and others
Video: how to install new icons using IconPackager
Se7en Theme Source Patcher: a free utility and a large selection of packages
The application is designed to replace all classic desktop icons, local hard drives, folders, and Control Panel icons. Initially, the program was created for the "seven", but now it supports other versions of Windows, in particular, our "ten".
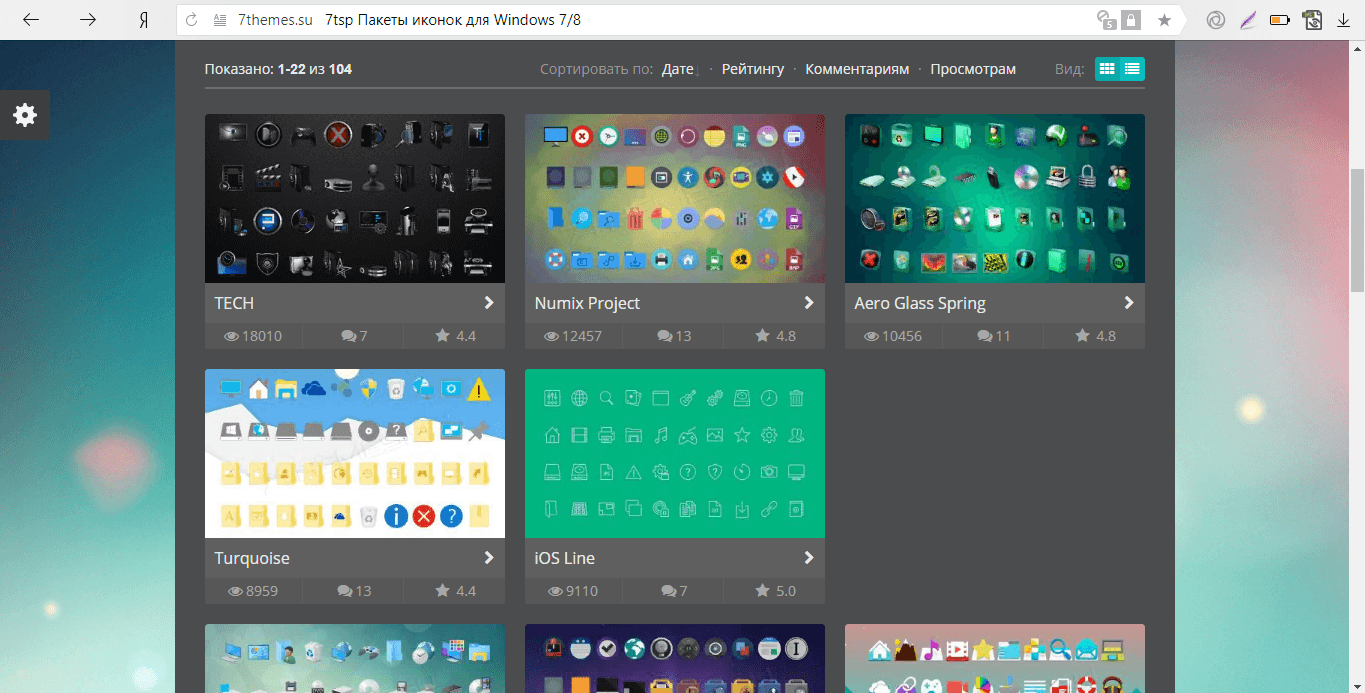
The program uses the popular 7z compression format. The disadvantage of the utility is that icon packs are not initially built into it. You need to download all collections on the same site from where you download the application, and then add them yourself to the utility database for further use. Nevertheless, the choice of packages on this resource is very large.
The advantage of this program is that it is free. Before replacing icons, the utility creates a restore point and backup system files so that you can return all the Windows icons to the classic ones:
- Let's move on to apps. Click on the "Download" button.
 Click on the "Download" button to download the program's executable file
 - Your browser will download the archive - open it, and right-click on the file in it and click on "Extract to ..." in the menu. Select a folder and unzip the archive.
 Click on "Extract to the specified folder" in the context menu of the file
 - Find the extracted file, right-click on it again and click on the "Run as administrator" link in the context menu.
 In the context menu of the unpacked file, click on "Run as administrator"
 - Allow this application to make changes to the PC by clicking on "Yes" in the system window that appears. The application does not require installation, so its window will open immediately.
 Click "Yes" to allow the program to make changes to the device
 - Pre-select and download your favorite themes from the same site.
 Download the icon pack you like on the developer's website
 - In the application window, click Add a Custom Pack.
 Click the Add a Custom Pack button
 - In Windows Explorer, select the downloaded icon pack archive and click Open.
 Find the icon pack file and click "Open"
 - The collection will appear in the menu. At the bottom of the window there will be a Start Patching button. Click on it. The utility will ask if you need to create a restore point. Be sure to create - click "Yes".
 Give permission to create a backup before installing new icons
 - Wait for the procedure to complete. After that, you need to reboot the device twice for the changes to take effect.
- Icon packs from this developer contain not only icons, but also some other elements of the Windows interface, for example, pictures to replace the clock, date, and even the Task Manager window. If you do not need them, before installing the collection, click on the Extra item. In the Option Menu, uncheck the items you don't need and click Save.
 In the Option Menu, remove unnecessary items that you do not want to change and click on Save
 - If you want to restore classic Windows icons, click on the Restore button in the lower right corner in the program window. In the new window, check the box next to the first item and click OK.
 To return the default Windows icons, click Restore and then OK
You must install a new icon pack on a clean system, that is, on classic Windows icon images, and not on third-party icons. Therefore, make a preliminary recovery using the Restore key if you have icons that are different from the standard ones.
Video: how to put icons using Theme Source Patcher utility
IconTo: application with built-in instructions for use
IconTo is a free application from the developer AleXStam that can change icons for system items, folders, hard disk partitions or even their groups.
 In IconTo you can change the icons of folders, system objects and hard disk partitions
 It has the following advantages over other utilities:
- Over 300 built-in icons. It is also possible to upload your own icons.
- Instructions for installing icons: at the bottom of the window you will see hints.
- There is a conversion of png, jpg, ico formats, as well as an option to extract images from files in dll, exe and some other formats.
- The program interface is completely in Russian.
IconTo is suitable for all versions of Windows, from Windows 98 to the modern "ten". The size of the downloaded installer does not exceed 15.1 MB, so the utility can be used on computers with a small amount of memory. The application is available for download on the official website of the developer.
How to change folder icon on Windows 10
If you want to highlight a certain folder against the general background of icons to make it more recognizable, follow these steps:
- Click on the folder shortcut with the right mouse button. In the menu that appears, click on "Properties".
 In the context menu of the folder, select "Properties"
 - A window with various sections will immediately appear on the display - go to the "Settings" tab. In the last section, click on the "Change Icon" button.
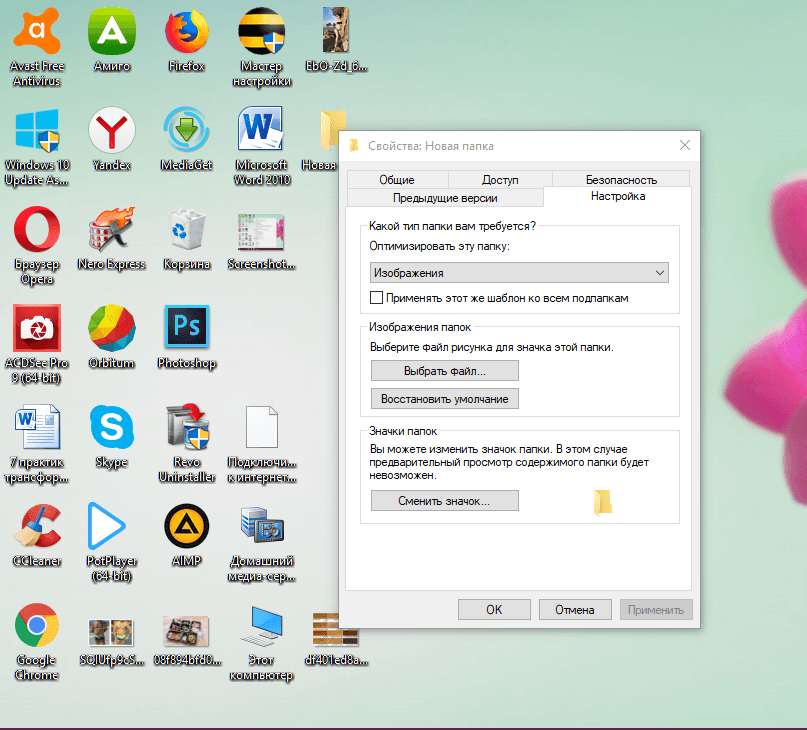 In the "Settings" tab, click on the "Change Icon" button
 - Select an icon from the available ones: scroll the list of icons to the right to see all the shortcuts. If you have your own image with the desired ico format and you want to put it exactly, click "Browse".
 Select an icon among the suggested ones or click on the "Browse" button if you have your own icon
 - In the additional Windows Explorer window, find the folder where the image is stored. Left-click on it to select it, and then click on "Open".
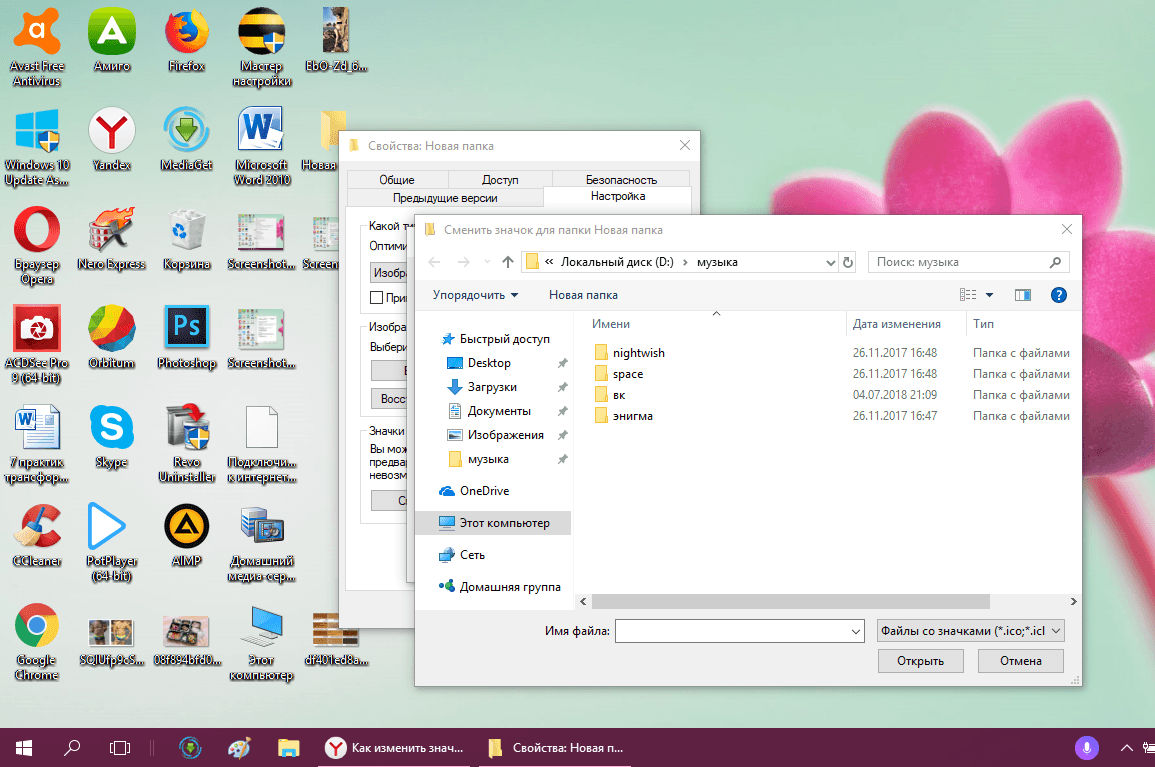 Find the desired icon in the form of a file with the extension .ico in "Windows Explorer"
 - For a convenient search, you can use the line with a magnifying glass - just enter the name of the icon file or the ico extension.
 Enter ico in the search bar and find the desired file
 - To save the changes, click OK in the window with the list of available icons. The folder icon will then change.
How to change all folder icons at once
To change the appearance of all folders, you need to resort to a more complex method - editing the registry in the system window. However, this method is not recommended for beginners: it is better to use the special programs described in the "Using special utilities" section of this article. If you are already a confident PC user, then you can perform manipulations in the system window:
- To call the "Registry Editor" system window, simultaneously press the Win and R keys - a small "Run" panel will open with a single "Open" line. In it we type the regedit command. For the system to execute it, click on OK or press Enter.
 In the "Run" window, write the command regedit
 - In the next window, click "Yes". So we will give permission to the "Registry Editor" to make changes on the computer.
 Click "Yes" to allow the system utility to make changes to the device
 - First, let's make a backup in case the registry is edited incorrectly. On the top panel we find the item "File" and click on it with the left mouse button. In the menu that appears, click on "Export".
 Select "Export" from the "File" menu
 - In the new window that opens, select the folder in which the copy will be stored. Give an appropriate name to the file. Then click "Save".
 Name and save a copy in any folder
 - Now you can start editing. Double click on the third main branch - HKEY_LOCAL_MACHINE.
 Open the HKEY_LOCAL_MACHINE folder by double clicking
 - In turn, go to the following blocks in the same left part of the window: Microsoft - Windows - CurrentVersion - Explorer - Shell Icons.
 The Shell Icons folder should be in the Explorer section
 - If you did not find the last Shell Icons folder, create this section yourself: right-click on the Explorer section, select "Create" in the context menu, and then click on the "Section" item. We name it accordingly.
 If you do not have a Shell Icons folder, create it using the context menu of the Explorer section
 - Click on Shell Icons. On the right panel, right-click on an empty area to open the menu. In it, select "Create", and then - "String parameter". Specify the number 3 as the name for the new registry entry.
 Click on "Create" and then on "String Parameter"
 - Right click on it and select "Edit". You can also simply double-click on it with the left mouse button.
 Click on "Edit" in the context menu of the newly created parameter
 - In a small window, in the line for the value of the entry, insert the path to the file, where its name and ico extension must be indicated. We click on OK.
 In the line "Value" we write the path to the ico file, which should be set as an icon
 - If you have a 64-bit system, the path to the final Shell Icons folder in the left pane will be slightly different: Wow6432Node - Microsoft - Windows - CurrentVersion - Explorer. Next, repeat the same steps as for a 32-bit system.
- Close all windows and reboot your device. After starting the OS, you will see that the icons of all folders have changed.
Change app shortcut icon
If you are tired of the old shortcut icons of your programs, try replacing them. For example, let's take the icon of the popular Google Chrome browser:
- We are looking for the desired icon on the "Desktop" (in our case, this is the "Google Chrome" icon). We click on it with the right mouse button to call the context menu with a list of options. We select the same item as in the case of changing the folder icon - "Properties".
 Click on "Properties" in the context menu of the Google Chrome shortcut
 - You will immediately be taken to the desired tab - "Shortcut". Click on the middle button "Change Icon".
 In the "Shortcut" section, click on the "Change Icon" button
 - A window similar to the one shown in the instructions for changing the folder icon will appear on the display. Here, however, there will not be such a large selection of icons. As a source, we specify not the system library, but the executable file chrome.exe. We make a choice, for example, in favor of the original yellow icon. We click on OK.
 Select an icon from the available ones or upload your own ico file
 - In the window with the properties of the shortcut, first click "Apply". The system will ask permission to make changes. Click on the "Continue" button.
 Click on the "Continue" button to save all changes
 - After that, click on OK - the window will close, and the icon icon will change.
- If you want to change the shortcut icon to your own, use the Browse button to upload your own third-party image file.
How to create your own icon
If you want to set your image (drawn or downloaded from any site) with a png or jpg extension as an icon, you need to reduce its size if necessary using the standard Windows Paint utility, and then convert it to an ico file using special services - converters.
An easier way is to use the services of online and software icon generators that are already configured to create files with a certain format and other parameters, such as image sizes. For example, let's take the IcoFX program, which combines an icon generator and a tool for drawing and editing pictures. It is paid, but its developer, IcoFX Software, provides 30 days of free use. How to use it, we will tell in the instructions:
 On the home page program click on Windows Icon From Image if you want to download an image
 A page with a set of image editing tools will open.
 Click on the Magic Wand on the left vertical panel
 On the right panel, select the checkerboard tile to make the background transparent
 Click Save to save the edited image
 Find the folder where you want to save the future icon and click on "Save"
 Choose the size and color quality of the future drawing
If you are no longer attracted by the look of the old icons on the "Desktop", change them either to other classic Windows icons, or to your own - any small ico images found on the Internet or drawn by yourself. To change icons, you can use both the built-in Windows tools and third-party applications.