Wi-fi router Asus RT-N12: setting up a connection to a computer. Router asus rt n12 connection and setup How to set up an asus router on a laptop
Those who order the Internet connection service are faced with the need to organize the work of Asus RT-N12. The Wi-Fi router works via wireless communication protocols, additionally supporting a wired connection. Modern devices allow you to combine computers, tablets, as well as smartphones, TVs equipped with Smart TV into one network, which provides more convenient use of technology.
The Asus RT-N12 router provides simultaneous and fast Internet access for any of the above gadgets
This router requires certain settings. It is worth noting that all routers of a well-known brand differ in almost the same settings, however, in different models However, there are various nuances.
The Asus RT-N12 setup manual will help even a novice user to easily understand the connection features, gaining access to the World Wide Web in a few minutes.
How to connect Asus RT-N12?
Connecting the Asus RT-N12 router to a computer takes a matter of minutes. You need to be careful and careful.
Then you need to follow these steps:
- We connect the wire from the provider to the correct port.
- We connect any of the LAN ports located on the modem to the network card of the computer equipment using a special cable included with the router. It is worth noting that the cable must be properly connected to the network card connector along with the LAN port.
- We fasten the antennas to the device.
- Turn on the power for the Asus RT-N12 router.
Before setting up Beeline Internet on your computer, make sure that the IPv4 connection properties look like this:
- Automatically obtain IP addresses.
- Obtain DNS server addresses - automatically.
If you do not check, there is a high probability that you will encounter problems with the Internet connection provided by the provider. These properties are located in the Network and Control Center, which is located in the "Control Panel" section. When you click on "adapter settings", click on the connection icon on local network. Then select properties and go to the IPv4 protocol section. In this protocol, select properties and set the necessary parameters. It is worth noting that some third-party utilities are able to change these parameters while performing their functions to optimize the Internet.
It is important not to use the provider's connection, both during the procedure itself and after it is completed. Otherwise, the Internet connection will not work properly. A provider connection is a connection used by the user before buying a modem.
The next step will enable the connection. We launch the Internet browser and follow the recommendations. This instruction will ensure that there are no difficulties when connecting:
- First of all, enter the modem's IP address in the address bar, which looks like this: 192.168.1.1.
- Then we press "Enter".
- In the window that appears, the system will prompt you to enter control data that allows you to access the router interface. We register login and password. It is worth noting that each router of this company is characterized by standard control information, so we write admin in both fields. After that, you will enter the main page, where the Beeline Internet settings will be directly selected.
On the main page, click on the "Internet" section, which is located on the left.
L2TP connection will require filling in the connection parameters. In the WAN connection type field, specify L2TP. Then click on "Yes" in the column asking whether to obtain an IP address automatically. We set a similar parameter near the "Connect to the DNS server automatically" field. Then enter the username. It is worth noting that in this column we indicate the login that the provider provided. The same goes for the password.
- We save the selected parameters.
On ends. An Internet connection will be established within a minute, and you will be able to log on to the network and open any Internet sites.
Configuring Wi-Fi Settings
RT-N12 provides an opportunity to get simultaneous Internet access to different gadgets and devices. Setting up the Asus RT-N12 router, in particular this function, requires the selection of the following parameters:
- In the menu, click on the option called "Wireless Network".
- In the new window select:
- hostname for the Asus RT-N12 router, i.e. SSID. Name wireless network will be visible to users and will allow you to recognize it in the list of available networks. It is worth noting that Russian letters should not be used.
- Specify the following as the authentication method: WPA2-Personal.
To create it, we use both Latin letters and numbers. The minimum number of characters is eight.
- Save the settings by clicking on the appropriate option.
After that, the user will be able to connect any device to the wireless network. It is worth noting that if you connect to the router wirelessly after changing the settings of the router, the Internet connection will be disconnected. If you encounter such a situation, then rejoin the network by searching for it and entering an access password.
WATCH VIDEO
After purchasing asus rt n12, you have a question: how to set up a local wifi network. To answer, you need to understand the features of connecting through this router. That is what we are going to do now.
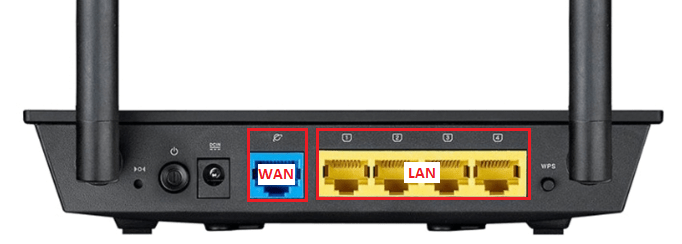
So, first of all, let's deal with the connectors on the back of the equipment and connect the cables correctly. There are 5 special ports on the back of the router: 1 of them is designed for WAN, to which the provider's main cable is connected, and the remaining 4 for LAN type cables.
After connecting all the cables, further configuration is best done from a personal computer that has a direct connection to the equipment. Next, we move on to setting up the router itself.
IMPORTANT! To connect a desktop computer or laptop, a LAN cable is used, one end of which is connected to any LAN port y on the router, and the second to the corresponding port on the network card of your personal computer or laptop.
This recommendation will seem ridiculous and obvious to someone, but still check the connection of the router to the outlet. And also make sure that the Internet connection is working and there are no problems with the provider. In addition, check that only the LAN connection is active.
Initial router setup
We have already connected all the cables, checked the Internet connection and plugged the router into a power outlet. Now we need to learn how to set up the route. And this is done as follows:

IMPORTANT! We write “admin” if we have not changed the factory settings yet.
- If you are setting up the hardware for the first time, and you are logged in for the first time, the automatic setup will start. With automatic configuration, you only need to click on the "next" button and enter the necessary data.
- Then the router will determine the type of Internet connection. If it is successfully determined, enter the password and username that you usually use to access the Internet.
- Now you need to enter an individual name for the Wi-Fi wireless network and come up with a password for it.
If it is not possible to set up the equipment and establish correct operation using automatic settings, and the type of connection was not detected automatically, you must make the settings manually.
Setting up a local network of various providers using a router
Internet settings from Beeline, Rostelecom and Dom.ru differ from each other. Next, consider the setup procedure for each provider.
To begin with, let's analyze the Asus RT-N12 setup for the Beeline network: on the main page of the router settings (we went to it through the browser's address bar using the IP address of the router), click the "Internet" section. A window opens in front of us, where we fill in some lines, as shown in the illustration below. The main thing is to select L2TP in the connection type and tp.internet.beeline.ru in the VPN server item. We put ticks in two places, as in the figure.

After that, save the entered data by clicking "OK". If all the items are marked correctly, after 20-30 seconds the connection with the Beeline network will be terminated. Then, after a few seconds, the connection will be restored, and you will be able to work with various sites and other Internet resources. Also, the Wi-Fi network will be correctly displayed and work on all devices: smartphones, tablets, and so on.
If you use the services of Rostelecom, or Dom.ru, then we configure the router in the same way, but only on the main page of the router settings in the "Internet" section we indicate other data: in the connection type item, we indicate PPPoE, not L2TP, as before. We also enter your unique username and password. The rest of the items remain unchanged. The illustration below shows what a completed section looks like.

Setting up a wireless Wi-Fi network using the Asus RT-N12 router
Open the menu and select "Wireless Network". Next, fill in a number of items:
- The first item is the SSID, or the name of the wireless network. The name of your network will be displayed in the Wi-Fi search list on all devices within the range of the network. The name is written in English letters.
- In the "Authentication" item, select WPA2-Personal.
- Next, enter the password in the "WPA Preshared Key" item. The password must contain at least 8 digits.
- We save the settings.
The figure below shows what the "Wireless Network" section looks like.

Setting up a local network via asus rt n12
So, we figured out how to connect and configure the asus rt n12 router. Now let's look at how to set up a local wifi network through asus rt n12.
We go to the "Local Network" section.
We change the address of the router, which was set by default, we do this in the "LAN IP address" tab.
Enter the IP address of your local network and click Apply. After that, the equipment will work for your local network.
This article will sequentially present the configuration of the Asus RT-N12 router. Here you can see step by step and in pictures the process of connecting, configuring, and then operating the router.
This device works with stationary and tablet computers, smartphones, laptops, modern TVs via Wi-Fi, etc. Otherwise, you can use the device's cabled connection instead of the wireless connection.
The router is configured as follows:

In order to correctly configure the router, you will need data on the type, which is written in the contract with the Internet service provider, and whether the binding is made to the physical address of the network device. Moreover, if the connection is of the type Point to point protocol over Ethernet(PPPoE)/Layer 2 Tunneling Protocol (L2TP)/Point-to-Point Tunneling Protocol (PPTP), you will most likely need more information such as user login, system password, and IP address. Of course, this information is available in the contract.

On a note! In some cases, the default network name is set to something other than the factory one, or even a password is entered. Either this router has already been carried out. One way or another, before each new setting, it is recommended to do a full reset to the factory state - this can be done by holding the back button for more than ten seconds - after that all the indicators will go out for a while, a full reboot will be carried out, as well as a return to the default settings.
Setting via control panel
After connecting the router, and after establishing a signal between it and the computer, you need to:
- Write the following address in the address bar of any browser: 192.168.1.1.

- After that, the "Control Panel" will open with a large selection of settings. In this case, a setup wizard is required. To do this, click on the "Go" button.

- After that, the system will prompt you to come up with an individual password for the “Control Panel” with the router settings. In any case, you must specify a password. First in the main field, then in the additional confirmation field, and after that you should proceed to the next window by clicking on "Next".

- In the next window of wireless network settings, in the line "Network name »
enter the name of the Wi-Fi network used, and in the line "Network key »
register a new key that will be used when connecting to the network. You have to click "Apply" »
and wait a bit.

- The router will reboot. In the field of network connections, in place of the old Wi-Fi network, a new one will appear, with an individually specified name. When connecting to it, the new password will also be used.

- After connecting, you need to return to the "Control Panel" again. There you should open a page with information about this connection. After clicking on "Next »
, the system will pop up a new window.

- In a new window there will be an inscription « Sign in » and a request for a login with a password. This is the same login and password for the settings menu. They must be entered in the appropriate fields.
Set up manually
If everything goes smoothly, then everything is in order, and most likely there will be no additional problems when connecting. This means that in this case, the provider connects using "Automatic IP", and thus the router sets all the parameters on its own. In this case, at this stage, you can already connect to the Internet and work.

However, there is another option. In some cases, providers use a connection such as Layer 2 Tuneling Protocol (L2TP), Point to Point Tuneling Protocol (PPTP) , static ip , or Point to point protocol over Ethernet (PPPoE) (used by providers such as beeline or dom.ru), in which case you will have to manually configure a number of parameters.
Step 1. If the provider uses the above connection technologies, then in the "Manage settings" menu, when the connection is checked, the system will offer several types of Internet connection to choose from.

Step 2 In the next window, you will need to enter the username and password that are used when connecting. This information must be specified in the contract from the Internet service provider. You may also need to enter information such as IP address, service name, and so on. Each situation is different depending on the Internet provider and the connection itself.

Step 3 During setup, immediately after the router connects to the Internet, you will be prompted to set up Wi-Fi, etc. Everything should be set up immediately, according to the principle already indicated. You can independently change the parameters of the Internet connection (WAN). To do this, go to the main settings page, find the tab "Internet » and select "Connect » .

This page contains the main and most important Internet connection parameters for the Asus rt N12 router. After the name of the wireless network and password have been remembered, when the Internet is working properly, the settings menu can be closed.
How to set up wifi and change password
In order to change the name of the Wi-Fi network at any time, or change the key used when connecting directly to Wi-Fi:

A number of network settings, including channel parameters, are located on the left panel on the main page, on the “Wireless Network” tab » .
After the network name and also the key are changed, the access point will also change, so, of course, you will need to reconnect the first time. In some cases, it is not possible to connect - sometimes such problems occur after changing the password. In this case, it is recommended to delete the network connection, create a new one, and then reconnect.
How to protect router settings
Earlier in the article it was already indicated that you need to create a password for the "Settings Panel". However, in some cases, if the user did not do this in time, or some problems arose, or you need to change the password, you need to do the following:

The note! When entering the add-in menu, this password will be entered. It should be recorded separately, otherwise you will have to roll back the router to the factory settings.
Video - Setting up the ASUS RT-N12 router
Imagine: hurrying to work in the morning, you went to the kitchen to have breakfast. Turn on the kettle, and he will answer you: “The device cannot perform this operation. Please update the firmware! Turn on the toaster and hear: " Software outdated. Install the update!”…
The day is not far off when everything that surrounds us will be connected to the Internet, and it is time for us to prepare for this. How? Well ... first, let's learn how to configure a router (router) - a gadget that connects devices to a local network and provides them with Internet access. Today I will tell you how to set up a router using the example of a typical Asus RT-N12 D1 home segment model.
How to set up a router: instructions on the example of Asus RT-N12 D1
First power on
So here it is, brand new and shiny, fresh out of the box. The first thing experienced users do is install the latest version of firmware (firmware), which maximizes the potential of the device. Firmware for other models must be taken only on the manufacturer's website! Otherwise, your router may turn into a horned "brick".
Upgrade Procedurefirmware:
- Download the firmware to your computer and unpack the archive.
- Connect the power supply to the router and connect it to the mains, then turn on the device with the "Power" button.
- Connect the router to the computer using a patch cord (network cable): insert one end into the PC's network card connector, and the other end into any of the device's LAN ports. On the Asus RT-N12 D1, these are yellow sockets 1-4, the blue WAN socket is for the ISP cable.
- Log in to the router's web interface: launch any browser and type 192.168.1.1 (its local IP) into the address bar. In the authentication window, enter: username (username) - "admin" and password (password) - "admin". This information is given on a label affixed to the bottom of the machine.
The data for entering the web interface (popularly often called the "web face") may be different. For example, the network address is 192.168.0.1 or “tplinklogin.net” (on some tp-link models), login with a password is “mts”, “beeline” or something else. The main thing is to know where to look for them - on the factory label on the bottom side of the case of any router. Always.

- The first thing you will see after logging into the Asus RT-N12 D1 web interface and other similar Asus models is the Internet Quick Settings window. We are not interested in it yet, so open the second tab and click on the house icon - this will take you to the main menu.

- Go to the "Administration" section and open the "Firmware Update" tab. On devices of other brands, this section may be called “System” or “System Tools”, and the desired menu item may be “Software Update” or “Upgrade Firmware”.
- At the top of the window is the current firmware version. If the one you downloaded is newer, click the "Choose file" button and specify its location. By clicking on "Submit" next, you will start the update.
Attention! In no case do not interfere with the firmware installation process - do not press any buttons on the device, do not disconnect the network cable, do not turn off or restart the computer.

- When the firmware is installed, exit the web interface and press the "Reset" button on the device case, which will reset the settings.
Setting up an Internet connection (WAN)
Fast auto tuning
- Connect the provider's cable to the WAN port of the router (in my example, this is a blue socket marked with an icon that looks like a logo Internet Explorer, on some other models it is signed "INTERNET").
- Open the web interface. The Quick Internet Setup feature is able to automatically recognize the type of connection. Click in the first window "Go" and do the following:
- Change the settings for accessing the "web-muzzle". Leaving this data as default is not safe.

- Enter the connection login and password that the service provider gave you.

- Give your wireless mesh a unique name and create a network key (password to connect).

On this quick settings finished. Click Apply.
Manual tuning (for experienced)
Ask your provider for the following information:
- WAN connection type.
- Your name and password account.
- The Mac address to which your contract is linked (if the Internet provider does not use MAC identification, then it is not necessary).
- IP address, default gateway, and subnet mask (if you have been assigned a static IP).
- DNS addresses if automatic connection is not used.
- If necessary, other data: VPN server(when connecting PPTP and L2TP), pppd parameters, service name, access concentrator, etc.
Go to the main menu "web faces" and in the section " Additional settings» click « Internet". The main WAN settings are on the tab " Are common».

First of all, in Main parameters» Set your WAN connection type. The rest is “Enable WAN, NAT, UpnP”, leave it as it is, if the provider has not specified anything about this.
IN " At a construction siteIP addressesWAN» Leave the value "automatic" if you have not been issued a static IP, which is an additional paid service.
« DNS WAN” Also leave automatic or mark “No” and enter manually. For example, public from or .

IN " Account settings» Be sure to enter your username and password. The rest - according to the circumstances.

IN " Supplier's special requirements”, if necessary, write down the VPN address, host name and Mac specified in the contract. Click Apply.

Setting up a wireless network (WLAN)
In chapter " Wireless network"The most basic is also on the" General "tab.

- SSID– WLAN name. You can give any.
- BroadcastingSSID- determines whether gadgets with Wi-Fi will see your mesh in the list of available connections. If you mark " hideSSID”, then some devices will not be able to connect to it.
- Wireless network mode. The optimal one is “Auto”, it allows any 802.11b / g / n devices to connect to the router without speed limits.
- Broadcast channel width. The default is 20/40 MHz. To maximize bandwidth, set to 40 MHz. With frequent failures and breaks in communication, reduce to 20 MHz.
- Channel(1-13) on which the transmission takes place. If the connection is consistently good, leave the default selection. With frequent breaks, you can sort through the channels and stop at where there are the least problems.
- Option " Extended channel» allows you to use an additional channel when working in some modes.
- Authentication and EncryptionWPA ensure data security during transmission. Optimal - WPA2-Personal and AES.
- Preshared keyWPA– a sequence of any characters, from 8 to 63, which will be used for encryption.
- Key rotation interval– after the number of uses specified here, the key must be changed. You can put 0.
For those who have never set up Wi-Fi, all this may seem complicated. To make life easier for beginners, a technology was invented Wireless WPS. It allows you to transfer wireless network settings from a Wi-Fi adapter to a router literally “over the air”.
On the back of the Asus RT-N12 D1, if you notice, there is a "WPS" button. On some older devices, it may be called "QSS" or "EZSetup". So, to transfer the settings, just press this button first on the router, then on the adapter and wait a couple of minutes.

Set up a local area network (LAN)
Attention! If you do not understand the purpose of these parameters, leave them as they are!
The main parameters of the local network are set on the first two tabs of the menu of the same name - " LAN IP" And " DHCP server».
On the tab " LAN IP» indicates the IP of the router in the local network. Here, as you can see, the same address is written on the label, and you can change it (within the available address pool).

Further - "ServerDHCP"(DHCP stands for Dynamic Host Configuration Protocol). If it is enabled, connected devices will automatically obtain IP addresses. If it is disabled and at the same time manual assignment is activated, then, accordingly, they will not.
Also on the "DHCP" tab you can set:
- pool start and end address within a subnet (for example, a subnet allows 256 IP addresses, but for security purposes we will limit this to the number of network devices we have at home);
- IP lease time;
- the main gateway (in some cases, the IP of the provider's gateway is prescribed here);
- IP DNS and WINS servers (the latter are used in NetBIOS-based network structures);
- IP and Mac addresses of hosts that bypass DHCP (with manual IP assignment).

Most home users find it more convenient to keep the DHCP server enabled, that is, do not change anything in this section.
Firewall
A firewall is the protection of an internal network from external intrusion by filtering incoming and outgoing traffic. Filtering is carried out according to the rules that the administrator creates. It is recommended to enable it if you are not sure that all your gadgets are securely protected by a software firewall.

On the tab " Are common» produced:
- enable/disable firewall;
- activation / deactivation of protection against DoS attacks (optimal value - yes);
- selection of the type of registered packets (lost, accepted, both types or absent);
- permission/prohibition to respond to ping requests from the Internet (optimally - no).
On the tab " FilterURL» indicate the addresses of sites that you want to block.

« Keyword filter» will exclude loading pages where these words occur.

« Network Services Filter» prevents the listed hosts (clients) from accessing certain network services. Uses 2 types of filtering - blacklist and whitelist.
- Hosts from the black list are denied access to the specified services, while others are allowed.
- Whitelisted hosts are only allowed to access the specified services. The rest are prohibited.
Here you can also set the rule duration.

General menu
Finally, let's go over the sections of the "General" menu.
Attention! If the purpose of the option is not clear to you, it is not recommended to reconfigure it!
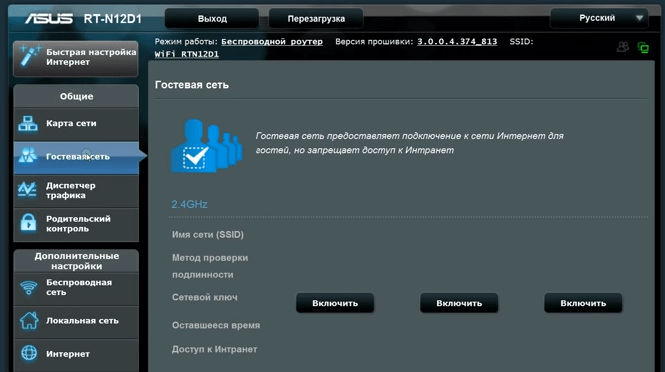
- "Network Map"- Displays current LAN and WAN connections, Wi-Fi security settings, router and client information. Allows you to change individual settings, such as encryption options, network key, etc.

- "Guest Network"- allows guest Wi-Fi networks to use the router to access the Internet, but prohibits access to LAN resources.
- "Traffic Manager" allows experienced users to manage QoS - a technology for distributing network resources depending on the type of traffic and the set priorities. For example, voice traffic is given more bandwidth and higher priority than other traffic. Works in automatic and custom modes, the first one is enabled by default. Optimally tuned.

- "Parental control". The purpose of this section, I think, is clear to everyone. It makes it possible to restrict certain hosts from using the Internet. For those who find it difficult to figure it out on their own, you can watch the tutorial video.

As you can see, a router is a complex thing and can do much more than just transfer traffic from one network to another. We have considered only the most important options of the Asus RT-N12 D1, and if I dared to describe them all, it would be a very, very long article. But the main thing, I think, we have achieved: now you can configure routers of this type in no time.
The RT G32 router is designed to broadcast Internet traffic wirelessly and wired. Its setup takes about 5-10 minutes for an experienced user, and a beginner will have to follow the instructions.
By setting up a router, you can use your home Internet from any mobile device without any wired connections. All you need to do is log in to your Wi-Fi network.
In this article, you will learn how to configure the ASUS RT-G32 router.
Connecting a router
The package contains all the elements necessary to connect the router:
- complete cord (jack-jack) for connecting the device to a PC;
- power unit;
- the router itself.
The picture shows all the necessary ports.
To connect, do the following:
- plug your Internet cable into the marked "INTERNET" port (usually it is highlighted in blue);
- with a complete cord, you must connect any output "LAN" port of the router to the corresponding connector on the computer;
- plug the mains charger into the DC 12V power connector.
Thus, we implement the chain: Internet - Router - PC. In this case, a separate power source will be an additional path.
Authorization
To access the ASUS RT G32 router settings, open a browser and enter http://192.168.1.1 in the address bar.
After pressing Enter, a window with an authorization request will appear:
- login(username);
- password.

Prior to the first setup, both fields must be set to "admin". By default, this is both login and password at the same time.
In the menu that appears, select the interface language. The language selection is at the top of the page between the general information and the exit from the panel.

Internet setup
This is the main tweak that will allow the router to receive and send traffic to your ISP. It will require detailed information about connecting to the Internet.
Most users prefer not to conduct such an operation on their own and give money to those who do it for them. There is nothing terrible here. But think about it, is it worth paying decent amounts for actions that, with the acquisition of experience, will take no more than 5 minutes?
If you have come to the right conclusion, and will take care of the matter yourself, read the general information. In fact, it is not enough, and therefore it is easy to learn.
Each provider uses one of the allowed connection types:
- PPPoE;
- L2TP;
- DHCP.
This information is indicated in the WAN menu (the very first item).
follow to this menu needed in a chain:
- WAN;
- "Internet connection".
Here you specify the type of connection.

The setup procedure is greatly simplified if your provider uses dynamic IP technology. If you have this technology, it is enough to specify the connection type "Dynamic IP". Then the router will automatically access the Internet.
In other cases, further instructions must be followed. If you do not understand where to get the information to fill in the required fields, contact the provider by phone. It can also be placed in your written contract (account data with the provider).
PPPoE connections (Rostelecom, Dom.ru)
When setting up a WAN, for example, for the Rostelecom provider, use the following parameters:
- select PPPoE as connection type;
- in the IP address setting, set automatic acquisition;
- connection to the DNS server should also be automatic;
- in the account fields, you must specify your login and password issued by the provider;
- be sure to enter "rostelecom" below in the "Hostname" field.

After entering the data, check the visual prompt and click "Apply".
L2TP connections (Beeline)
After selecting L2TP (L2TP + Dynamic TP) as Beeline data transfer type, continue filling in the fields:

If the data is entered correctly, click "Apply" and try to use the Internet.
The visual table of parameters corresponds to the image above (Rostelecom connection).
Note that for Beeline it is mandatory to specify the server and hostname.
PPTP (VPN) when automatically obtaining a local IP address
Specify the communication technology:
- Internet setup;
- connection type.
Make the setting:
- "YES" on automatic IP acquisition;
- "YES" on automatic connection to DNS;
- enter the login and password received from the provider;
- fill in the Server.. field in the service provider block (the data is specified in the contract or you can check with the provider over the phone).
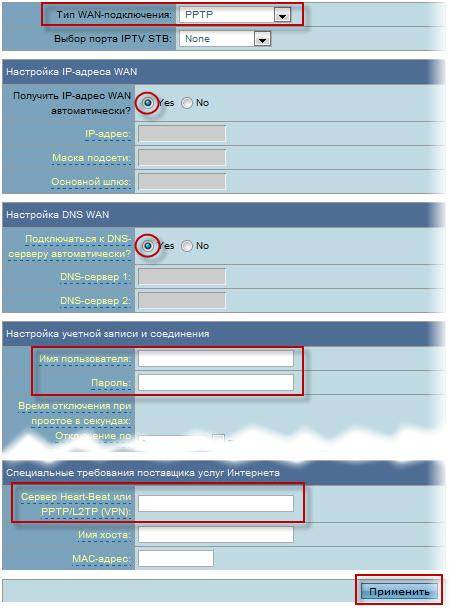
PPTP (VPN) with static local IP address
This technology does not provide for automatic data acquisition. Therefore, you will have to enter all the information manually. As a source, use a written contract with the provider.
Proceed to setting up the Internet by selecting the appropriate type of connection:
- Internet setup;
- connection type.
- automatic receipt of IP - "NO";
- specify the IP address;
- Subnet mask;
- main gate;
- DNS server 1 and 2;
- enter the login and password for the provider;
- fill in the Heart-Beat or PPTP/L2TP(VPN) Server field.
Video: setting up a router
NAT when automatically obtaining an IP address (DHCP)
This is the same data transmission technology that does not require any additional information.
The only step in the configuration will be to specify the connection:
- follow the options menu;
- select WAN connection type Dynamic IP.

After selecting, click "Apply" and use the Internet.
Setting up IPTV on ASUS RT G32 router
This manipulation is carried out if you want to broadcast programs to your TV via the Internet by wire. After all, it is much easier than paying for a separate television service.
Before setting up IPTV directly, make sure that the appropriate port is specified in the WAN connection (find the port number under the cord that you plugged in to broadcast TV). This item is located immediately below the connection type.
- Route.

Indicate "YES" everywhere. After a couple of seconds, the TV will display the image.
If the image does not appear, consider several possible reasons for this:
- your ISP does not provide this feature (check with your service provider);
- device parameters do not match the parameters of your TV (which happens in rare cases);
- the provider uses a special connection type.
WiFi
Setting up a wireless network is the final step in preparing the device for full operation. The only exceptions are the additional features of the device.
To set up a Wi-Fi network, follow the chain:
- wireless network;
- are common.

There are many fields here, some of which are mandatory:
- SSID is the name of your Wi-Fi network (you can specify any);
- by selecting "YES" or "NO" next to Hide SSID you will determine whether the network will be visible mobile devices when searching;
- the country code nominally identifies the location;
- the channel sets the connection flow and if you have a lot of networks nearby, you should determine the free channel yourself to avoid interference with the Wi-Fi connection (if there are no networks near you, select "Auto");
- authentication method - protection level (the most common WPA2);
- The WPA preshared key is your password for using Wi-Fi.
Video: ASUS Wireless Router RT G32
To complete the setup, click Apply and restart the router. After that, it will successfully distribute traffic wirelessly.
Setting up a DC++ client connection
With the use of a router, in most cases there is a problem when working with a DC ++ client. This problem is caused by the traffic translation function being redirected from the computer to the router. And this complicates the interaction with torrents.
To fix this problem, go to the menu:
- virtual server.
- "YES" on the item enable virtual server;
- service name - any;
- choose the range of ports yourself (for example, 3211 or 3333);
- the local IP address corresponds to the one on which the DC should run;
- local port - any of the specified range (it must be unoccupied);
- protocol is BOTH (you choose both).
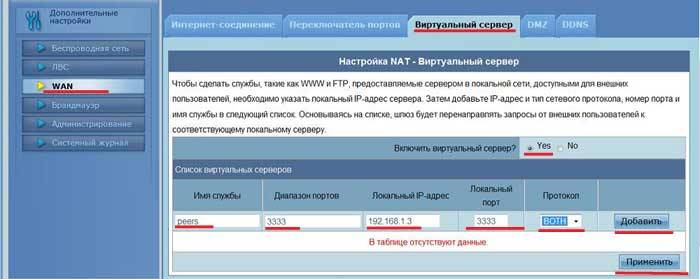
To finish, click add and then apply.
This completes the first step. Now proceed to the second.
Client DC Synchronization:
- connection mode - firewall with manual port forwarding;
- specify your external IP address in the field (you can find out through the router "System log" "System status");
- TCP / UDP ports - indicate the one that is selected in the preliminary configuration of the virtual server on the router (3333 was indicated as an example).

After the operation, the problem should be fixed.
Saving or Restoring Settings
Quite often it happens that the device settings are lost.
There may be several reasons for this:
- accidentally changing settings;
- an error occurs in the firmware of the router.
To avoid repeated manipulation of the settings, you should use the restore function.
To do this, follow the menu chain:

Note! If the router firmware is out of order, there is a possibility that you will not be able to use the admin panel. For such cases, the “Reset” button is provided on the rear panel of the device. It is located deep in the body and therefore you will need to use a thin object.
Here you will see all three available operations:
- restore - will lead to complete reset and return to factory settings;
- save - allows you to make a copy of all settings in a special file on your hard drive;
- load (maybe Send) - will help you return the saved settings from the saved file.
Do not panic if the settings are lost for some unknown reason. If you did not foresee such a situation the first time, be sure to make a save for the next one.
Firmware update
Firmware is the software side of the device, which is responsible for its functionality. The router you purchased may not match latest version firmware. But the updates contain fixes for the detected problems in their previous versions.
To update the firmware, you must first find this file on the official website of the manufacturer. It is enough to specify the version operating system and upload the file.
Then follow the menu of the router:

In the New Firmware File field, click Browse.. and select the downloaded firmware.
After clicking Submit, the router should automatically update and reboot. If the reboot does not occur, do it yourself.
Important! If you have updated the firmware, the router will have to be configured again.
Setting up a Wi-Fi router ASUS RT G32 is quite simple. The manufacturer did a good job with the visualization of the menu, so that the user could understand where the required tab is located. With this approach, you will be able to configure yourself after 3 manipulations.
It should be remembered that the information that is not in the proposed options of the customizer is with one hundred percent probability in the contract with the provider. Basically, these are your Login and Password. It can also be the connection type and server addresses in the case of non-automatic data acquisition.
>