Gamenet driver with digital signature. How to disable digital signature verification of Windows drivers. Group Policy Settings
It is not uncommon for gamers to encounter the problem that the applications they would like to run do not work. People immediately rush to the forums and technical support to find a solution. One method is some command line manipulation. At the same time, few people explain exactly what these changes lead to. It's about what to do to disable digital signature verification Windows drivers 7 (64 bits), and other versions too.
Signature
Let's first understand what a label is on software and any files that allows you to determine its creator, as well as to ensure that the software has not been changed after the signature.
In the case of drivers, the operating system checks their authenticity, as well as compatibility with this OS. In addition, the driver is checked for the absence of modifications by third-party users.
If a file or driver contains an incorrect signature or does not exist at all, this may either mean that it was created by an unverified developer, or that this file has been modified (for example, infected with a virus). However, the absence of a signature does not guarantee the harmfulness of drivers, and its presence is not necessarily a guarantee of security.
Example
We will start, oddly enough, with a specific example when you may need to know the "OS" of Windows 7. Disabling digital signature verification of drivers may be required all the time, for example, if you decide to play toys from the Fogeym service. Previously, you had to download a special client, as Mail.ru now has, but they decided to abandon it and built the entire system into a browser.
But along with the new technique, a new defense called Frost also came. In order for it to work, you need to perform the actions we are considering. Moreover, the advice of other users will be quite unambiguous, but useless. As a result, two problems arise.
- Why does a self-respecting gaming service force protection?
- Why does this method not always work? And the user, frustrated by an unsuccessful attempt, forgets to return the settings to the initial ones.
As you can see, it may be necessary to disable driver digital signature verification in Windows 7, but how useful is this for the system and security? We do not in any way recommend that you do not trust the sites in the example, however, if you encounter problems, it is better to contact technical support instead of user forums. Experts will help and prompt you, not unknown people with a dubious reputation.
Warning
Before you start the procedure, which we will talk about in this article, absolutely decide and decide - do you really need it? Are you absolutely sure what and why you are going to do? After all, if you disable driver digital signature verification in Windows 7, the security of your system is at risk.

On the one hand, there is no problem if this operation is necessary to install drivers from a reliable source. For example, from a licensed disc, and not bought on the market in a stall. On the other hand, applications downloaded from the Internet from unverified sites and exchangers. By downloading a driver (application) in such a place and disabling protection, you can infect your computer with a spy that will collect data, steal passwords, or even connect your computer to a network for DDoS attacks. In general, decide for yourself how much you need to disable the digital signature verification of Windows 7 drivers (32 bits).
First way
Finally, we got to the direct consideration of the issue. There are several options for disabling digital signature verification of drivers in Windows 7 Home Basic 64 and other versions. Both of these methods are slightly different from each other and require almost the same steps. So, let's begin.
- First, we need to enable command line so that you can enter the necessary commands. To do this, click "Start", then go to "My Programs" and to "Accessories". You need to run this utility as an administrator. If the user entry with which you work on the computer is the only one by default and has full rights, then you can simply enter in the Start button menu in the search
- After that, enter bcdedit.exe /set nointegritychecks ON into the line. If you need to enable driver checking again, you need to set the ON parameter to OFF. Be careful and don't get confused. It seems that ON in English is "enable", but in fact you are turning on a service that disables driver verification.

Second way
The next method is not much different from the previous one. In order to disable driver digital signature verification in Windows 7, you will need to enable the command line again, as described in the paragraph above, and enter the following sequence. After each of them, you must confirm the entry by pressing Enter.
- bcdedit.exe -set loadoptions DDISABLE_INTEGRITY_CHECKS
- bcdedit.exe -set TESTSIGNING ON
Make sure the task has been completed. This can be understood by the message "Operation completed successfully". Only after that the verification of the digital signature will be disabled. If you need to roll back the changes that these commands made to your computer, then you need to repeat them in reverse order, with a few exceptions. Instead of the ON -> OFF command, and instead of DDISABLE - ENABLE.
Third method
This method is not suitable for everyone, since it only temporarily solves the problem that we are trying to deal with today. If you need to install and test drivers for any equipment, you can safely use it. But if, as already mentioned, we are talking about game protection systems that do not work with the check enabled, then, unfortunately, this technique will not work for you.

In order to disable driver signature verification in Windows 7, you will need to restart your computer. Then, at the stage when you usually enter BIOS, you need to press the F8 key. After that, a window should appear with a choice of boot options and their settings. You should be interested in almost the very bottom line, the first one above the "normal start" - Disable driver signature enforcement.
By booting the operating system with this option, you will be able to install the driver you need, however, during a normal boot, it will stop working. So in any case, disabling the digital signature verification of Windows 7 (64) drivers is simply necessary forever if you want to work with the driver you need.
Fourth way
Another method involves using and configuring Group Policy on your operating system. It should be noted right away that this method does not work on all assemblies of operating systems, so it is not a fact that it will suit you. Now we perform the following steps.
- Open the Start menu.
- We enter gpedit.msc into the search.
- A window will open with many directories. You will need to follow the path below.
- First, select the item - "User Configuration". After that, go to the "administrative templates" branch and select "system". The last thing you need to do is find the item "driver installation".
- Select the "Digital Signature" option. We double-click on it with the left button, or click a little to the left of "Change parameter".
- Set the switch in the upper left corner to "Off".
- We accept changes.

Protection against counterfeit drivers should start working immediately, but you can restart your computer to be sure. If you are going to restore the default value, please note that if you specify "Warn" about an unsigned driver, then even if you continue to install it, it will not work.
Fifth method
We will only mention this possibility in passing. This action is not only a little illegal, but also fraught with considerable risk, because we will almost forcibly install an unverified driver on the computer.
If all the previous methods did not help you, you can always sign the driver yourself. To do this, you will need the driver itself and two completely legal developer programs SDK for Windows and Driver Kit, of course, latest versions, or pirated software, the use of which may be more dangerous for your computer than the same drivers that you are trying to "force" install on your computer.

Before doing this, you can try adding the driver manually. To do this, run the command line in the already known way and write the Pnputil -a c:\***.inf command, where the last value is the path to the desired driver. If the computer still gives an error, you will have to sign the driver yourself.
Conclusion
And finally, whatever you do with operating system and whatever changes you make, if they do not help you solve your problem, do not forget to return everything as it was. Remember that no matter how users criticize the operating Windows system, it was created by professionals who know a lot about programming. By intervening on your own in an already created, integral structure, you risk a lot.
In Windows 7, Microsoft has significantly tightened the requirements for installed drivers (we recommend that you read an entertaining article about). Now any driver you install must be digitally signed, verified and certified by Microsoft. Before downloading and installing a driver for any device, Windows 7 verifies the digital signature of that driver. And if you see a message when you try to install a driver for a new device in Windows 7: " Windows can't verify the publisher of this driver software", then this driver is not digitally signed. In the dialog box indicated, you can select the option ”Install this driver software anyway” ("Install this driver anyway"), however, in any case, this driver will not be installed, which means that the device will not work.
When installing an unsigned driver, the device will be marked with an exclamation mark in Device Manager and contain the following error message:
Windows cannot verify the digital signature for the drivers required for this device. A recent hardware or software change might have installed a file that is signed incorrectly or damaged, or that might be malicious software from an unknown source. (Code 52)


Also, the following errors may indicate problems with the digital signature of drivers:
The digital signature verification policy for drivers works in both 32 (x86) and 64 (x64) versions of Windows 7, and the main reason for the appearance of such a policy for installing third-party drivers is the desire to improve the stability and reliability of the Windows OS, ensuring that all released drivers passed through the certification test and the compatibility test at Microsoft.
Fortunately, in Windows 7 you can disable driver digital signature verification. And you can do this in several ways:
- Sign the driver yourself (you can do this using special software, or follow the instructions described in the manual)
- Disable Driver Signature Verification Using Group Policy
- Change OS boot mode to boot without digital signature verification (using bcdedit)
- Boot Windows 7 without digital signature verification (via the boot menu by pressing F8)
Let's consider all the listed options for disabling driver signature verification
Booting Windows 7 Without Digital Signature Verification
It is possible to temporarily disable verification of driver signatures if you reboot the system, press the key at boot F8 . In the menu that appears with system boot options, select the item DisabledriverSignatureEnforcement("Disabling mandatory driver signature verification").

After booting Win 7, you can install an unsigned driver and test its operation, however, if you boot in normal mode, the driver will not work
Disable driver signature verification in Windows 7 using group policy
In the event that you completely want to disable driver signing verification in Windows 7, you can do this using Group Policy.
Open the Local Group Policy Editor by typing
In the policies menu, go to User Configuration->Administrative Templates-> System->Driver Installation.

In the right pane find ‘Code Signing for Device Drivers’ and double click on it.
In the window that appears, select ‘Enabled’, and in the lower menu select ‘Ignore’. Click OK and restart your computer. After rebooting and applying the policy, in your Windows 7 you will completely disable driver signing, and you can install any, including unsigned drivers.

Disable driver signature verification in Windows 7 using bcdedit
Open a command prompt with administrator rights and type the following two commands in sequence:
bcdedit.exe /set loadoptions DDISABLE_INTEGRITY_CHECKS bcdedit.exe /set TESTSIGNING ON
After executing each of the commands, a message should appear stating that the command completed successfully.

Restart your computer and try installing the unsigned driver. Voila!
If you need to cancel this mode of operation and re-enable digital signature verification in win 7, run the following commands:
bcdedit.exe /set loadoptions ENABLE_INTEGRITY_CHECKS bcdedit.exe /set TESTSIGNING OFF
Good day, dear readers Denis Trishkin is with you!
Windows users who have worked on versions of XP and earlier are well aware that these operating systems often have problems installing new hardware. In new developments, unpleasant moments also occur, but the digital signature of the driver is most often to blame for them. The fact is that, starting with this version, Microsoft has tightened the requirements for software that allows you to connect new equipment. Before installing, the OS checks for the presence of the necessary label. If it is not detected, the device will not work. But there are ways to get around this.
The digital signature of the driver is a special security label that indicates the creator of the software, and also marks its change after the moment of certification. If the relevant software has such a “stigma”, you can be sure that it is of high quality and nothing has happened to it since release.
Is it possible to install a driver without a signature?( )
It is almost impossible to determine that, after publication, a file without a corresponding label has not been modified. It is advisable not to allow such software to be opened on your computer if you are not 100% sure of the authenticity of the source and complete security. The problem is that viruses are usually hidden under such documents.
What to do during installation?( )
During the installation of a new program, a window will appear in which one of the warning messages will be indicated:
The problem is that there are no reliable sources on the Internet that can confirm the reliability of the user who published the program. In fact, anyone can open the contents of a package and change it. The first version could indeed have come from the manufacturing company. But if there is no label, someone most likely changed it.
I recommend installing such programs only if you received it from a licensed disk.
If you still decide to use such software, most likely the operating system simply will not automatically miss it. Therefore, the installed equipment in the device manager will have a special sign (exclamation mark in a yellow triangle).


Important! The e-label validation policy in Windows 7 works on all versions: x86 and x64. The main reason for introducing this rule is to increase the security and stability of the system.
But on the part of users, this is not always convenient, since sometimes there are devices that just need to be installed, but at the same time, the operating system simply does not want to do this. Don't worry - there is a way.
At the same time, there are several ways to disable the verification of an electronic label:
 ( )
( )
This method allows you to temporarily disable the function we need. To do this, press the button during the download. F8. After that, a black screen will appear with OS boot options. You need to select " disable mandatory driver signature verification».


Then we start Windows and install the necessary software. Here you can test its work.
If you boot the system in working mode, the new device will not work.
Disable via group policy( )
To prevent electronic labels from being checked at all, it can be disabled through group policy. To do this, open the program "", and then type gpedit.msc.


In the window that appears, go to:

Now you can install any driver.
Shutdown via bcdedit( )
To write the code, open the command prompt as an administrator. In the window we type the following:
bcdedit.exe /set loadoptions DDISABLE_INTEGRITY_CHECKS
bcdedit.exe /set TESTSIGNING ON
Press Enter.


Successful completion will be confirmed by the corresponding command. Restart your computer and check.
To turn this feature back on, after the " TESTSIGNING» write « OFF».
If we consider this issue as a whole, such additional protection allows the system to work longer without interruption. On the other hand, some devices may simply not function on your computer, as Windows considered them dangerous. In any case, it is up to you to choose whether to install an unsigned product or not. After all, the issue of computer security lies entirely on the shoulders of its owner.
I hope you found something new for yourself in the article. Subscribe and tell your friends about us - let them be literate in the computer field.
All 64-bit versions of Windows, starting with Windows 7, by default prevent the installation of device drivers that are not signed with the correct digital signature. Unsigned drivers are blocked by the operating system. The presence of a digital signature ensures (to some extent) that the driver is released by a specific developer or vendor, and its code has not been modified since it was signed.
Today we will show you how independently sign any unsigned driver for 64 bit versionWindows10 or Windows 7 .
Let's assume that we have a device driver for x64 Windows 10 or Windows 7 that is not digitally signed (in our example, this will be a driver for a rather old video card). Archive with drivers for our version of Windows (I managed to find a driver for Windows Vista x64) was downloaded from the manufacturer's website and its contents were unpacked to the c:\tools\drv1\ directory. Let's try to install the driver by adding it to using the standard utility pnputil.
pnputil –a "C:\tools\drv1\xg20gr.inf"
Note. This and all subsequent commands are executed from a command prompt run with administrator rights.
During the installation process, Windows 7 will display a warning that the system cannot verify the digital signature of this driver.
In Windows 10, such a warning does not even appear, and a warning appears in the console that in a third-party INF file there is no information about the digital signature.

When trying to install a driver from Windows Explorer, if you right-click on the driver's inf file and select Install / Install an error will appear:

The third-party INF does not contain digital signature information.
The third party INF does not contain signature information.

Let's try to sign this driver using a self-signed certificate.
Utilities required for driver signing
To work, we will need to download and install (with default settings) the following Windows Application Developer Tools.
- Windows SDK (or Microsoft Visual Studio 2005 or higher) for your version of Windows - these packages include the Windows SDK Signing tools for Desktop, which includes the utility we need - signtool.exe;
- Windows Driver Kit 7.1.0 - ISO image GRMWDK_EN_7600_1.ISO size 649 MB
Advice. On Windows 10, you can use newer versions of the Windows SDK and Windows Driver Kit. Before installing these tools, make sure you have the .NET Framework 4 installed on your system.
Create a self-signed certificate and private key
Let's create the directory C:\DriverCert in the root of the disk.
Open a command prompt and change to the following directory:
cd C:\Program Files (x86)\Microsoft SDKs\Windows\v7.1\bin
Let's create a self-signed certificate and a private key issued, for example, to Winitpro:
makecert -r -sv C:\DriverCert\myDrivers.pvk -n CN="Winitpro" C:\DriverCert\MyDrivers.cer
During creation, the utility will ask you to specify a password for the key, let it be P@ ss0 wrd.

Based on the created certificate, we will create a public key for the software publisher's certificate (PKCS).
cert2spc C:\DriverCert\myDrivers.cer C:\DriverCert\myDrivers.spc
Let's combine the public key (.spc) and the private key (.pvk) in one Personal Information Exchange (.pfx) format certificate file.
pvk2pfx -pvk C:\DriverCert\myDrivers.pvk -pi [email protected]-spc C:\DriverCert\myDrivers.spc -pfx C:\DriverCert\myDrivers.pfx -po [email protected]
Advice. You can create a self-signed Code Signing certificate without using third-party tools using the PowerShell 5.0 cmdlet - .
$cert = New-SelfSignedCertificate -Subject "Winitpro" -Type CodeSigningCert -CertStoreLocation cert:\LocalMachine\My
Then you need to export this certificate to a pfx file with a password:
$CertPassword = ConvertTo-SecureString -String " [email protected]” -Force –AsPlainText
Export-PfxCertificate -Cert $cert -FilePath C:\DriverCert\myDrivers.pfx -Password $CertPassword

Advice. Even though the certificate has a limited validity period, expiring a CodeSigning certificate means you won't be able to create new signatures. The validity period of a driver already signed with this certificate is indefinite (or old signatures are valid for the specified timestamp).
Generating a CAT driver file
Let's create a directory C:\ DriverCert\ xg and copy into it all the files from the directory where the archive with the driver was originally unpacked (c:\tools\drv1\). Make sure that among the files there are files with the extension . sys and . inf(in our case xg20grp.sys and xg20gr).
Let's go to the directory:
cd C:\WinDDK\7600.16385.1\bin\selfsign
Based on the inf file, using the inf2cat.exe utility (included in the Windows Driver Kit -WDK), we will generate a file for our cat platform (contains information about all driver package files).
inf2cat.exe /driver:"C:\DriverCert\xg" /os:7_X64 /verbose

To make sure that the procedure went correctly, check that there are messages in the log:
Signability test complete.
and
Catalog generation complete.
Advice. In my case, the Inf2Cat.exe command returned an error:
signability test failed.
22.9.7: DriverVer set to incorrect date (must be postdated to 4/21/2009 for newest OS) in \hdx861a.inf
To fix the error, you need to find the line with DriverVer= in the section and replace it with:

After executing the command, the g20gr.cat file should be updated in the driver directory
Signing the driver with a self-signed certificate
Go to directory:
cd "C:\Program Files (x86)\Windows Kits\10\bin\10.0.17134.0\x64"
Let's sign a set of driver files with the certificate we created, as a timestamp service (time stamp) we will use the Globalsign resource. The following command will digitally sign a CAT file using a certificate stored in a password-protected .pfx file.
signtool sign /f C:\DriverCert\myDrivers.pfx /p [email protected]/t http://timestamp.globalsign.com/scripts/timstamp.dll /v "C:\DriverCert\xg\xg20gr.cat"

If the file is signed successfully, the following message should appear:
Successfully signed: C:\DriverCert\xg\xg20gr.cat
Number of files successfully Signed: 1
Note. The driver's digital signature is contained in the .cat file referenced by the driver's .inf file. Using the following command, you can check the digital signature of the driver in the cat file:
SignTool verify /v /pa c:\DriverCert\xg\xg20gr.cat

Lido in the file properties on the Digital Signatures tab.

The CAT file contains digital signatures (fingerprints / thumbprints) of all files that are in the driver directory (files that are listed in the INF file in the section CopyFiles). If any of these files have been changed, then the checksum of the files will not match the data in the CAT file, as a result, installation of such a driver will fail.
Certificate Installation
Because the certificate we created is self-signed, the system does not trust it by default. Let's add our certificate to the local certificate store. You can do this with the commands:
certmgr.exe -add C:\DriverCert\myDrivers.cer -s -r localMachine ROOT
certmgr.exe -add C:\DriverCert\myDrivers.cer -s -r localMachine TRUSTEDPUBLISHER
Or from the graphical wizard for adding certificates (the certificate must be placed in the Trusted Publishers and Trusted root Certification Authorities local machine). In a domain, you can centrally .

Note. You can check the presence of the certificate we created in trusted ones by opening the certificate management snap-in (certmgr.msc) and checking the presence of the certificate we created (issued for winitpro) in the appropriate stores. 
Note. When checking the certificate store using the utility, this certificate will be displayed as untrusted, because it is not listed with the list of Microsoft root certificates (this list is needed periodically).
Installing a driver certified by a self-signed certificate
Let's try to install the driver signed by us again by running the command:
Pnputil -i -a C:\DriverCert\xg20\xg20gr.inf
Now, during the driver installation process, the warning window about the missing digital signature of the driver will not appear.
Successfully installed the driver on a device on the system.
driver package added successfully.

In Windows 7, this warning appears. about whether you are sure you want to install this driver (on Windows 10 x64 1803, this pop-up window does not appear). By pressing " Install”, you will install the driver on the system.

If for some reason the driver is not installed, a detailed driver installation log is contained in the file C:\Windows\inf\setupapi.dev.log. This log will allow you to get more detailed information about the installation error. In most cases, the error “Driver package failed signature validation” occurs - most likely this means that the driver certificate has not been added to trusted certificates.
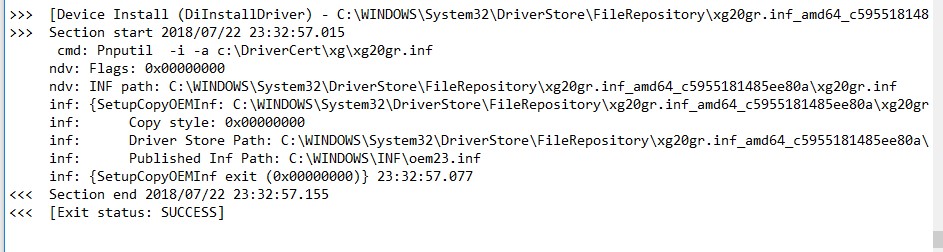
If the driver installation was successful, the setupapi.dev.log file will contain lines like this:
>>> >>> Section start 2018/07/22 23:32:57.015 cmd: Pnputil -i -a c:\DriverCert\xg\xg20gr.inf ndv: Flags: 0x00000000 ndv: INF path: C:\WINDOWS\System32 \DriverStore\FileRepository\xg20gr.inf_amd64_c5955181485ee80a\xg20gr.inf inf: (SetupCopyOEMInf: C:\WINDOWS\System32\DriverStore\FileRepository\xg20gr.inf_amd64_c5955181485ee80a\xg20gr.inf) 23:32:57.046 inf: Copy style: 0x00000000 inf: Driver Store Path: C:\WINDOWS\System32\DriverStore\FileRepository\xg20gr.inf_amd64_c5955181485ee80a\xg20gr.inf inf: Published Inf Path: C:\WINDOWS\INF\oem23.inf inf: (SetupCopyOEMInf exit (0x00000000)) 23:32: 57.077<<< Section end 2018/07/22 23:32:57.155 <<<
As you can see, to install a self-signed driver, we didn't even have to disable driver digital signature verification using bcdedit.exe, as described (bcdedit.exe /set loadoptions DISABLE_INTEGRITY_CHECKS and bcdedit.exe /set testsigning ON commands).
Installing drivers is greatly simplified if you use special utilities that can automate all actions. Getting rid of routine is good, but when using such applications, they often offer unsigned drivers. As a result, the operating system issues a notification that the verification of the digital signature of the product has not been passed, and requests the user's permission to install such software. Here, all automation comes to an end, because you need to constantly click "Install this driver anyway."
There are two ways to get rid of this message:
- sign the problematic driver;
- disable digital signature verification for all products in the system.
Let's look at how to disable the digital signature of drivers in Windows 7, and at the end we will touch on the first option.
The term hides a certain digital label, an identifier by which the version of the product is determined, its relevance, authenticity, and security are checked. The signature indicates the absence of modifications by ill-wishers (embedding spyware and other malicious modules).
If you are trying to install an unsigned driver, be aware that you are solely responsible for the consequences of using it, and when installing it, you need to be sure that the download source is reliable.
There are several workarounds in Win 7. For all cases, except for a special option for starting the operating system, administrator rights will be required.
Special download option
Suitable if you need to temporarily work with unsigned software. When you want to run some emulator or test a device whose driver is not digitally signed, it is better to choose the following method. It consists in starting Windows 7 in one of the special modes.
- We restart the computer and start pressing F8 between the completion of the hardware self-test and the moment when the OS starts loading.
- Using the cursor block of keys, we move to the option "Disabling mandatory checks ...".
- Press Enter to confirm the action.
A feature of such an OS launch is that driver signature verification will not be performed exactly until the end of the current session. The next time the computer boots in normal mode, the unsigned driver will not work, and the user will see an alert that the driver could not be authenticated or failed.
Command line
If you need to constantly work with software that does not have a digital label, disable driver signature verification permanently. This is most quickly done using the command line.
Beginners are unlikely to know the commands that will be executed and the consequences of running them. In the absence of trust, it is better to go to one of the following sections, which visually shows how to allow the installation of unsigned programs to control the operation of peripherals, or watch a video on this topic.
- We open the command line by executing "cmd" in the command interpreter window (called with Win + R or by clicking on the button of the same name in the "Start") or in the "Start" search bar.
You can also call the command line through a shortcut in the "Standard" directory.
- Type or paste the following command "bcdedit.exe /set nointegritychecks ON" and press Enter to run it.
If you want to run only signed drivers again, use the "OFF" option instead of "ON".
- We close all applications and restart the computer with the “shutdown / r” command or through the “Start” if it is more convenient.
Another way to get rid of the message that the publisher of any drivers could not be verified using the command line is to enable a mode where unsigned products will run in an isolated environment.
We launch the command line in any way and execute a sequence of commands in it:
- exe -set loadoptions ddisable_integrity_checks;
- exe -set testsigning on.
Make sure that after each press of the Enter button, a message appears indicating that the operation was successful.
You can enable mandatory driver authentication before downloading and installing them back in the same way, replacing the "ddisable" parameter with "enable" in the first command, and "on" with "off" in the second.
Group Policy Settings
We note right away that for the home edition of Windows 7, the proposed option is irrelevant, since the "Group Policy Editor" is absent in it.
- In the command interpreter, execute "gpedit.msc".
- Go to the current user configuration section and expand "Administrative Templates".
- We go down the hierarchy, as shown in the screenshot.
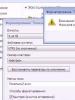
- Open the "Digital Signature..." entry editing dialog.
- Move the switch to the "Disable" position and click "OK".
Registry Editor
The last method to remove driver authentication is to change the value of the registry key that activates / deactivates this option.
- Run the "regedit" command.
- We go to the section with the settings of the current user.
To find the inf file, you will most likely have to unpack the installer, if one is used, using an archiver, for example, 7z.
You can also download the ReadyDriverPlus utility to sign drivers. It will automatically start the system in the mode with software signature verification disabled, as described in the first section.
Video instruction
At the end, we suggest watching a video that shows how to disable driver authentication.