First application. An overview of the tools for launching and debugging applications on Android Enabling debugging via USB
Sandbox
server god September 18, 2011 at 03:55 pmAn overview of tools for launching and debugging applications on Android
- Lumber room *
While developing my first Android app, I ran into the problem of launching the app for testing and debugging. This article should help a novice user choose an emulation tool.
Android Virtual Device (AVD)
Installation:This emulator is built into the Android SDK.
Customization:
(on an example of use in Eclipse)
Window > Android SDK and AVD Manager > New
We enter the name of the virtual device, the platform, the size of the memory card, the type of display ...
Click Create AVD.
Launch:
The first launch of the emulator takes a very long time, especially on weak devices. For example, I could not wait for the first launch on my netbook, and when I launched it for the first time on a computer, I was sure that the emulator had gone into an eternal loop.
Subsequent launches of the emulator will be a little faster.
The time between pressing the "Run" button and the appearance of the main activity of the test application on the emulator takes an average of 11 seconds. The measurements were carried out on a sufficiently productive computer.
Advantages and disadvantages:
+ the ability to test the application on different versions of the Android OS, on devices with different types display...
+ various settings needed for testing, for example, changing the screen orientation
+ SD card emulation
- a long period of time between pressing the "Run" button and launching the application on the emulator
- the emulator works very slowly, for example, what the phone processed in 1-2 seconds, the emulator did in 8-10 seconds
VirtualBox+Android x86
Installation and setup:- Download and install VirtualBox.
- Downloading the image.
- “Creating a Linux 2.6/Other Linux virtual machine, 512 Mb RAM, Bridged Network, HD 2 Gb, Disable Mouse Integration. We connect ISO file and boot one of the LiveCD options (there is an HDPI and MDPI option) ”or follow this instruction.
- Press Alt-F1 to exit to the console and type netcfg and remember the IP address of the emulator. To return to the GUI, press Alt-F7.
- adb connect
Launch:
The time between pressing the "Run" button and the appearance of the main activity of the test application on the emulator did not detect, but, according to subjective feelings, this happens almost instantly.
Advantages and disadvantages:
+ small time interval between pressing the "Run" button and launching the application on the emulator
+ sometimes nimble work
- rather long and sometimes problematic installation
- the emulator works slowly in places, there are problems with the image (especially on MDPI)
- problems with SD card emulation, changing screen orientation,…
- only two (three) available Android OS versions and only two available display types
Android phone connected via USB
Installation and setup:- Turn on debug mode on your phone. (Settings > Applications > Development > USB Debugging).
- Download the driver for your phone.
- We connect the phone to the PC.
- Installing drivers. The ADB Interface section should appear in Device Manager.
- adb devices. If your phone does not appear in the list, then reinstall the ADB driver.
Launch:
Between pressing the "Run" button and the appearance of the main activity of the test application on the phone, about 5 seconds pass.
Advantages and disadvantages:
+ the ability to see the application the way the user will see it (a very important point, especially when creating the interface and design of the application)
+ multitouch (if available in the phone)
+ change screen orientation, accelerometer (if available in the phone)
- only one OS version and one display type
- another object will appear on the physical desktop
Conclusions:
I tried each of these emulation tools and settled on this option:1. writing and testing an application using a phone;
2. Testing the app on numerous Android Virtual Devices with various combinations of OS version and display type.
I hope that the reader has made a choice of an emulator or learned something new for himself.
Good luck with testing!
The basic steps for creating an Android emulator for testing the created applications were shown. Using an emulator is, of course, quite convenient, but only if you have enough powerful computer and loading the emulator, as well as its work, do not hinder a lot of time. But not everyone is lucky enough to have such monster machines, so in this article I'll show you a pretty good way to test your work in Android Studio with a real connected device.
This article will suit you in 2 main cases:
1) Your computer is not powerful enough to run the emulator quickly (be it in Android Studio or Eclipce);
2) You have an old one lying around Android smartphone and you don't know where to put it (it's a pity to give/throw away).
It is also worth noting that this method can also be useful for owners of productive computers, because testing on an emulator is one thing, and observing the application on a real smartphone is quite another.
So, in order to connect your smartphone to Android Studio, you first need to install the required set of drivers. As a rule, torment with a standard set of drivers often will not lead to anything, so I recommend downloading this file right away (don't be afraid - it's not a virus, although the antivirus swears) and, having previously removed the old drivers, install this file (during installation, the phone it is better not to connect).
After installing the drivers, connect your device to the computer via USB. All desired settings will run and install automatically.
Next, launch Android Studio. Go to Tools ---Android and check the box next to the line "Enable ADB Integration" (ADB - Android Debug Bridge). After that, you need to configure Android Studio so that when you click on the green "Run" button, your application is immediately installed and launched on the connected smartphone. Go to Run --- Edit Configurations. The following window appears:
and in the "Target Device" block, check the "USB Device" box and click OK.
That's all, congratulations, if you did everything correctly, the drivers detected your device, then when you click on the application launch button (highlighted in red):
the application will install and run on the connected device.
After that, you just have to pick up the connected device and test your programming work.
It is worth noting that if the application was installed, but did not automatically start, then most likely this means that there is an error somewhere in the application (although it may not be highlighted in Android Studio, for example, an important piece of code is simply missed).
I hope this article is useful to you. Good luck in your endeavors!
When creating Android applications, most developers use various emulators. This is convenient because there is no need to store a bunch of different devices in the drawers of the desk, there is no headache with connecting devices to the computer, there are no heaps of wires on the table. We click the mouse and see the work of our program on the computer screen. Simple and elegant. However, the emulator is not a phone. He is limited in his abilities. If your application uses any specific hardware features, such as camera operation, Bluetooth or USB connection, work while receiving a phone call, it is highly likely that you can not do without debugging on a real device. Fortunately, Eclipse contains everything you need to accomplish this task.
Connecting the phone and launching the program
Before you can connect your phone to a computer using a USB data cable, there are a few preparations you need to make. The fact is that Eclipse is configured to work with the emulator by default, and we need to correct the debug mode configuration. It's simple. Select the menu item Run > Debug Configuration, and then DroidDebug. On the Target tab, in the Deployment Target Selection Mode section, set the switch to Manual and click Apply. Thus, the manual platform selection mode is enabled. Now, when you start the application, a dialog box will appear where you can select an emulator or one of the connected phones.
In order for the phone to work in debug mode, it must also be configured accordingly. From the home screen, click on Menu button and find the Settings app. In this application, open the “Applications” section, and then the “Development” item. In the screen that opens, check the box next to “USB Debugging” (USD Debgging). This sequence of actions works on most phones, but it is quite possible that UBS debugging mode is enabled on your device somewhere else.
Connect your phone to your computer and click the Debug button in Eclipse. In the dialog that appears, you will see two lists: “Chose a running Android device” and “Launch a new Android Virtual Device”. The first of them lists the phones connected to the computer, the second - the emulators. Select your phone from the first list. Eclipse will install the application you are debugging on your phone and launch it. You can debug your program.
Phone status monitoring DDMS (Dalvik Debug Monitor Service)
All information about the state of the phone is available through a special tool called the DDMS (Dalvik Debug Monitor Service) debug monitoring service. To launch it, click the android button in the top right corner of Eclipse.
The DDMS window consists of several panes. The Devices panel displays a list of available emulators and connected phones. It also lists currently running processes. Each process runs in its own virtual machine. Threads are displayed on a separate Threads tab. The File Explorer tab is designed to work with file system phone. With it, you can copy files from your computer to your phone and vice versa. Using the Screen Capture button, you can take a screenshot of the phone screen. The green beetle button allows you to attach the debugger to the selected process. To use this feature, you must have the open source code for this process.

Also of note is the LogCat logging utility and its associated panel, which can be very helpful in troubleshooting. Working with the log is carried out through a special class android.util.Log. The most commonly used methods are:
Log.e() - for error logging,
Log.w() - for logging warnings,
Log.i() - for logging informational messages,
Log.d() - for debug logging,
Log.v() - for logging verbose records,
Two strings must be passed as parameters to these methods. The first is a tag that can then be used to search and filter in LogCat. The second is the actual information that is logged.
Earlier I wrote . You can solve the problem radically, do not use the emulator, but test immediately on mobile device running android. I have a wonderful HTC, and set it up for it. So, in order to run applications on a physical device, you need:
- Enable USB debugging on your phone. You can do this by going to Settings -> Applications -> Development and checking the box "USB debugging"
- Wait for the driver to install
- Disconnect and reconnect your phone to the computer.
To check that the phone is visible to the computer, you need to do the following:
If this is the case for you, then you can use a special program: PdaNet. () Usually it is used to use the Internet from the phone from the computer, but it just so happens that it contains a huge number of drivers for phones. During installation, I was asked for the device model, and then a beautiful red balun popped up with a warning that the driver was not tested, and everything could end badly, but no - everything is fine, it was installed. After that, I ran the check again (the command above) and my phone appeared in the list of devices.
And how to work from Eclipse? In fact, everything has already been done - just launch the project and it opens on the phone.
Decompiling and Debugging Android Applications
Alexander Antipov
This article will show you how to attach a debugger to an Android application and step through the methods that are called using the information obtained after decompiling the application.
This article will show you how to attach a debugger to an Android application and step through the methods that are called using the information obtained after decompiling the application. The good news is that debugging doesn't require superuser privileges. The described techniques can be very useful during pentests. mobile applications, since we can "penetrate" the code while the program is running, get and write information that we usually do not have access to. For example, you can intercept traffic before encryption and get keys, passwords, and any other valuable information on the fly. The article will be useful for pentesters and mobile application developers who want to gain deeper knowledge about possible attacks on the Android platform.
Test environment requirements:
- Operating system: Windows / Mac OS X / Linux
- Java (version 1.7 recommended)
- IDE (Eclipse, IntelliJ IDEA, Android Studio)
- Android SDK (https://developer.android.com/sdk/index.html?hl=i)
- APKTool (https://code.google.com/p/android-apktool/)/APK Studio (http://apkstudio.codeplex.com)
- Android device/emulator
This article will use the following configuration: Windows 8, Android Studio and IntelliJ IDEA. Device: Nexus 4 with Android version 4.4.4. I recommend adding all utilities to the PATH environment variable in order to facilitate and speed up access to these tools.
The Android application package (APK) used in this article can be downloaded from here: com.netspi.egruber.test.apk .
Device setup
The instructions below will help you prepare the device for experiments.
Activating the Developer Options section
To begin with, debugging via USB (USB debugging option) must be enabled on the Android device, which will allow you to “communicate” with the device using the tools from the Android SDK. However, before that, you must activate the Developer options section. On the device, go to the Settings > About Phone section and click several times on the Build Number item, after which a message should appear stating that the Developer options section is activated.


Figure 1: In order to activate the Developer options section, you need to click on the Build number several times
Enable debugging via USB
To enable USB debugging, go to Settings > Developer options and check the box next to USB debugging.

Figure 2: Enabling the USB debugging option
Connecting the device and running ADB
After connecting the device to the computer via the USB port, the message "USB debugging connected on the device" should appear. You should also check if you can connect to the device using the Android Debug Bridge (ADB) app included with the Android SDK (Android SDK Platform-tools package). At the command prompt, enter the following command:
The device should appear in the list.

Figure 3: List of connected devices
If the device is not displayed in the list, then the most likely reason is incorrect installed drivers(on Windows). Depending on the device, the driver can be found either in the Android SDK or on the manufacturer's website.
Checking the application for debugging
Before debugging Android applications, you first need to check if this is possible. Verification can be done in several ways.
The first way is to run Android Device Monitor, which is part of the Android SDK (in the tools folder). AT windows file called monitor.bat. When you open Android Device Monitor, the device will appear under Devices.

Figure 4: Android application Device Monitor
If any application on the device can be debugged, that application will also appear in the list. I created a test program, but the list is empty because the program cannot be debugged.
The second way to test the application for debugging is to examine the AndroidManifest.xml file from the application package (APK, Android application package). An APK is a zip archive containing all the information needed to run an app on an Android device.
Whenever an application is loaded from Google Play Store, the application package is also downloaded. All downloaded APK files are usually stored on the device in the /data/app folder. If you don't have superuser rights, you won't be able to get a list of files from the /data/app directory. Although, if you know the name of the APK file, you can copy it using the utility adb. To find out the name of the APK file, enter the following command:
will appear command line devices. Then enter the following command:
pm list packages -f
A list of all packages on the device will be displayed.

Figure 5: List of packages on the device
Looking at the list, we find a test application.

Figure 6: Package of the created test application (highlighted in white)
Now you need to copy the package file. Open a shell and enter the following command:
adb pull /data/app/[.apk file]

Figure 7: Copy the APK file from the device to the system
Now we need to open the package file and examine the contents of AndroidManifest.xml. Unfortunately, we cannot simply unpack the archive because the APK file is encoded in binary format. For decoding, the most commonly used utility is apk tool although I am using APK Studio because this application has a friendly GUI. The rest of the article will talk about APK Studio.
In APK Studio, click on the little green icon, give the project a name, and specify the path to the APK file. Then specify a path to save the project.

Figure 8: Creating a new project in APK Studio
After opening the APK, select the AndroidManifest.xml file and look at the settings for the application tag. If the android:debuggable flag is not present (or present but set to false), then the application cannot be debugged.

Figure 9: Contents of the AndroidManifest.xml file
Modifying the AndroidManifest.xml file
Using the apktool utility or APK Studio, we can modify the files and pack the contents back into a package. We will now modify the AndroidManifest.xml file so that the application can be debugged. Add the line android:debuggable="true" inside the application tag.

Figure 10: Changing the content of the application tag
After adding the flag, click on the "hammer" icon and re-assemble the package. The rebuilt package will be in the build/apk directory.

Figure 11: Package rebuild completed successfully
After rebuilding, the package is signed and can be reinstalled on the device (all Android applications must be signed). Most applications do not verify the certificate used to sign. Otherwise, you need to change the code that performs this check.
Now you need to install the rebuilt package. First, remove the old application with the following command:
adb pm uninstall
Then install the new package:
adb install [.apk file]
You can also remove and install a package with one command:
adb install -r [.apk file]

Figure 12: Installing the rebuilt package
Check that the reinstalled application runs correctly on the device. If everything works, go back to the Android Device Monitor, where the test application should appear.

Figure 13: Now the rebuilt application can be debugged
Setting up the development environment (IDE)
Now you can hook a debugger to the rebuilt application, but first you need to create a project in the development environment (this article uses IntelliJ IDEA). We create a new project. Specify an arbitrary name in the Application name field. In the Package name field, specify a name that exactly matches the folder hierarchy of the rebuilt package.

Figure 14: Creating a new project in IntelliJ IDEA
Usually the name of the APK file matches the folder structure, although if you're not sure, in APK Studio check the directory hierarchy up to the folder where the application files are located. In my case, the name and folder structure are exactly the same (com.netspi.egruber.test).

Figure 15: Test application directory hierarchy
Uncheck "Create Hello World Activity" and finish creating the project (all other options remain default). The new project should look something like this:

Figure 16: Folder and file hierarchy of the new project
After creating the project, you need to add the source code from the APK file so that the debugger "knows" the names of symbols, methods, variables, etc. The good news is that Android applications can be decompiled with almost no quality loss (the source code will match with the original). After decompilation, the source code is imported into the development environment (IDE).
Obtaining Sources from an Application Package
First you need to convert the APK to a jar file. Then, using the java decompiler, we will get the source code of the application. We will do the conversion to jar using the utility dex2jar. dex2jar has a d2j-dex2jar.bat file used to convert APK to jar. The command syntax is quite simple:
d2j-dex2jar.bat [.apk file]

Figure 17: Converting APK to jar
Then we open or drag the resulting file into the JD-GUI (this is a java decompiler).

Figure 18: Structure of the jar file
The jar file should be displayed as a hierarchical structure, inside which there are java files with readable source code. Go to File > Save All Sources to pack all sources into a zip archive.

Figure 19: Saving the sources of the decompiled file
After saving the source texts, unpack the archive into a separate directory.

Figure 20: Unpacked archive
Now you need to import both directories into the project created earlier in the IDE. In IntelliJ, go to the src folder and copy the contents of the unpacked archive (two directories) there.

Figure 21: Both folders copied to the src directory
Returning to Intellij, we see the updated project.

Figure 22: Source texts appeared in the project
If we click on any element from the list, we will see the original text. As you can see in the screenshot below (source code of the LoginActivity class), the source code has been obfuscated using ProGuard.

Figure 23: Obfuscated source code for the LoginActivity class
Connecting a debugger
Now that the project has source code, we can start setting breakpoints on methods and variables. When the breakpoints are reached, the application will stop. As an example, I set a breakpoint on the method (right in the obfuscated code) responsible for processing the information entered in the text field.
Figure 24: Set a breakpoint on an obfuscated method
As soon as the breakpoint appears, we connect the debugger to the process on the device by clicking on the icon with the screen in the upper right corner (the icon may differ on your IDE).
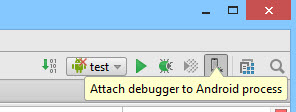
Figure 25: Attaching a debugger to a process
Figure 26: List of processes for attaching a debugger
After selecting a process, the debugger will connect to the device.
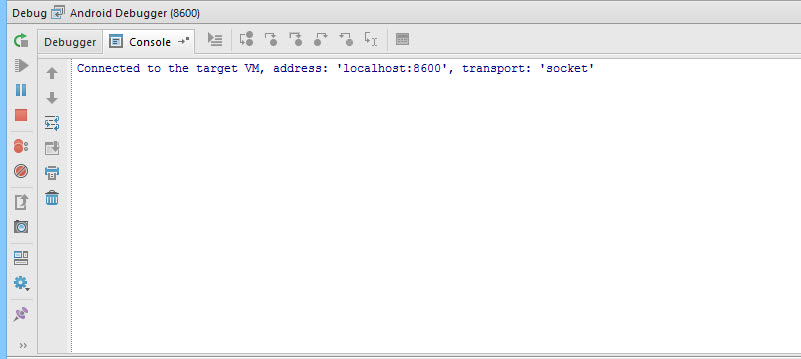
Figure 27: Debugger attached to a process running on the device
In the text field, I will enter the number 42 (if you remember, there is a breakpoint on the corresponding method).

Figure 28: Enter the number 42 in the text field
After pressing the "Enter Code" button, the application execution will break at the breakpoint, because the debugger is "aware" which method is being called on the device. A compiled Android application contains debugging information (such as variable names) available to any Java Debug Wire Protocol (JDWP) compliant debugger. If debugging is enabled in the application, a JDWP-compatible debugger (most of the debuggers that come with Java development environments fall into this category) will be able to connect to the Android application's virtual machine and then read and execute debugging commands.

Figure 29: Breakpoint hit
The screenshot below shows the number that we previously entered in the text field.
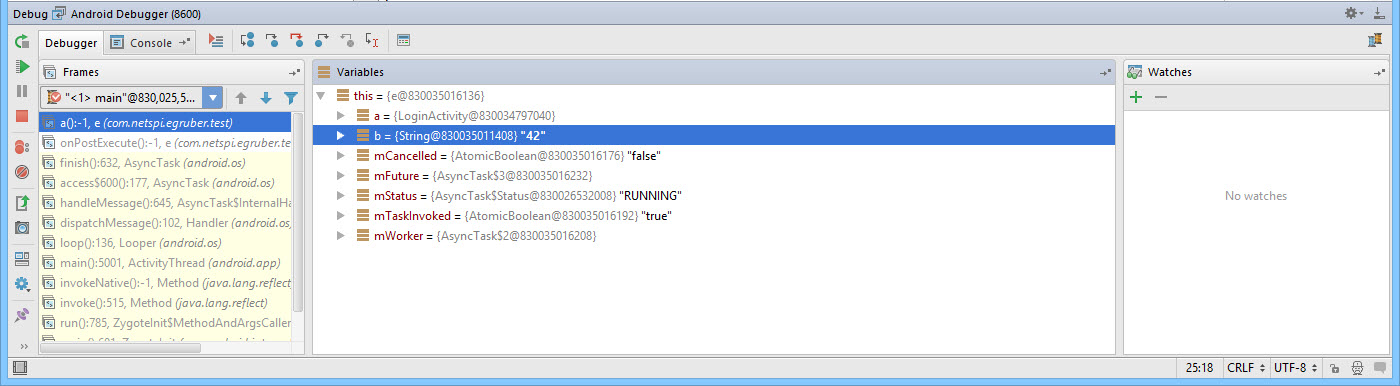
Figure 30: List of variables of the current instance of the class
Conclusion
We can not only read the data in the application, but also insert our own. This can be useful if, for example, we want to interrupt the flow of code execution and bypass some parts of the algorithm. With the help of a debugger, we can better understand the logic of the application and analyze what is not available to a normal user. For example, it can be very useful to view the encryption functions used and the dynamic keys. Also, sometimes when debugging, it's useful to know how functions interact with the file system or database in order to understand what information is stored by the application. Such manipulations are available on any Android device without superuser privileges.