Screen capture on android. How to take screenshots on Android. Instructions on how to take a screenshot using the built-in tools
Not all users know how to take a screenshot of the screen on Android on their phone when they encounter this issue. Perhaps you know how screenshots are taken on a computer, but if it is not at hand, then we will use the phone and auxiliary programs. Today, we will look at all the ways to take a screenshot on your phone.
How to take a screenshot on the phone on Android, 2 ways
Hello, friends! Screenshots are a quick way to tell your blog readers about your accomplishments and take a unique photo. It can also be posted on a website or blog.
We are not always sitting at the computer, and sometimes it becomes necessary to create one or another screenshot, right now on the phone. In the article, we will consider the process of creating a screenshot on phones running on Android.
So, how to take a screenshot of the screen on Android on your phone? There is quite simple ways which are available to any beginner. The first simple way is by pressing two keys. The first power button of the phone, and the volume down button. We take a screenshot. Simultaneously press the power button, usually located on the right side on Android.
Next, hold down the lower volume down button, which is located on the left side. Or on the phone panel. After that, there will be a click. And you will see a screenshot in the window of your Android. The buttons must be pressed simultaneously. The picture you have taken can be found in the device's memory via "Pictures".
The next method to take screenshots is with "Special Gestures". This feature is available for more modern versions of Androids and Smartphones. For it to function, it must be enabled through the "Settings" of the phone. Next, just swipe your phone screen and take a screenshot.
There is also a Screenshot icon on the screen of your phone. You need to open the top quick menu, click on it and the screenshot is ready.
How to take a screenshot of the screen on Android using a computer
There are special programs on the Internet that allow you to take screenshots on your phone through a computer. We will analyze the program - MyPhoneExplorer. Why this particular program? It is free and you can download it online. Installing this utility is simple. After you install the program on your computer, then proceed to the process of creating a screenshot.
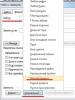
Connect the USB cable to the computer and phone. Next, run the program - MyPhoneExplorer. Then, we act according to the following instructions. In the program itself, we need to click on the "Miscellaneous" section and select "Phone Keyboard" (Figure 1).

After that, a screenshot will be created, and we can save it on the computer by clicking on the "Save" button, which is located on the program panel.
Screenshot on phone using programs
We know that every phone has a special application, or as it is also called Google Play. With it, you can download programs for creating screenshots. We list the most convenient applications that will help you in this matter:
- Screen Capture. This program has a very simple functionality. She takes pictures from the phone screen with a simple shake. phone device or by pressing the buttons we talked about above.
- screenshot. This program is official and requires users to confirm the rights to use it. But it works by analogy, as, for example, the previous version.
- Screenshot PRO. This application creates screenshots on your phone with just one click of a single button. Just point your finger at the "Start" button and the program highlights the desired area on the phone screen to take a screenshot.
You can download these applications for free. They take screenshots on Android very quickly and save pictures. Now, we know how to take a screenshot on the phone on Android.
How to take a screenshot on iPhone
To take a screenshot on a device running operating system iOS, you don't need to download any third party software. The function is built-in and works on all gadgets, be it a tablet or a smartphone. The instruction looks like this:
- Simultaneously hold down the "Home" and "Power" buttons;
- After successful completion, you will hear a characteristic sound, and the display will turn white for a second. Do not be afraid, this symbolizes the successful creation of a screenshot;
- The screenshot you take will be in the Photos app. It is worth noting that in latest version iOS for screenshots, a separate folder with the appropriate name is created.

How to take a screenshot on Android
Owners of devices based on Android can use the universal method provided by the developers of modern gadgets.

This method works flawlessly on all gadgets that are equipped with a version of Android higher than the fourth. Those who own an Android 3.2 or older device will simply need to hold down the Recent Apps button. However, this method does not work on Android 1 and 2; for them, users need to download separate software.
How to take a screenshot on devices with custom firmware
Many currently popular smartphone developers release their products with a proprietary shell. It is more optimized and also has pre-installed apps by companies. However, this is not all. It also contains useful additions, one of which allows you to take a screenshot. The option is most often called "Take a screenshot" in various variations and is located in the menu, which opens with a swipe from top to bottom on the main screen or anywhere else. 
How to take a screenshot on Android 6 and 7
Surely you will agree that simultaneously holding down the buttons for a screenshot is quite inconvenient. That's why Google has released a special update for devices running Android 6 and 7, thanks to which you can take a screenshot with a simple tap.
Proprietary Methods
Many companies use a non-standard method for taking screenshots in their gadgets. For example, on some Samsung smartphones, you need to hold down the "Home" and "Power" buttons.
Many Samsung flagships use another universal method that Huawei and Xiaomi have adopted - in order to take a screenshot, you just need to swipe the edge of your hand across the screen from right to left and vice versa. It is worth noting that most often this option is disabled by default, but you can enable it in the menu. The location is individual for each device, you can find it on the Internet.
Many Xiaomi smartphones and tablets take a screenshot when you press the volume rocker and the menu button (three bars arranged horizontally). Another option is to click the "Screenshot" button, which is located in the navigation menu. 
LG has gone the furthest and developed a special Quick Memo application that allows you not only to take a screenshot, but also process it in the editor. The range of possibilities is quite wide - you can crop the image, as well as add various effects or inscriptions to it.
How to take a screenshot on a computer
There are a huge number of programs for a computer with which the user can control his smartphone. One of the most versatile is MyPhoneExplorer, thanks to which you can take a screenshot of your gadget and save it on your PC's hard drive. It only works with Android devices.
The program is presented in two modules. The first is installed on a computer, the second on your smartphone. They interact with each other by pairing via Bluetooth, USB cable or Wi-Fi.
To take a screenshot using MyPhoneExplorer, you need to:

Third party software
For both operating systems, a huge number of applications are presented that allow you to customize the methods in which a screenshot is taken, as well as editor capabilities that differ from each other. The most striking examples are "Screen Capture" and "OK Screenshot". Their functionality is approximately the same, but the second one requires root rights, which will be a problem for an inexperienced user.
Every user should be able to take a screenshot or a screenshot. And it's easy. On Apple products, it is enough to hold down two buttons at the same time, and on Windows, click on the key labeled Print Screen. But what about the owners of Android devices? How difficult is it to take a screenshot if the operating system (OS) is a "green robot"? In this article, we will look at how to take a screenshot on Android.
Already on versions 4 and 5 of Android, the following method is available, which allows you to quickly take a picture or “screen” the screen. To do this, you just need to press two keys at the same time. Only not on the virtual keyboard, but on the very body of the smartphone or tablet. For this:
- We turn on the device.
- Select the image we want to take a screenshot of.
- Simultaneously press 2 buttons - Power (on / off / sleep mode) and "Volume Down" (lower part of the volume control). We hold them for 1-2 seconds.
- We are waiting for the display to blink and a specific sound from the camera shutter appears. All screenshot is ready!

By the way, this method works on smartphones and tablets from almost all manufacturers - Samsung, Lenovo, Irbis, Micromax, Highscreen, Philips, Sony, Huawei, etc. The only condition is Android 4.0 and higher.
But what if you have a rather old smartphone? Indeed, on such a device, there may be a third android as an OS. It also provides a screenshot feature. It is only necessary to hold the item "Recent programs" for a long time. But on the "ancient" android version 1 or 2, screenshots can only be done through a separate application. By default, the OS does not have such a function.
Many are interested in where screenshots are saved on android? There are several options. Most often in the "Photos (pictures) of the camera" or in a separate folder "Screenshots" in the Gallery. Here you can find the screenshot taken, view old pictures and delete those that are no longer needed. Sometimes screenshots are also saved in Pictures/Screenshots on the device's memory card.

What is the easiest way to take a screenshot on Android 6 and 7?
Progress does not stand still. Therefore, in 2015, the developers released an update for Android 6, which allows you to take screenshots with one touch. This is convenient on tablets and mobile phones with a large screen size, where it is problematic to press two buttons at the same time.
So if you have a device with Android OS 6 or 7, then it has the ability to take screenshots as follows:
Agree, everything is simple. However, some users criticize this way of taking screenshots. The main reason is that it takes a lot of time for the whole procedure. Approximately 7-8 seconds. Whereas by pressing "Power" and "Volume Down" you can screen the image almost instantly. You can't argue with that. But it is not always convenient to hold down two buttons at the same time. Therefore, sometimes it is easier to take a screen through Now on Tap.
Branded and special ways to take screenshots
Many manufacturers, trying to expand the functionality of their products and make them more user-friendly, introduce additional tools that allow you to take screenshots. Let's look at several options using Samsung devices as an example:
- Take a screenshot on the old one Samsung phone Galaxy S with android 2.3 is possible by pressing and holding the "Home" and "Back" buttons.
- On gadgets such as Samsung Galaxy a3, j3, etc., a screen is created by simultaneously pressing the "Power" and "Home" buttons.
- How to do with android OS? Most models support the following option: press and hold the power button until a menu appears, in which we select the "Screenshot" item.
- Flagship devices from Samsung support the "Screenshot with the palm of your hand." That is, with its help, you can take a screenshot of the screen without pressing buttons. It is enough just to hold the edge of your hand across the display (touching it!). And it can be both from left to right, and vice versa. This option is activated in the "Settings", in the "Additional functions" section.


As for other manufacturers of smartphones and tablets, they are constantly introducing new ways to create screenshots.
- On many HTC and Meizu devices, you can “screen” the image on the display by pressing the “Power” and “Home” buttons together.
- For Xiaomi products, you can click on the scissors icon with the words “screenshot” in the quick menu. After that, the screenshot will be saved in the device memory. In addition, on some gadgets from Xiaomi, the ability to take screenshots with a three-finger gesture down is implemented.
- LG smartphones come with a proprietary Quick Memo app by default. It also allows you to quickly take screenshots. Launches Quick Memo through the top "curtain" of the notification panel.
- On Sony mobile devices (Xperia series), a screenshot can be obtained through a special window that is called up by long pressing the power button.
Is it possible to take a screenshot on Android using apps?
Of course, you can also take screenshots with the help of additional software. There are a number of applications (available in Play market or Google Play), the functionality of which includes the creation of screenshots. What is their advantage? No need to bother and remember which buttons take a screenshot. It is enough to go into the program, select the appropriate item and take a screenshot. In addition, many such applications offer convenient tools for editing the screen.
If you do not know which software to choose, then pay attention to the following programs:
- Screenshot Ultimate;
- Screenshot Pro;
- No Root Screenshot it.
These applications allow you to take screenshots in completely different ways - by shaking your smartphone, by touching a widget on the desktop, through a separate shortcut or according to timer settings, by holding a key for a long time, etc. » images (JPEG, PNG, etc.) and quickly send it through a special service.
Some applications that take screenshots require Root, that is, the so-called superuser rights!
For reference! If the screenshot is not saved, then first of all check if there is free space on the media where the picture should be loaded. If the disk is really full to capacity, then use the CCleaner application or delete the cache to clear the memory.
Finally
Let's sum up all the above. It turns out that you can take a screenshot of the screen on android in different ways. In our opinion, the easiest way is to use the standard options, where you just need to press one or two buttons. Although someone chooses to create screenshots of the screen and special applications. The choice is yours! In any case, taking screenshots on Android is no more difficult than on iOS and Windows.
Sooner or later, any owner of an Android device needs to take a screenshot. As an experienced PC user, you know that there is a special key on the computer for this - PrintScreen. You open the virtual keyboard, and there ... nothing like that.
Just don't panic! Everything is much simpler than it seems at first glance. There are no less ways to take a screenshot on Android than on a PC, they are just not so obvious. We invite you to learn more about them.
Universal way for all Android versions starting from 4.0
To capture the contents of the screen of a smartphone or tablet, it is enough, just like on a computer, to press certain keys. But not on the virtual keyboard, but on the body of the gadget. It " power” (power button) and “ volume down” (lower half of the volume rocker). Press both buttons exactly at the same time and hold them in this position for a while. After 1-2 seconds, you will hear the sound of the camera shutter - this means that the screenshot is ready. After that, the system will automatically save it in the /Pictures/Screenshots or /Pictures/ScreenCapture directory internal memory devices.
The method works on phones and tablets of any manufacturer - Nexus, Fly, Motorola, Sony Xperia, ZTE, Huawei, etc. The only condition is that the device should not have too much old version Android, the rest is not important.
Proprietary Methods
Some manufacturers of mobile devices, in an effort to make life easier for their users, are developing additional ways to get screenshots. Let's look at a few examples.
Samsung
To take a screenshot on an older smartphone of this brand, such as the Samsung Galaxy S with Android 2.3, just press and hold the Back and Home buttons for 1-2 seconds.
On models released no more than 4 years ago, for example, on the Samsung Galaxy s2 phone and on the Galaxy Tab 2 tablet, the universal method described above is used - simultaneously pressing the "Power" and "Volume-" buttons. 
On the most modern devices, such as the Samsung Galaxy a3, Samsung Galaxy j3 and others that left the assembly line no earlier than a year or two ago, the third method is used. This is the simultaneous pressing of the "Power" and "Home" buttons.

By the way, both options work on some devices - both this and the previous one. And on others - only the last.
For modern Samsung gadgets, there is another way to get screenshots - gesture. To capture a picture on the screen, it is enough to swipe it with the edge of your palm from right to right or vice versa. By default, the option is disabled. To use it, open the settings menu - section "Control" - "Palm control" and select "Screenshot".
The finished screenshots are saved in the Pictures/ScreenCapture folder.
HTC
HTC smartphones allow screen capture in two ways:
- Universal - by simultaneously pressing "Turn on" and "Volume-".
- By pressing the "Power" and "Home" buttons. This option is not supported by all devices. If it doesn't work for you, use the first one.
Xiaomi
Xiaomi smartphones and tablets also support additional methods getting screenshots. This is the simultaneous pressing of the “Volume-” and the keys in the form of three stripes (menu), as well as the “Screenshot” icon, which is located behind the curtain of the notification panel.
LG
The software shell of LG Android smartphones contains a proprietary application Quick Memo (QMemo +), which not only takes screenshots, but also allows you to process them in the built-in editor. For example, trim around the edges, add inscriptions, etc.
To launch Quick Memo, pull down the notification shade and tap on the icon shown in the picture below.

In addition, a universal method works on LG devices.
Lenovo
The proprietary Lenovo VIBE UI shell also contains a built-in screenshot function. It is called:
- From the drop down menu.
- From the menu, the power button and lock the device.

And of course, the traditional way works on Lenovo smartphones and tablets - pressing the combination of the "Power" and "Volume Down" buttons.
Asus Zenfone
Asus Zenfone and Zenfone 2 also have their own signature features, which are provided by the ZenUI shell.
To take screenshots with one touch, make small changes to the Asus ZenUI settings:
- Go to the gadget's options menu, open the Asus Personal Settings section and select the Recent Apps Button. Assign the action to the button as "Press and hold to take a screenshot". After that, it (the button shown in the picture below), when pressed for a long time, will “photograph” the image on the display.
- For Zenfone 2: From the home screen, open the menu quick settings. Next, go to the "Advanced Settings" section and select the "Screenshot" option. Confirm saving. After that, the "Take Screenshot" icon will appear in the quick settings.
Meizu
Chinese Meizu gadgets, depending on the model, allow you to capture the screen in two different ways:
- The first one is universal.
- The second is by simultaneously pressing the "Power" and "Home" buttons.
On Android 3.2 and older
To take a picture of the display in Android 3.2, press and hold the Recent Apps button (like on the Asus Zenfone). But here you do not need to make any preliminary settings.
The ancient versions of Android - 1 and 2, unfortunately, do not have this function at all. To make up for the shortcoming, you will have to install a third-party application.
On devices with custom firmware
Custom firmware gives Android devices many useful additions, and one of them is the convenient creation of screenshots. The "Take Screenshot" option is right in the power button's menu.

On Android 6 and 7 versions
Images taken using Google Now on Tap differ from those taken in the standard (universal) way in that they do not have notification and navigation bars. This is convenient: if you take a screenshot, for example, for a blog post, you won't have to crop it.
Via computer
A lot of programs have been written with the help of which the user can control the phone from a computer. Most of them are created by device manufacturers, but only for devices of their own brand. However, there are also universal ones. One of best apps of this class, in our opinion, is the free MyPhoneExplorer . In addition to remote content management on a smartphone or tablet of any model, it allows you to take screenshots and save them to your PC.
The program consists of two modules: a server one, which is installed on a Windows-based computer, and a client one, designed to be installed on an Android gadget. The interaction of the modules provides pairing of the phone and PC in three ways: via a USB cable (do not forget to enable USB debugging), via Wi-Fi (if both devices are on the same network), and via Bluetooth.
MyPhoneExplorer will allow you to manage your mobile device just as if you were holding it in your hands. But now we will not study its possibilities. Our task is to figure out how to take a screenshot:
- Let's establish a connection first. The desired method is set in the program settings on the PC.
- After the data mobile device appear in MyPhoneExplorer, go to the "Miscellaneous" menu and select "Phone Keyboard".

- When the picture from the last screen is displayed in the window on the PC, click the save button.

Using programs from Google Play
Screen capture

The Screen Capture application takes pictures both with the help of buttons - software and hardware, and by shaking the device. Like the previous program, it includes simple tools for editing the finished picture. Does not require mandatory root rights, but if they are, it provides a little more options.

The functionality of the application is practically the same as the previous two: the same soft button and a built-in mini-editor with the function of cropping the frame and drawing. Requires mandatory root.